


Appendix E - Upgrading/Downgrading the System
266
Enova Digital Media Switchers - Hardware Reference Manual
3.
In the OnLine Tree tab, right-click in the Workspace Bar and select Refresh System OnLine Tree. Verify that the DXLink
unit is listed in the OnLine Tree.
4.
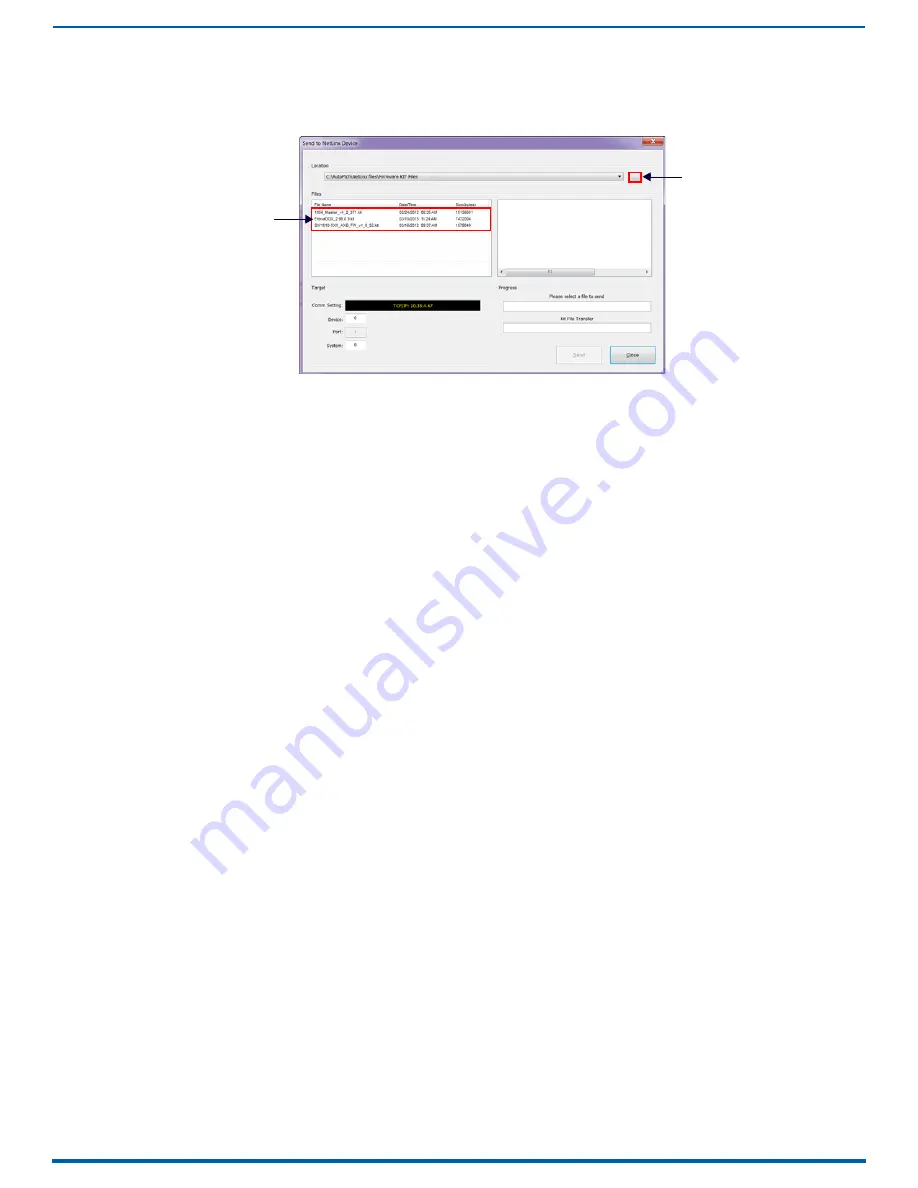
Select Tools/Firmware Transfers/Send to NetLinx Device to open the Send to NetLinx Device dialog (FIG. 153):
5.
Click the Browse button (...) and navigate to the downloaded file.
6.
Select the file for the DXLink unit (.kit file) and click Send.
7.
Click Close once the download process is complete. Reboot the DXLink unit.
8.
In the OnLine Tree, right-click on the switcher and select Refresh System (this establishes a new connection and
refreshes the device list and their firmware versions in your system).
NOTE:
Reset factory settings on DXLink Fiber Transmitters (enables access to most recent AMX-provided EDIDs).
To reset factory settings and enable the most recent EDIDs on a DXLink Fiber TX via Pushbutton ID:
CAUTION:
Resetting factory settings does not reset the firmware version, but does remove any settings previously applied
to the transmitter, applies EDID formats provided by the firmware, and enables auto-setup mode.
1.
Unplug the power connector from the rear of the Transmitter.
2.
Press and hold the ID Pushbutton on the of the DXLink Fiber TX while plugging in the power connector.
3.
When the NetLinx LEDs begin to flash in unison, start counting flashes (at the rate of once per second).
4.
As soon as the blink rate increases (after 10 flashes at that rate, the LEDs begin to blink at a faster rate), release the ID
Pushbutton.
5.
The Transmitter automatically reboots to complete the process.
NOTE:
DXLink Transmitter factory settings can also be reset via Telnet.
Downgrade Sequence Overview
The sequence provided below is the only approved sequence for downgrading an Enova DGX 100 Series Digital Media
Switcher.
IMPORTANT:
If an Enova DGX is upgraded from 8/16/32/64 to 100 Series, downgraded back to 8/16/32/64, and then re-
upgraded to 100 Series, you must check the firmware versions for all boards in the enclosure (monitor upgrade via the
System Configuration interface on the System/Devices/Switcher Update Status page). If some or all of the firmware
versions have not been upgraded to 100 Series firmware versions as expected (see Status page during upgrade),
upgrade the enclosure a second time.
NOTE:
Solecis Digital Switchers do not need to be downgraded to work with the Enova DGX 8/16/32/64. Always use the
latest available firmware with Solecis units.
1.
Downgrade any DXLink Twisted Pair or DXLink Fiber endpoints (see below).
2.
Replace the current (100 Series) CPU Board with an Enova DGX 8/16/32/64 CPU (see the following page).
3.
Downgrade the enclosure (see below).
4.
Downgrade the front control panel (see below).
FIG. 153
NetLinx Studio - Send to NetLinx Device dialog
Browse for the downloaded
(unzipped) DXLink firmware
Select the DXLink
.kit file
file


