www.amulethotkey.com
DXG Quick Start Guide for VM640 v1.2 June 2018
QS-DXMG-0002
AMULET
HOTKEY
®
Quick Start Guide
dual-slot form factor
Graphics Virtualization Card for Dell 14G M-series blade servers
DXG
Figure 3:
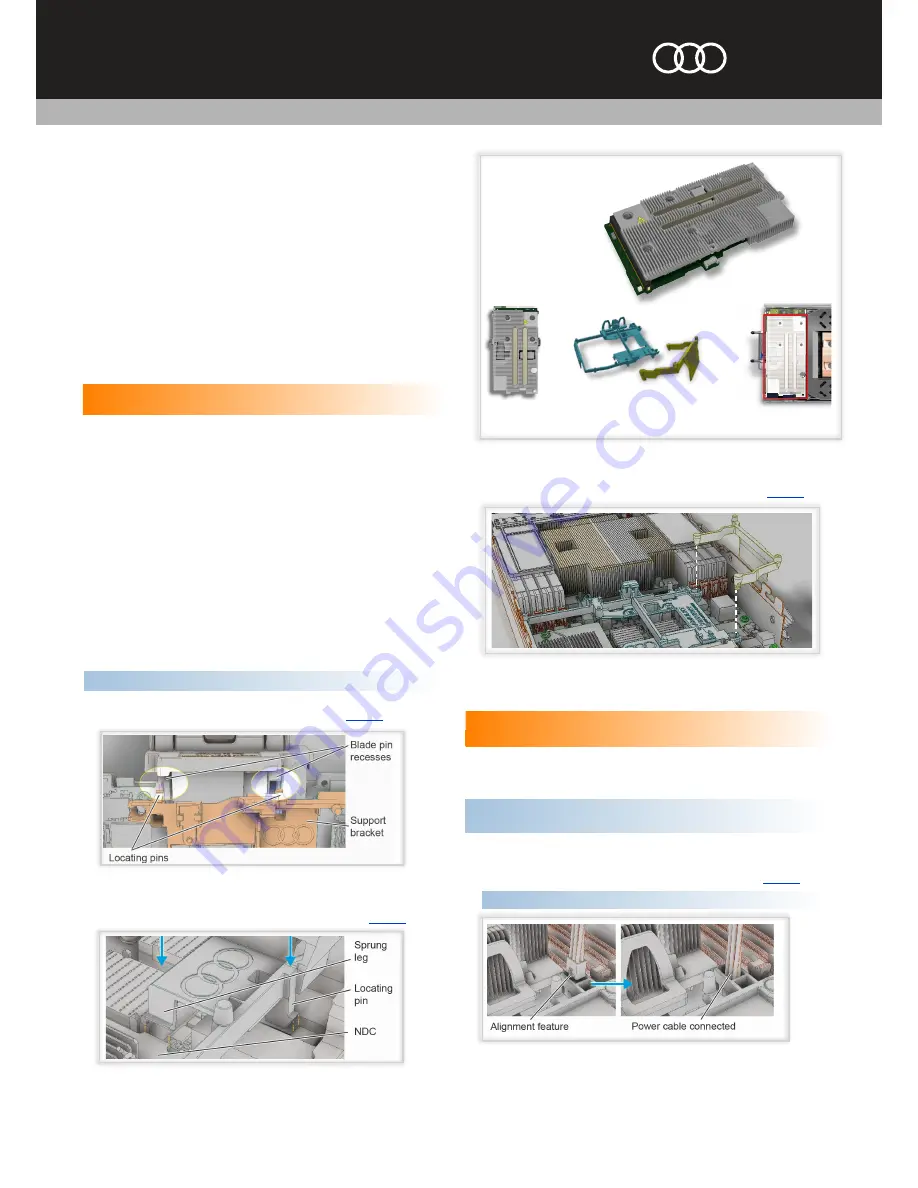
Install the mezzanine support bracket extension (part B)
Install any compatible Network Interface Card (optional)
Important!
Only an additional, compatible network card (NIC) can fit in the
other mezzanine (’mezz’) slot. Contact Technical Support for details.
1. If a NIC card is required, install a compatible NIC card in mezz slot A or B.
Connect the power cable
Important!
The DXG card can install in one of two positions and requires
either a short power cable for mezzanine slot A, or long for mezzanine slot B.
1. Select the correct power cable, long for mezz slot B, short for mezz slot C.
2. Push the connector on the power cable through the square hole in the
bracket (part A) and into the socket on the motherboard. See
Figure 4
.
Important!
Make sure the alignment feature aligns with the socket.
The DXG card incorporates an MXM GPU for GPU enabled Virtual Desktop
Infrastructure and compute solutions. The DXG card has a
dual-slot
form-factor.
This guide tells you how to install and configure a DXG card on a Dell PowerEdge
M640 blade server
.
An M640 blade can support
one
of this type of DXG card.
See
KBA 140 - Install a DXG-P6 in a M640 blade
for full details.
DXG kits
Each kit includes:
■
DXG Graphics Virualization Card, with Nvidia or AMD MXM GPU;
■
14G Mezzanine kit for the DXG card
(includes mezzanine support bracket
parts A and B, power cables for mezz slot B or C and support clip).
Prepare the blade
Important!
Always use anti-static handling procedures to handle a DXG card
or to work on the inside of a blade. Keep liquids away from the area.
1. Stop all VM activity on the blade. Shut down or migrate all virtual machines
hosted by the blade.
2. In the VMware vSphere client, locate the ESXi server in the
Inventory
and
put it in to
Maintenance Mode
.
3. Shut down the host M640 blade and remove it from the chassis.
4. Open the blade and remove any installed mezzanine cards.
Remove the Dell mounting bracket
1. Remove the screw on the Dell mezzanine card mounting bracket and retain.
2. Remove the two screws from the Network Daughter Card (NDC) and retain.
3. Remove together the mounting bracket and NDC from the enclosure.
4. Discard this mounting bracket and install again the NDC with the two screws.
Install the mezzanine support bracket (part A)
Important!
The bracket only fits one way in the blade.
1. Move the support bracket (part A) into the blade so that the locating pins on
the bracket align with the two blade pin recesses. See
Figure 1
.
1
Dual-slot DXG card.
2
Mezzanine support bracket.
3B/C
Mezz slots B and C.
2
1
M640 blade
3B
3C
4
DXG-P6 Graphics
Virtualization Card
3. Install the retaining screw into the bracket.
Install the mezzanine support bracket extension (part B)
1. Push the ends of the two arms of the mezzanine support bracket extension
(part B) into the holes on part A so that it clicks into place. See
Figure 3
.
B
2. Move the bracket (part A) downwards. As the pins engage with the recesses,
make sure that the sprung leg engages under the NDC. See
Figure 2
.
Figure 4:
Connect the correct cable the motherboard
3. Hold the DXG by the PCB or connector and push the free flat connector of
the power cable into the socket on the DXG.
Figure 1:
Align pins with the Airmax recesses
Figure 2:
Move the support bracket (part A) into position


