background image

DM745-HDM11 User Guide

DM745-HDM11 User Guide

Page 8

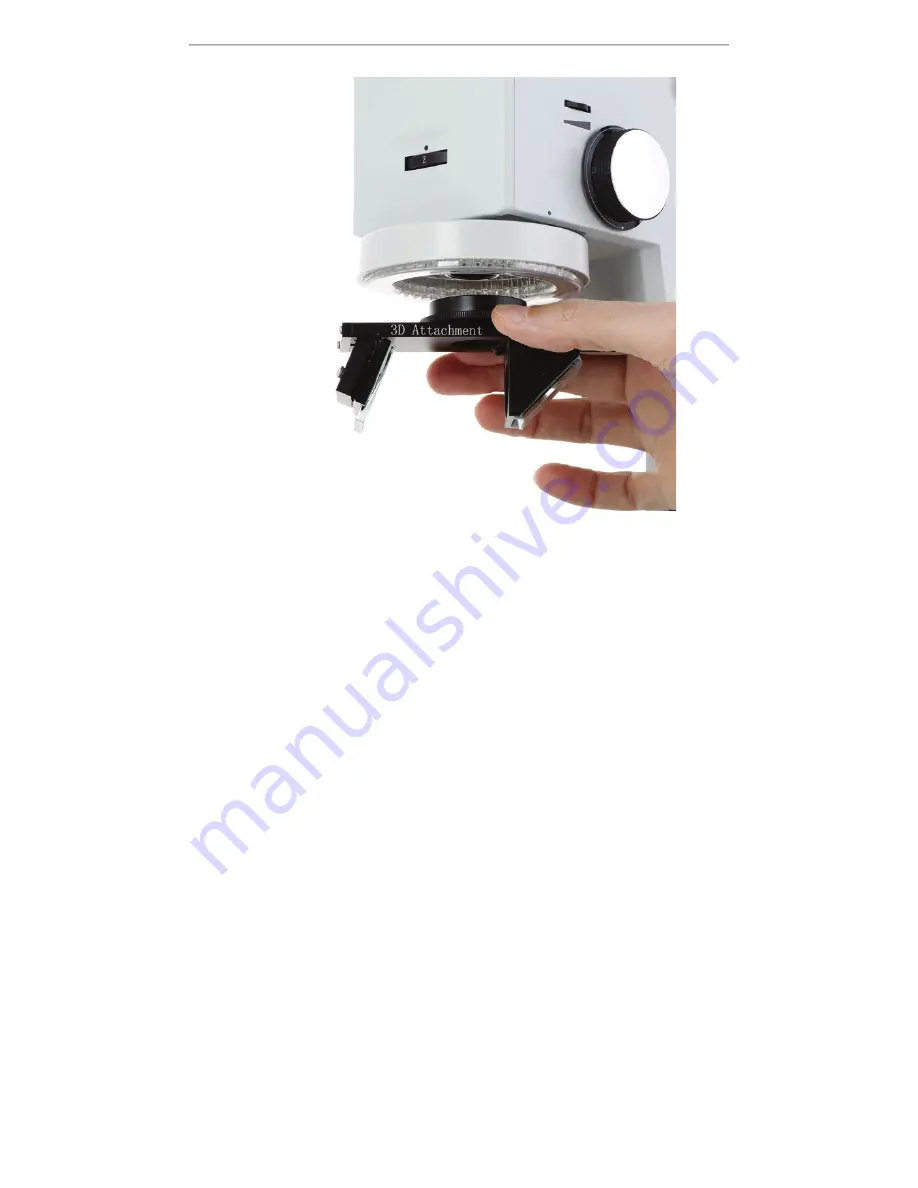
Attaching the 3D Attachment

The optional 3D attachment is designed to mount to the objective lens’ housing. The 3D attachment’s mounting ring has 

female threads which will screw onto the objective housing’s male threads. Guide the 3D attachment’s mounting ring 

upward onto the objective housing, then rotate to the right using the knurled portion of the ring. Continue rotating until 

the ring is fully mounted. Do not applying excessive pressure, otherwise the attachment will be difficult to remove. When 

securely mounted, the attachment’s slider should rotate freely.

Summary of Contents for DM745-HDM11

Page 1: ...45 HDM11 digital integrated microscope and accessories The information in this manual is provided to help you familiarize yourself with the assembly and use of the products Please read thoroughly before using the products and keep this manual with the product for reference v0 9 20220708 ...

Page 2: ...o the instrument or injury to yourself or others Only use the provided power adapter or authorized replacement Incompatible power adapters can cause damage to the instrument If you should lose the included power adapter please contact AmScope for information about a replacement Do not dismantle Dismantling can result in damage to the instrument and potential exposure to dangerous materials or elec...

Page 3: ... 9 Optical Magnification 10 Monitor Magnification 10 Illumination 11 3D Attachment 11 Software 12 Calibration 13 Calibration Tool 13 Profiles 13 Units 13 Line Calibration 13 Calibration by Circle 13 Main Tools 14 Assist Tools 15 The Camera Settings Panel 16 Image Exposure 17 Manual Exposure 17 Color 17 White Balance 17 System Settings 18 General Settings 19 Image Tab 20 File Tab 21 Folder Tab 22 M...

Page 4: ...DM745 HDM11 User Guide Page 4 140 ...

Page 5: ...0 x 1080 Pixel Size 2 9µm x 2 9µm Active Sensor Area 5 57mm x 3 13mm Shutter electronic rolling shutter Monitor Specifications Display Size 11 6 Monitor Magnification 46X Displayed Magnification 11 3X 72 5X Native Resolution 1920 x 1080 Aspect Ratio 16 9 Brightness 220 nits What s In The Box The DM745 HDM11 standard outfit includes One microscope with track stand One monitor Three thumb screws One...

Page 6: ...et with the screen facing the front of the microscope Align the holes in the back of the monitor with the holes in the bracket Insert each of the three mounting screws and rotate clockwise until they are securely fastened Two cables are attached to the microscope behind the bracket including HDMI and power Insert each cable into its respective port on the monitor ...

Page 7: ... cover on the underside of the mouse remove any insulator strip if present then replace the cover A USB dongle will be inserted into a dummy slot on the underside of the mouse Remove the dongle and insert it into an available USB port on the microscope Locate the power switch on the underside of the mouse and move it to the ON position Storage Devices An external storage device is required to save...

Page 8: ... will screw onto the objective housing s male threads Guide the 3D attachment s mounting ring upward onto the objective housing then rotate to the right using the knurled portion of the ring Continue rotating until the ring is fully mounted Do not applying excessive pressure otherwise the attachment will be difficult to remove When securely mounted the attachment s slider should rotate freely ...

Page 9: ...will decrease tension Magnification Zoom Dial The zoom dial controls the magnification of the microscope by adjusting the internal zoom mechanism The dial can be rotated in a continuous movement from the 0 7X setting to the 4 5X setting Key magnifications have detents mechanical catches which allow the dial to click into place This allows you to set magnifications more precisely when performing me...

Page 10: ...ue to its association with the image sensor However it should be used when calculating total system magnification as described in the following section about monitor magnification Monitor Magnification Since the image displayed on the monitor is larger than the camera s sensor the monitor is considered to have its own magnification referred to as monitor magnification The magnification factor is c...

Page 11: ...ntensity 3D Attachment The 3D attachment can be used to alter the angle of view allowing you to view an object from oblique angles without moving the object The 3D attachment consists of a mounting ring and a slider The slider can be positioned for normal viewing or 3D viewing The open position removes the slider s mirrors from the optical path allowing you to view normal ly The engaged position p...

Page 12: ...ware to manage camera and display settings as well as to perform image capture and measuring functions All of these functions are accessed from the on screen console The console is divided into four sections including Calibration Main Tools Assist Tools and a measurements log ...

Page 13: ... The line should span as many readable graduations as possible and should be parallel to the ruler s edge to improve the preci sion Move the cursor along the image of the ruler until it has spanned an adequate number of graduations then click the left mouse button again to create the second anchor point A popup window will be displayed Enter a name for the profile the length of the measurement and...

Page 14: ...nes Parallel Lines draw a pair of lines and the second will be parallel to the first Angle measure an angle Rectangle draw a rectangle 3 Point Arc draw an arc 3 Point Circle draw a circle Concentric Circles draw concentric circles Polygon draw a polygon Circle to Point measure the distance from the center of a circle to an arbitrary point Circle to Line measure the distance from the center of a ci...

Page 15: ...manual Graphics Settings change characteristics of shapes including color Output Settings Camera Settings controls for manipulating camera settings Delete remove graphics currently on screen Freeze Image freezes the live video feed to display a static image Export Capture captures photos Save Graphics saves the graphics data Browse Folder view saved images System Settings manage system settings in...

Page 16: ...en level of the RGB image Manually adjust the proportional Blue level of the RGB image High Dynamic Range adjust the compression level of colors to improve detail in overexposed or underexposed areas Sharpen Edges Auto Exposure automatically adjusts exposure settings White Balance adjusts color balance based on a neutral grey reference Frame Rate select the video frame rate to match the electrical...

Page 17: ...e Balance The color of an object is influenced by the color of light reflecting off of it or passing through it Different light sources produce light with different color biases Common examples are incandescent lamps which typically produce warm colors compared to fluorescent or LED lamps which produce cooler colors This sort of bias is referred to as color tem perature Due to this phenomenon a wh...

Page 18: ...DM745 HDM11 User Guide Page 18 System Settings The System Settings panel allows you to customize general software settings ...

Page 19: ...o use for timestamps or file naming Language Set the displayed language to English Simplified Chinese or Traditional Chinese Switch User Use the administrator account or create a separate user account to maintain individual preferences Functions such as Application Upgrade can only be accessed by the administrator account Restore Factory Restore all system settings to factory defaults Application ...

Page 20: ...d PNG Image Saving Quality This is used to set the level of quality for images being saved A lower percentage will result in a smaller file but image quality will be degraded A higher percentage will result in a larger file with improved quality Image Naming Length This sets the number of digits to be used when using the serial number option with automatically generated file names Image Naming For...

Page 21: ...s sets the number of digits to be used when using the serial number option with automatically generated file names File Naming Format This defines what will be included in an automatically generated file name You can enter custom text and use predefined placeholders 1 adds a numeric sequence to the file name but only when the rest of the name is unique 2 adds a timestamp to the file name ...

Page 22: ...r option with automatically generated file names Folder Naming Format This defines what will be included in an automatically generated folder name You can enter custom text and use pre defined placeholders 1 adds a numeric sequence to the folder name but only when the rest of the name is unique 2 adds a timestamp to the folder name ...

Page 23: ...u would need to right click on the screen after drawing a reference line during the calibration process to display the calibration pop up window When this box is checked the pop up window will automatically display after the line is drawn Automatically update the value after switching calibration When this box is checked on screen measurements will be recalculated when the calibration profile is c...

Reviews: