background image

This Ammann ma chine has been de signed and con structed in
con for mance with cur rent stan dards and di rec tives.  This ma -
chine can con sti tute a dan ger to per sons and prop erty how ever
if:

It is not used for the in tended pur pose

It is not op er ated by trained per son nel

It is in cor rectly mod i fied or con verted

The safety re quire ments are not ob served

For this rea son, all per sons con cerned with op er a tion, main te -
nance and re pair of the ma chine must read and fol low the safety 
re quire ments.  This may have to be con firmed with re spect to
the user com pany by sig na ture.

The fol low ing also ap ply:

The per ti nent reg u la tions for the pre ven tion of ac ci dents

Gen er ally re cog nised safety rules and road traf fic reg u la tions

Coun try-spe cific re quire ments

In tended  use

This ma chine is only in tended for:

The com pac tion of all types of sur faces

Re pairs to all types of sur faces

Sta bili sa tion of pave ments and roads

Work ing in trenches

Underfilling and com pac tion of verges

Im proper  use

The ma chine can con sti tute a haz ard if used im prop erly by un trained

per sons or not for the in tended pur pose.
For ex am ple:

Work ing in hor i zon tal di rec tion

Pile driv ing

Com pac tion of verges

Who is al lowed to op er ate the ma chine?

Only trained, in structed and authorised per sons over the age of 18

may op er ate the ma chine.  The re spon si bil i ties must be clearly de -

fined and ob served prior to op er a tion of the ma chine.
In vari ance from this, mi nors can be em ployed, as long as it is nec es -

sary to their train ing ob jec tive and their pro tec tion is as sured by a su -

per vi sor.
Per sons who are un der the in flu ence of al co hol, med i cines or drugs

must not op er ate, main tain or re pair the ma chine.  
Main te nance and re pairs, in par tic u lar of hy drau lic sys tems and elec -

tronic com po nents re quire spe cial knowl edge and must be car ried

out only by trained spe cial ists (me chan ics spe cial is ing in con struc -

tion and ag ri cul tural ma chin ery).

Con ver sions and changes to the ma chine

Un author ised changes to the ma chine are not per mit ted for safety

rea sons.
Orig i nal parts and ac ces so ries have been spe cially de signed for the

ma chine.  It should be noted that parts and spe cial equip ment not

sup plied  by  Ammann  Verdichtung  GmbH  are  not  ap proved  by

Ammann Verdichtung GmbH.  The in stal la tion and/or the use of such 

prod ucts can also af fect the ac tive and/or pas sive safety.
The man u fac turer dis claims all li a bil ity for any dam age caused by

us ing non-orig i nal parts or spe cial equip ment.

Safety  in for ma tion  con tained  in  the  op er at ing  and
main te nance  in struc tions

The fol low ing terms and sym bols are used in this op er at ing man ual

that draw at ten tion to im por tant in for ma tion:

Loa ding  the  ma chi ne

Al ways shut off the en gine when load ing and trans port ing.
Se cure the ma chine to pre vent it tilt ing or slip ping.
A risk to life ex ists if per sons walk or stand un der sus pended loads.
It should be noted that the ma chine may swing when sus pended.
Se cure the ma chine on trans port ve hi cles to pre vent it roll ing, slip -

ping or tilt ing.

Start ing the ma chine

Be fore start ing the ma chine

Fa mil iar ise  your self  with  the  op er at ing  and  con trol  el e ments  and

mode of op er a tion of the ma chine and the work ing area.
Use per sonal pro tec tive equip ment (pro tec tive hel met, safety shoes, 

etc.)
Use hear ing pro tec tion.
Be fore start ing the ma chine, check whether:

The ma chine has any no tice able de fects

All pro tec tive de vices are se curely in place

The con trol el e ments func tion

The ma chine is free from oily and ig nit able ma te rial

All han dles are free from grease, oils, fu els, dirt, snow and ice.

Only use ma chines that have been reg u larly main tained.

Star ting in en clo sed spa ces, tun nels, mi nes or deep dit ches

En gi ne ex haust gas are highly dan ge rous!
For this rea son, when ope ra ting the ma chi ne in en clo sed spa ces,

tun nels, mi nes or deep dit ches, it is im por tant to en su re that the re is

suf fi cient air to bre ath (see UVV «

Con struc ti on  work

», BGV C22, pa -

ra graphs 40 and 41).

Op er a tion

Guide the ma chine so that hands do not come against fixed ob jects;

risk of in jury.
Guide the ma chine so that the op er a tor can not be crushed be tween

the ma chine and hard ob jects.
Lis ten for any ab nor mal noise and smoke.  Lo cate the cause and

have the dam aged re paired.
Do not hold the throt tle be low «

MAX

», as this can dam age the cen -

trif u gal clutch.
Never re lease the ma chine with the en gine run ning.
Keep feet away from the tamp ing base plate

Park ing the ma chine

If pos si ble, park the ma chine on a level, firm sur face.
Be fore leav ing the ma chine:
Se cure the ma chine to pre vent it tilt ing.

02

03

10

00-

2


Hb

m

gn

u t

hci

 dr

eV 

nn

a

 m

mA 


71

02/

70

1. Safety reg u la tions

37

Summary of Contents for ATR 60 C

Page 1: ...nleitung DE Translation of the original Operating instructions EN Traduction du Mode d emploi original FR Traducci n del Instrucciones de servicio original ES Book ID 2 00013020 ATR 60 C ATR 68 C Hond...

Page 2: ......

Page 3: ...Originalbetriebsanleitung DE Book ID 2 00013020 ATR 60 C ATR 68 C Serial Nr Honda GX100 Serial Nr...

Page 4: ...Normen Applied harmonized standards Normes harmonis es appliqu es Normas armonizadas aplicadas EN 500 1 EN 500 4 Die benannte Stelle nach 2000 14 EG The notified body of 2000 14 EC L organisme habilit...

Page 5: ...achten Sie zus tzlich auch die entsprechenden in Ihrem Land g ltigen Vorschriften und Richtlinien Die Ammann Verdichtung GmbH haftet nicht f r die Funktion der Maschine bei Handhabung die nicht der bl...

Page 6: ...fu 31 9 Hilfe bei St rungen 10 Lagerung 33 1 Safety regulations 37 2 Technical data 39 3 Operation 3 1 Description 41 3 2 Before using 42 3 3 Motor operation 43 3 4 Working with the tamper 46 4 Transp...

Page 7: ...de dameuse 99 9 Aide en cas de d faillances 10 Emplacement 101 1 Reglas de seguridad 107 2 Datos t cnicos 109 3 Manejo 3 1 Descripci n 111 3 2 Antes de la puesta en marcha 112 3 3 Manejo del motor 11...

Page 8: ...Wir machen ausdr cklich darauf aufmerksam dass nicht von der Ammann Verdichtung GmbH gelieferte Teile und Sonderausstattun gen auch nicht von der Ammann Verdichtung GmbH freigegeben sind Der Einbau u...

Page 9: ...ungsarbeiten nie bei laufendem Motor durchf hren Nie Benzin oder andere entz ndliche Stoffe zur Reinigung verwen den Beim Reinigen mit Dampfstrahlreiniger elektrische Teile und D m material nicht dire...

Page 10: ...3 0 PS Drehzahl 4300 1 min K hlung Gebl se Tankinhalt 3 2 l Kraftstoffverbrauch ca 0 9 l h 4 Vibration Schlagzahl 680 1 min Sprungh he bis 65 mm Arbeitsgeschwindigkeit bis 13 5 m min Fl chenleistung...

Page 11: ...Abschnitt 1 7 4 u der EG Maschinenrichtlinie geforderte Ger uschangabe betr gt f r Schalldruckpegel am Bedienerplatz LPA 94 dB Gemessener Schalleistungspegel LWA m 105 dB Garantierter Schallleistungs...

Page 12: ...n B den Befestigung von Wegen Arbeiten in Gr ben bis 3 m Tiefe Unterf llungen und Verdichtungen von Randstreifen 3 1 1 bersicht 1 Gashebel 2 Halteb gel verstellbar 3 Chokehebel 4 Motor 5 Transportgrif...

Page 13: ...n Motor und Maschine Fehlende Schmierstoffe entsprechend der Schmierstofftabel le erg nzen 0 2 0 3 1 0 0 0 2 H b m G g n u t h c i d r e V n n a m m A 7 1 0 2 7 0 Pers nliche Schutzausr stung insbeson...

Page 14: ...chte 2 In diesem Fall Motor lstand pr fen und ggf korrigieren Startvorgang wiederholen 3 3 2 Motor starten Kraftstoffhahn 3 auf ON stellen Chokehebel 4 auf CLOSE schieben 0 2 0 3 1 0 0 0 2 H b m G g n...

Page 15: ...ig durchziehen II 0 2 0 3 1 0 0 0 2 H b m G g n u t h c i d r e V n n a m m A 7 1 0 2 7 0 3 Bedienung 10 Anlassergriff 1 nicht gegen den Motor zur ckschnel len lassen Startseil von Hand in die Ausgang...

Page 16: ...2 min warmlaufen lassen Chokehebel w hrend des Warmlaufens auf OPEN schie ben 3 3 4 Motor abstellen Gashebel 5 auf MIN stellen Motorschalter 6 auf OFF drehen Kraftstoffhahn 3 auf OFF stellen 0 2 0 3...

Page 17: ...herausdrehen Arbeitsh he durch Drehen des Halteb gels 2 einstellen Schrauben 1 festziehen 3 4 2 Vortriebsgeschwindigkeit Die Vortriebsgeschwindigkeit kann auf zwei Arten beeinflusst werden Durch Ver n...

Page 18: ...urzpausen den Gashebel auf MIN stellen der Stampfer l uft im Leerlauf Bei l ngeren Pausen und nach der Arbeit Motor abstellen und Kraftstoffhahn schlie en 0 2 0 3 1 0 0 0 2 H b m G g n u t h c i d r e...

Page 19: ...splay angezeigt Bei abgestelltem Motor werden die Betriebsstunden ange zeigt Nach Erreichen des Motor lwechselintervalls nach 100 Std blinkt die Anzeige jeweils 2 Std vorher und 2 Std nachher Auswahl...

Page 20: ...7 1 0 2 7 0 15 4 Transport Lebensgefahr durch schwebende Last Personen d rfen nicht unter schwebende Lasten treten unter schwebenden Lasten stehen auf schwebenden Lasten mitfahren Sicherstellen dass...

Page 21: ...4 1 4 Verzurren Nach dem Verladen den Stampfer auf dem Transportmittel ber F hrungsb gel und Griff verzurren 0 2 0 3 1 0 0 0 2 H b m G g n u t h c i d r e V n n a m m A 7 1 0 2 7 0 16 4 Transport...

Page 22: ...teile nicht direkt abspritzen Nach dem Waschen die Bauteile mit Druckluft trocken blasen um Kriechstr me zu vermeiden 0 2 0 3 1 0 0 0 2 H b m G g n u t h c i d r e V n n a m m A 7 1 0 2 7 0 5 Wartung...

Page 23: ...a GX100 0 4 l Erstmals nach 20 h dann alle 100 h Motoren l API SG CE SAE 10W40 2 80601100 2 Stampfsystem 0 65 l nach 200 h oder 1x j hrlich Motoren l API SG CE SAE 10W40 2 80601100 5 4 Firmenalternati...

Page 24: ...Gebrauchs eines Kraftstoffs mit h heren Ethanol oder Methanol Prozents tzen als oben angegeben sind von der Garantie nicht abgedeckt 0 2 0 3 1 0 0 0 2 H b m G g n u t h c i d r e V n n a m m A 7 1 0...

Page 25: ...terkante der maximalen Kraftstoffstand grenze des Kraftstofftanks einf llen Nicht berf llen Nur un verbleiten Kraftstoff verwenden Versch tteten Kraftstoff vor dem Starten des Motors aufwi schen Tankv...

Page 26: ...n reini gen Kraftstoffsieb einbauen evtl neue Dichtung 3 verwenden Kraftstoffschlauch montieren 0 2 0 3 1 0 0 0 2 H b m G g n u t h c i d r e V n n a m m A 7 1 0 2 7 0 6 Wartung Motor 21 Kein offenes...

Page 27: ...6 1 4 Kraftstofffilter Kraftstofffilter 1 austauschen 0 2 0 3 1 0 0 0 2 H b m G g n u t h c i d r e V n n a m m A 7 1 0 2 7 0 6 Wartung Motor 22...

Page 28: ...rausziehen und lstand pr fen lstand ggf bis zur oberen Grenzmarke Unterkante Einf ll stutzen auff llen Nicht berf llen leinf llverschluss Messstab 1 einschrauben und ver schliessen 0 2 0 3 1 0 0 0 2 H...

Page 29: ...in oder Reinigungsl sungen mit niedrigem Flammpunkt zum Reinigen des Luft filtereinsatzes verwenden Im Arbeitsbereich nicht rauchen Offenes Feuer und Funken vermeiden Brand und Explosionsgefahr Filter...

Page 30: ...ckluft max 5 bar von in nen nach aussen ausblasen Anzahl der Reinigungen auf der Filterpatrone vermerken Filterpatrone 4 vorsichtig einsetzen Filterdeckel 3 montieren 0 2 0 3 1 0 0 0 2 H b m G g n u t...

Page 31: ...Verschmutzungsgrad des Luftfilters auch bei abgestelltem Motor abgelesen werden Der gelbe Anzeigekolben rastet in 12 Stufen ein Im Anzeigefeld wird die Reststandzeit des Luftfilters bei zu nehmender V...

Page 32: ...14 Das Einhalten der Anziehdrehmomente wird mit Drehmo ment Schl sseln kontrolliert Bei Verwendung von Schmiermittel MoS2 gelten die angegebe nen Werte nicht 0 2 0 3 1 0 0 0 2 H b m G g n u t h c i d...

Page 33: ...er pr fen Gummipuffer 1 auf Risse und Ausbr che sowie festen Sitz pr fen bei Besch digungen sofort auswechseln 7 1 5 Faltenbalg pr fen Zustand und festen Sitz des Faltenbalges 1 berpr fen De fekten Fa...

Page 34: ...2 H b m G g n u t h c i d r e V n n a m m A 7 1 0 2 7 0 7 Wartung Maschine 29 Den Vibrationsstampfer kurze Zeit stehen lassen da mit das l zur ck ins Geh use laufen kann lwechsel bei warmem l durchf h...

Page 35: ...ohr einf llen Dichtfl chen zwischen Deckel 3 und Geh use reinigen Be sch digungen vermeiden Deckel 3 mit Dichtung 4 montieren auf korrekten Sitz der Dichtung achten Defekte Dichtung ersetzen lstand im...

Page 36: ...werden Stampfer auf ebener fester Unterlage nicht auf der Vergaser seite ablegen Stampffu 1 mit Griff 2 l sen und abnehmen Zwischenst ck 3 l sen und abnehmen K rzeres Zwischenst ck bzw Fu verl ngerun...

Page 37: ...ftstoffhahn auf ON tanken Z ndkerze wechseln Schaden beheben lassen Z ndschalter auf ON Z ndschalter wechseln Motor lstand pr fen Kontrollleuchte blinkt bei Bet tigung des Anlassergriffes Motor dreht...

Page 38: ...45 C liegen Die Maschine vor dem Lagern gr ndlich reinigen auf Leckagen und Sch den untersuchen festgestellte M ngel beseitigen mit einer Schutzplane abdecken 10 0 2 Wiederinbetriebnahme Vor Wiederin...

Page 39: ...Translation of the Original operating instructions EN Book ID 2 00013020 ATR 60 C ATR 68 C Serial Nr Honda GX100 Serial Nr...

Page 40: ......

Page 41: ...BG as well as the applicable ac cident prevention regulations Also observe the corresponding rules and regulations valid in your country Ammann Verdichtung GmbH is not liable for the function of the m...

Page 42: ...proved by Ammann Verdichtung GmbH The installation and or the use of such products can also affect the active and or passive safety The manufacturer disclaims all liability for any damage caused by us...

Page 43: ...pirit or other flammable materials for cleaning purposes When using pressure cleaning equipment do aim the jet directly at electrical parts and insulating material or cover these beforehand Do not pla...

Page 44: ...2 2 kW 3 0 hp Speed 4300 rpm Cooling Forced air Tank capacitiy 3 2 l 0 845 US gal Fuel consumption 0 9 l h 0 238 US gal 4 Vibration Number of impacts 680 rpm Jumping height up to 65 mm 2 559 in Worki...

Page 45: ...ppendix 1 sub clause 1 7 4 u of the EC Machinery Directive is for Sound pressure level at the workplace LPA 94 dB Measured sound power level LWA m 105 dB Guaranteed sound power level LWA g 108 dB The...

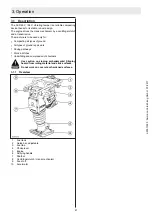
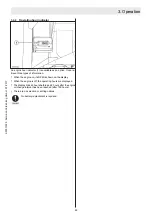
Page 46: ...repair work Paving pathways Work in ditches Underfilling and compression of shoulders 3 1 1 Overview 1 Fuel tank 2 Guide bar adjustable 3 Fuel tap 4 Choke lever 5 Engine 6 Carrying handle 7 Padfoot 8...

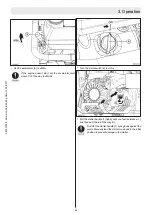
Page 47: ...the machine If lubrication is needed add it according to the lubrication chart 0 2 0 3 1 0 0 0 2 H b m G g n u t h c i d r e V n n a m m A 7 1 0 2 7 0 3 Operation 42 Use personal protective equipment...

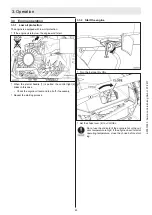
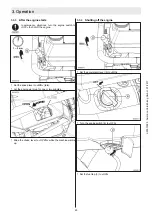
Page 48: ...ase Check the engine oil level and top it off if necessary Repeat the starting process 3 3 2 Start the engine Turn the fuel tap 3 ON Set the choke lever 4 to CLOSE 0 2 0 3 1 0 0 0 2 H b m G g n u t h...

Page 49: ...rd all the way II 0 2 0 3 1 0 0 0 2 H b m G g n u t h c i d r e V n n a m m A 7 1 0 2 7 0 3 Operation 44 Don t let the starter handle 1 spring back against the motor Manually lead the starter rope bac...

Page 50: ...ver to OPEN while the machine warms up 3 3 4 Shutting off the engine Set the accelerator lever 5 to MIN Turn the engine switch 6 to OFF Set the fuel tap 3 to OFF 0 2 0 3 1 0 0 0 2 H b m G g n u t h c...

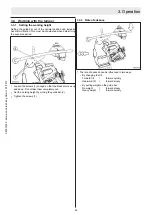
Page 51: ...t moves up and down Do not take them completely out Set the working height by turning the guide bar 2 Tighten the screws 1 3 4 2 Rate of advance The rate of advance can be influenced in two ways By ch...

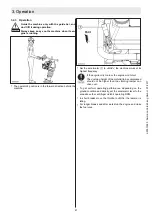
Page 52: ...n short breaks move the throttle to MIN the rammer is idling For longer breaks and after work stop the engine and close the fuel cock 0 2 0 3 1 0 0 0 2 H b m G g n u t h c i d r e V n n a m m A 7 1 0...

Page 53: ...shown on the display When the engine is off the operating hours are displayed The display blinks 2 hours before and 2 hours after the engine oil change interval has been reached after 100 hours There...

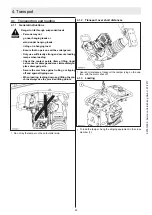
Page 54: ...n n a m m A 7 1 0 2 7 0 49 4 Transport Danger to life through suspended loads Persons may not go near hanging loads or stand under hanging loads riding on a hanging load Ensure that no persons will b...

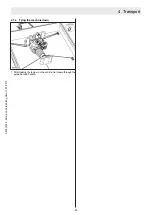
Page 55: ...4 1 4 Tying the machine down After loading the tamper on the vehicle tie it down through the guide bar and handle 0 2 0 3 1 0 0 0 2 H b m G g n u t h c i d r e V n n a m m A 7 1 0 2 7 0 50 4 Transport...

Page 56: ...hine with a high pressure water jet do not aim the jet directly at electrical components After washing blow components dry with compressed air to prevent creepage currents 0 2 0 3 1 0 0 0 2 H b m G g...

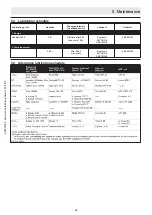
Page 57: ...Honda GX100 0 4 l First time after 20 h then every 100 h Engine oil API SG CE SAE 10W40 2 80601100 2 Tamping system 0 65 l After 200 h or annually Engine oil API SG CE SAE 10W40 2 80601100 5 4 Alterna...

Page 58: ...ng a fuel with percentages of ethanol or methanol greater than shown above are not covered under the Warranty 0 2 0 3 1 0 0 0 2 H b m G g n u t h c i d r e V n n a m m A 7 1 0 2 7 0 6 Maintenance engi...

Page 59: ...ur the fuel up to the lower edge of the tank s maximum fuel level line Do not overfill Use only unleaded fuel Wipe up spilt petrol before starting the engine Tightly close the fuel cap 2 0 2 0 3 1 0 0...

Page 60: ...r 2 and clean it in petroleum ether Put the fuel filter 2 back on Optionally use a new seal 3 Install the fuel hose 0 2 0 3 1 0 0 0 2 H b m G g n u t h c i d r e V n n a m m A 7 1 0 2 7 0 6 Maintenanc...

Page 61: ...6 1 4 Fuel filter Change the fuel filter 0 2 0 3 1 0 0 0 2 H b m G g n u t h c i d r e V n n a m m A 7 1 0 2 7 0 6 Maintenance engine 56...

Page 62: ...the oil level If necessary fill the oil to the upper limit mark the lower edge of the filler hole Do not overfill Screw the oil cap dipstick 1 in and lock it 0 2 0 3 1 0 0 0 2 H b m G g n u t h c i d...

Page 63: ...ble substances For cleaning the filter element do not use any flammable or aggressive materials In the work area do not smoke and prevent open flames or sparks Replace the filter element when the filt...

Page 64: ...gh the fil ter cartridge 4 from the inside out Note the number of filter cartridge cleanings Carefully install the filter cartridge 4 Put on the filter cover 3 0 2 0 3 1 0 0 0 2 H b m G g n u t h c i...

Page 65: ...s the actual dirt level in the air filter to be read even when the engine is off The yellow in dicator bar has 12 stages The display field shows the remaining air filter life as dirt builds up Filter...

Page 66: ...0 14 Tightening torque is controlled with torque wrenches The values given do not apply when MoS2 lubrication is used 0 2 0 3 1 0 0 0 2 H b m G g n u t h c i d r e V n n a m m A 7 1 0 2 7 0 7 Mainten...

Page 67: ...ber buffers Check the rubber buffers 1 for tears and outbreaks as well as for secure fit If they are damaged replace them immediately 7 1 5 Checking the bellows Check the bellows 1 for condition and s...

Page 68: ...rain the used oil 0 2 0 3 1 0 0 0 2 H b m G g n u t h c i d r e V n n a m m A 7 1 0 2 7 0 7 Maintenance Machine 63 Let the vibrating tamper stand for a little while so that the oil can run back into t...

Page 69: ...e tube Clean the sealing surfaces between the cover 3 and the housing avoid damage Install the cover 3 with its seal making sure the seal is seated properly Replace defective seals Check the oil level...

Page 70: ...t be replaced Lay the tamper on a firm even surface not on the carburettor side Loosen and remove the padfoot 1 and handle 2 Loosen and remove the adaptor 3 Tightly screw on the adaptor or foot extens...

Page 71: ...ug Have damage repaired Set ignition switch to ON Change ignition switch Check engine oil level Engine does not start when starter is operated Starter faulty Spring broken Replace starter Replace star...

Page 72: ...e between 0 C 32 F and 45 C 113 F Before storing the machine clean it thoroughly check for leaks and damage and fix any problems cover it with a protective tarpaulin 10 0 2 Return to service Before us...

Page 73: ...Traduction du Mode d emploi original FR Book ID 2 00013020 ATR 60 C ATR 68 C Serial Nr Honda GX100 Serial Nr...

Page 74: ......

Page 75: ...dent attenantes Observer en outre les prescriptions et directives correspon dantes en vigueur dans votre pays Ammann Verdichtung GmbH n assumera aucune responsabilit pour le fonctionnement de la machi...

Page 76: ...aux qui ne sont pas livr s par nos soins ne sont pas non plus homologu s par nos soins Le mon tage et ou l utilisation de tels produits peut galement alt rer la s cu rit active et ou passive Toute res...

Page 77: ...nt du moteur Ne jamais utiliser d essence ou d autres substances inflammables pour le nettoyage Lors du nettoyage avec un nettoyeur jet de vapeur ne pas exposer de pi ces lectriques et de mat riaux d...

Page 78: ...1 min Refroidissement aire Contenu du r servoir 3 2 l Consommation de carburant 1 0 l h 4 Vibration Nombre de coups 680 1 min Hauteur de saut jusqu 65 mm Vitesse de travail jusqu 13 5 m min Surface tr...

Page 79: ...on de bruit exig e conform ment l annexe 1 paragraphe 1 7 4 u de la directive CE sur les machines est de pour le niveau de pression sonore au poste de conduite LPA 94 dB pour le niveau de puissance so...

Page 80: ...ins les travaux dans les tranch es ole comblement des sous sols et le compactage des accote ments 3 1 1 Pr sentation g n rale 1 R servoir carburant 2 Etrier de maintien r glable 3 Robinet de carburant...

Page 81: ...et de la machine Approvisionner en lubrifiants conform ment au tableau des lubrifiants 0 2 0 3 1 0 0 0 2 H b m G g n u t h c i d r e V n n a m m A 7 1 0 2 7 0 Utiliser l quipement de protection perso...

Page 82: ...ce cas v rifier et corriger ventuellement le niveau d huile moteur R p ter l op ration de d marrage 3 3 2 D marrage du moteur Placer le robinet de carburant 3 sur ON Pousser le levier de starter 4 sur...

Page 83: ...ond un grand coup II 0 2 0 3 1 0 0 0 2 H b m G g n u t h c i d r e V n n a m m A 7 1 0 2 7 0 3 Maniement 78 Ne pas faire rebondir la poign e du d marreur 1 con tre le moteur Replacer manuellement le c...

Page 84: ...r OPEN durant le chauffage du moteur 3 3 4 Arr t du moteur Placer le levier des gaz 5 sur MIN Tourner le commutateur du moteur 6 sur OFF Placer le robinet de carburant 3 sur OFF 0 2 0 3 1 0 0 0 2 H b...

Page 85: ...bas Ne pas d visser enti rement R gler la hauteur de travail en tournant l trier de maintien 2 Resserrer les vis 1 3 4 2 Vitesse d avancement La vitesse d avancement peut tre influenc e de deux fa on...

Page 86: ...placer la manette des gaz MIN le fouloir est au ralenti Pendant de longues pauses et apr s le travail du moteur et fermer le robinet de carburant 0 2 0 3 1 0 0 0 2 H b m G g n u t h c i d r e V n n a...

Page 87: ...ay Lorsque le moteur est arr t les heures de fonctionnement sont affich es Une fois atteint l intervalle de vidange d huile moteur au bout de 100 h l affichage clignote toujours 2 h avant et 2 h apr s...

Page 88: ...en raison de la charge suspendue Il ya un danger pour les personnes si ils sont sous des charges suspendues ils marchent sous des charges suspendues ils lors du transport de charges suspendues S assur...

Page 89: ...arrage Apr s le chargement amarrer la pilonneuse sur le moyen de transport l aide de l trier de guidage et de la poign e 0 2 0 3 1 0 0 0 2 H b m G g n u t h c i d r e V n n a m m A 7 1 0 2 7 0 84 4 Tr...

Page 90: ...ession Apr s le lavage s cher les composants par soufflage l air comprim afin d viter des courants de fuite 0 2 0 3 1 0 0 0 2 H b m G g n u t h c i d r e V n n a m m A 7 1 0 2 7 0 5 Entretien 85 5 2 V...

Page 91: ...fois apr s le 20 h apr s tous les 100 h Huile pour moteur API SG CE SAE 10W40 2 80601100 2 Syst me de pilonnage 0 65 l Apr s le 200 h ou 1 fois par an Huile pour moteur API SG CE SAE 10W40 2 80601100...

Page 92: ...ments dus l utilisation d un carburant plus forte teneur en thanol ou m thanol que celle indiqu e ci dessus ne sont pas couverts par la garantie 0 2 0 3 1 0 0 0 2 H b m G g n u t h c i d r e V n n a m...

Page 93: ...le niveau est bas Verser le carburant jusqu au bord inf rieur de la limite maxi male du niveau d essence du r servoir Ne pas trop remplir N utiliser que de l essence sans plomb Essuyer l essence renve...

Page 94: ...ns rer le tamis carburant Utiliser si besoin un nouveau joint 3 Monter le tuyau de carburant 0 2 0 3 1 0 0 0 2 H b m G g n u t h c i d r e V n n a m m A 7 1 0 2 7 0 6 Entretien du moteur 89 Pas de fla...

Page 95: ...6 1 4 Filtre carburant Remplacez le filtre carburant 1 0 2 0 3 1 0 0 0 2 H b m G g n u t h c i d r e V n n a m m A 7 1 0 2 7 0 6 Entretien du moteur 90 1 B6899571...

Page 96: ...le cas ch ant le niveau d huile jusqu la marque li mite sup rieure bord inf rieur de l orifice de remplissage Ne pas trop remplir Remettre le bouchon jauge d huile 1 en place 0 2 0 3 1 0 0 0 2 H b m...

Page 97: ...riaux inflammables Ne pas utiliser de produits inflammables ou agressifs pour le nettoyage Dans la zone de travail ne fumez pas viter les flammes nues et des tincelles le feu et l explosion Remplacem...

Page 98: ...filtrante 4 avec de l air comprim sec max 5 bars Noter le nombre de nettoyages de la cartouche filtrante Ins rer prudemment la cartouche filtrante 4 Monter le couvercle de filtre 3 0 2 0 3 1 0 0 0 2 H...

Page 99: ...filtre air m me lorsque le mo teur est arr t Le piston indicateur jaune s enclenche dans 12 paliers Dans le champ d affichage vous pouvez consulter la lon g vit restante du filtre air par rapport un...

Page 100: ...des couples de serrage est contr l avec des cl s dy namom triques En cas d utilisation de lubrifiant MoS2 les valeurs indiqu es ne s appliquent pas 0 2 0 3 1 0 0 0 2 H b m G g n u t h c i d r e V n n...

Page 101: ...rifier les fissures et les d chirures ainsi que la bonne fixation des coussins en caoutchouc 1 les remplacer aussit t en cas d endommagement 7 1 5 Contr le du soufflet V rifier l tat et le serrage du...

Page 102: ...e 0 2 0 3 1 0 0 0 2 H b m G g n u t h c i d r e V n n a m m A 7 1 0 2 7 0 7 Entretien de la machine 97 Laisser reposer quelque temps la pilonneuse afin que l huile puisse retourner dans le carter Eff...

Page 103: ...age Nettoyer les surfaces tanches entre le couvercle 3 et le car ter viter tout endommagement Monter le couvercle 3 avec le joint 4 veiller la bonne fixa tion du joint Remplacer le joint d fectueux Co...

Page 104: ...un support plat et r sistant pas du c t du carburateur Desserrer le pied 1 avec la poign e 2 et le retirer D bloquer la pi ce interm diaire 3 et l extraire Visser une pi ce interm diaire plus courte o...

Page 105: ...ler en carburant Remplacer la bougie d allumage Faire liminer le dommage Interrupteur d allumage sur ON Remplacer l interrupteur d allumage v rifier le niveau d huile du moteur et r approvi sionner si...

Page 106: ...e avant le stockage Contr ler l absence de fuites et de dommages cartez les manques constat s Recouvrir d une b che de protection 10 0 2 Remise en service Avant la remise en service contr ler la machi...

Page 107: ...Traducci n del Instrucciones de servicio original ES Book ID 2 00013020 ATR 60 C ATR 68 C Serial Nr Honda GX100 Serial Nr...

Page 108: ......

Page 109: ...s pertinentes de preven ci n de accidentes Respete tambi n los reglamentos y las ordenanzas v lidos en su pa s La empresa Ammann Verdichtung GmbH no se responsabiliza del funcionamiento de la m quina...

Page 110: ...que no ha sido suministrados por nosotros El montaje o el uso de tales pro ductos tambi n puede afectar a la seguridad activa y o pasiva El fabricante no asume la responsabilidad de da os causados por...

Page 111: ...ecci n ambiental Trabajos de limpieza Nunca efectuar los trabajos de limpieza con el motor en marcha Nunca utilizar gasolina u otras sustancias inflamables para la limpie za Al limpiar con el aparato...

Page 112: ...Refrigeraci n Aire forzado Capacidad del tanque 3 2 l Consumo de combustible aprox 0 9 l h 4 Vibraci n N mero de percusiones 680 1 min Altura de salto hasta 65 mm Velocidad de trabajo hasta 13 5 m mi...

Page 113: ...ruido1 La indicaci n de ruido requerida seg n el Anexo 1 Secci n 1 7 4 u de la Directiva de m quinas CE es para el nivel de presi n ac stica en el puesto del operario LPA 94 dB el nivel de potencia s...

Page 114: ...njas rellenos y compactaciones de arcenes 3 1 1 Cuadro general 1 Dep sito de combustible 2 Estribo de sujeci n regulable 3 Grifo de combustible 4 Palanca del starter estrangulador 5 Motor 6 Mango de t...

Page 115: ...su asiento correcto Estado del motor y de la m quina Cargar lubricantes conforme a la tabla de lubricantes 0 2 0 3 1 0 0 0 2 H b m G g n u t h c i d r e V n n a m m A 7 1 0 2 7 0 3 Manejo 110 Utilizar...

Page 116: ...bese el nivel de aceite de motor y corregir si fuera necesario Repetir el arranque 3 3 2 Poner el motor en marcha Situar el grifo de combustible 3 en la posici n ON Llevar la palanca del starter estr...

Page 117: ...I seguidamente tirar con fuerza II 0 2 0 3 1 0 0 0 2 H b m G g n u t h c i d r e V n n a m m A 7 1 0 2 7 0 3 Manejo 112 No dejar que el asa del motor de arranque retroceda a velocidad contra el motor...

Page 118: ...a la posici n OPEN abierto 3 3 4 Apagar el motor Situar la palanca del acelerador 5 en la posici n M N Girar el conmutador del motor 6 hacia la posici n OFF Situar el grifo de combustible 3 en la posi...

Page 119: ...esenroscar n del todo Ajustar la altura de trabajo girando el estribo de sujeci n 2 Apretar los tornillos 1 3 4 2 Velocidad de conducci n La velocidad de avance puede influenciarse de dos maneras Modi...

Page 120: ...as pausas breves mover el acelerador para MIN el pi sador est al ralent Durante las pausas largas y despu s del trabajo del motor y cerrar el grifo de la gasolina 0 2 0 3 1 0 0 0 2 H b m G g n u t h c...

Page 121: ...r gimen del motor re voluciones en la pantalla Con el motor apagado se muestran las horas de servicio Una vez alcanzado el intervalo del cambio de aceite de motor tras 100 horas parpadea la indicaci...

Page 122: ...de muerte por carga en suspensi n Personas no puede pasan por debajo de cargas colgadas est n debajo de cargas colgadas acompa ar las cargas suspendidas Asegurarse de que no hay ninguna persona ex pue...

Page 123: ...1 4 Sujeci n Tras cargar la apisonadora sobre el medio de transporte suje tar por el estribo gu a y el asidero 0 2 0 3 1 0 0 0 2 H b m G g n u t h c i d r e V n n a m m A 7 1 0 2 7 0 118 4 Transporte...

Page 124: ...cortocircuitos en cables por los que circula electricidad Recambiar inmediatamente las bombillas incandescen tes fundidas en las luces de control 0 2 0 3 1 0 0 0 2 H b m G g n u t h c i d r e V n n a...

Page 125: ...l La primera vez despu s de 20 h luego cada 100 h Aceite de motor API SG CE SAE 10W40 2 80601100 2 Sistema apisonador 0 65 l Despu s de 200 h o anualmente Aceite de motor API SG CE SAE 10W40 2 8060110...

Page 126: ...del sistema de combustible Los da os del motor o los problemas de funcionamiento debidos al empleo de un combustible con porcentajes de etanol o meta nol mayores que los indicados arriba no est n cub...

Page 127: ...l borde inferior del l mite m ximo del nivel de combustible del dep sito No se rebosar S lo se utilizar combustible sin plomo Se limpiar el combustible derramado antes de poner el mo tor en marcha Cer...

Page 128: ...i na para lavado Montar el tamiz de combustible Util cese una junta nueva si es necesario Montar el tubo de combustible 0 2 0 3 1 0 0 0 2 H b m G g n u t h c i d r e V n n a m m A 7 1 0 2 7 0 6 Manten...

Page 129: ...6 1 4 Filtro de combustible Cambiar el filtro de combustible 0 2 0 3 1 0 0 0 2 H b m G g n u t h c i d r e V n n a m m A 7 1 0 2 7 0 6 Mantenimiento del motor 124...

Page 130: ...comprobar el nivel de aceite Cargar aceite si fuera necesario hasta la marca l mite supe rior borde inferior de la boca de llenado No se rebosar Enroscar y cerrar el tap n de llenado de aceite varill...

Page 131: ...iales inflamables Para la limpieza no utilizar sustancias inflama bles o agresivas Prohibidas llamas sin protecci n Prohibido fumar Sustituir el cartucho del filtro en caso de que el elemento filtrant...

Page 132: ...m x 5 bar desde el interior hacia afuera Anotar el n mero de limpiezas realizadas en el cartucho del filtro Introducir el cartucho del filtro 4 con precauci n Montar la tapa del filtro 3 0 2 0 3 1 0...

Page 133: ...de suciedad real del filtro de aire incluso con el motor apagado El mbolo de indicaci n amarillo encastra en 12 nive les En el campo de indicaci n puede leerse la vida til restante del filtro de aire...

Page 134: ...te exactos se controlar n con una llave dina mom trica Si se utiliza lubricante MoS2 no rigen los valores indicados 0 2 0 3 1 0 0 0 2 H b m G g n u t h c i d r e V n n a m m A 7 1 0 2 7 0 7 Mantenimie...

Page 135: ...icos 1 con respecto a grietas y rotu ras as como en cuanto a su asiento correcto en caso de da os sustituir inmediatamente 7 1 5 Comprobar el fuelle plegable Comprobar el estado y el asiento correcto...

Page 136: ...rilla de compro baci n de aceite Evacuar el aceite usado 0 2 0 3 1 0 0 0 2 H b m G g n u t h c i d r e V n n a m m A 7 1 0 2 7 0 7 Mantenimiento m quina 131 Dejar la apisonadora vibradora durante un b...

Page 137: ...tubo gu a Limpiar las superficies sellantes entre la tapa 3 y la carcasa Ev tese da arlas Montar la tapa 3 con la junta 4 obs rvese el asiento co rrecto de la junta Sustituir la junta defectuosa Comp...

Page 138: ...nadora sobre una plantilla s lida no en el lado del carburador Aflojar la plataforma apisonadora 1 junto con el asidero 2 y desmontarla Aflojar la pieza intermedia 3 y desmontarla Atornillar y apretar...

Page 139: ...j a Hacer reparar Contacto de arranque a ON Cambiar contacto de arranque Compruebe el nivel de aceite del motor y rellene en la medida de lo necesario El motor no gira al accionar el arran que Arranqu...

Page 140: ...almacenaje a fondo Examinar la existencia de fugas y da os ausencias com probadas examinadas Cubrir con una cubierta de protecci n 10 0 2 Nueva puesta en funcionamiento Antes de volver a poner en mar...

Page 141: ......

Page 142: ...1 2 0 3 1 0 0 0 2 H b m G g n u t h c i d r e V n n a m m A 7 1 0 2 7 0...

Page 143: ......

Page 144: ...1 2 0 3 1 0 0 0 2 H b m G g n u t h c i d r e V n n a m m A 7 1 0 2 7 0...

Page 145: ......

Page 146: ...1 2 0 3 1 0 0 0 2 H b m G g n u t h c i d r e V n n a m m A 7 1 0 2 7 0...

Page 147: ......

Page 148: ...1 2 0 3 1 0 0 0 2 H b m G g n u t h c i d r e V n n a m m A 7 1 0 2 7 0...

Page 149: ......

Page 150: ...1 2 0 3 1 0 0 0 2 H b m G g n u t h c i d r e V n n a m m A 7 1 0 2 7 0...

Page 151: ......

Page 152: ...1 2 0 3 1 0 0 0 2 H b m G g n u t h c i d r e V n n a m m A 7 1 0 2 7 0...

Page 153: ......

Page 154: ...Ammann Verdichtung GmbH Josef Dietzgen Stra e 36 53773 Hennef Phone 49 2242 8802 0 www ammann group com 07 2017...

Reviews:

Related manuals for ATR 60 C