background image

IOAK-1023 / 8034979

(02.2008./1)

601GE1.33ZYFG(W)

601GE2.33ZpYFG(Xx)

INSTRUCTION MANUAL

GAS COOKER

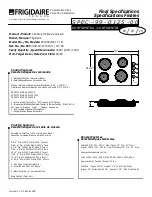
Summary of Contents for 601GE1.33ZYFG

Page 1: ...IOAK 1023 8034979 02 2008 1 601GE1 33ZYFG W 601GE2 33ZpYFG Xx INSTRUCTION MANUAL GAS COOKER ...
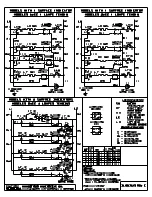
Page 2: ...y following these instructions carefully you will be able to avoid any problems in using the appliance It is important to keep the instruction manual and store it in a safe place so that it can be consulted at any time It is necessary to follow the instructions in the manual carefully in order to avoid possible accidents Caution Do not use the cooker until you have read this instruction manual The...

Page 3: ...3 Safety instructions 4 Description of the appliance 9 Installation 12 Operation 17 Baking in the oven practical hints 23 Cleaning and maintenance 29 Technical data 33 Table of Contents ...

Page 4: ... fixed by a specialist Do not open the tap on the gas connection or cylinder valve before checking that all burner knobs are closed Do not allow the burners to be soiled or liquids to spill on the burners If soiled clean and dry burners immediately after they have cooled down Do not put pans directly onto burners Do not place pans with a weight greater than 10 kg onto the grate over one burner or ...

Page 5: ...n such a case immediately close the cylinder valve or tap cutting off gas supply air the room and then call a person authorised to repair the source of the leakage In the event of any incident caused by a technical fault disconnect the power applying the above rule and report the fault to the service centre to be repaired Do not attach any antenna cords e g radio to the gas supply In a case of gas...

Page 6: ... is the law that all gaś appliances be installed by competent persons who will ensure that the installation is in accordance with The Gas Safety Installation Use Regulations 1994 the The Gas Safety Installation Use Amendment Regulations 1996 Failure to comply with these Regulations is a criminal offence Corgi registered installers under take to work to satisfactory standards Disconnection of gas a...

Page 7: ...he rings under caps and openings of burner nozzles are clean Do not uncover the pan too often a watched pot never boils Do not open the oven door unnecessarily often Only use the oven when cooking larger dishes Meat of up to 1 kg can be prepared more economically in a pan on the cooker burner Make use of residual heat from the oven If the cooking time is greater than 40 minutes it is recommended t...

Page 8: ...ch of children UNPACKING Disposal of the appliance Old appliances should not sim ply be disposed of with normal household waste but should be delivered to a collection and recycling centre for electric and electronic equipment Asymbol shown on the product the in struction manual or the packag ing shows that it is suitable for recycling Materials used inside the appliance are recyclable and are lab...

Page 9: ...perature function oven control knob 2 Push button ignition 3 4 5 6 Gas burner control knobs 7 Temperatureregulatorsignal light red 8 Cooker operation signal light yellow 9 Oven door handle 10 Drawer 11 Large burner 12 Medium burner 13 Medium burner 14 Small burner 2 12 13 7 8 601GE1 33ZYFG W ...

Page 10: ...Temperature control knob 2 Oven function selection knob 3 4 5 6 Gas burner control knobs 7 Temperatureregulatorsignal light red 8 Cooker operation signal light yellow 9 Oven door handle 10 Drawer 11 Large burner 12 Medium burner 13 Medium burner 14 Small burner 12 13 7 8 9 601GE2 33ZpYFG Xx ...

Page 11: ...11 SPECIFICATIONS OF THE APPLIANCE Oven fittings Baking tray Grill grate drying rack Roasting tray optional ...

Page 12: ...7 Installation Servicing Instructions for this appliance For installation in countries other than the UK the appliance must be connected in accordance with all local gas and electrical regulations Ventilation Requirements The room containing the appliance should have an air suppły in accordance with BS5440 Part2 1989 Ali rooms require an openable window or equivalent and some rooms will require a ...

Page 13: ...ying pan To this purpose adjustable feet are accessible after removal of the drawer The adjustment range is 5 mm HOOD 400 mm 400 mm 650 mm Connect to the electricity supply Warmng This appliance must be earthed The cooker is manufactured to work with a one phase alternating current 220 240V 50 Hz and is equipped with a 3 x 1 5 mm2 connection lead of 1 5 mm length with a plug including a protection...

Page 14: ...lexible con nector hose does not kink Use a 900 1125mm length of flexible con nector Ensure that all pipę work is of the correct rat ing for both size and temperature Flexible connections should comply with BS 669 Parts of the appliance likely to come into contact with a flexible connector have a temperaturę rise of less than 70 C After installałion make sure all connec tions are gas sound ...

Page 15: ...after drawing out the oven chamber floor Type of gas burner injector size large medium small Natural G20 20 mbar 1 24 0 84 1 09 0 67 0 75 0 52 LPG G30 28 mbar Adapting the cooker to another type of gas This operation may only be carried out by an appropriately authorised fitter If the gas the cooker is to be supplied with differs from the gas provided for the cooker by the manufacturer that is G20...

Page 16: ...pting the appliance to a different type of gas than that indicated by the manufacturer of the cooker on the data plate or purchasing a cooker for a different type of gas than supplied to the house is exclusively the responsi bility of the user and the fitter Gas supply to surface burners is opened and set by knobs fig A Knobs should be adjusted with the burner switched on and set to the economical...

Page 17: ...out and wash the oven fittings with warm water and a little washing up liq uid switch on the ventilation in the room or open a window heat the oven to a temperature of 250 C for approximately 30 min remove any stains and wash carefully The oven chamber should only be washed with warm water and a small amount of washing up liquid when handling the cooker follow the safety instructions carefully OPE...

Page 18: ...er a pan with a diameter of 90 to 150 mm a medium burner a pan with a diameter of 160 to 220 mm a large burner a pan with a diameter of 200 to 240 mm and the pan height should not be greater than its diameter Ignition without an ignitor light a match press in the knob to the end and turn it left to the large flame position ignite gas with a match set required flame size e g economical switch off t...

Page 19: ...els equipped with a surface burner safety valve hold the knob pressed down to the end when igniting for 10 seconds at the large flame position to activate the safety device Caution Do not adjust the flame between the off position and the large flame position Operation of the burner protection valve Some models are equipped with an automatic system that cuts off gas supply to a burner when the flam...

Page 20: ... present on the knob Possible knob positions Oven on and off In order to switch on the oven you need to set required working conditions of the oven its temperature and a mode of heating set the knob to the required position turn ing it right Switching on the oven is indicated by two signal lights yellow and red turning on The yellow light turned on means the oven is work ing If the red light goes ...

Page 21: ...r Bottom and top heaters on Setting the knob to this position allows the oven to be heated conventionally Caution At this oven function knob position when setting the temperature regula tor to a position other than zero the red light may go on although the oven is not being warmed up Fan bottom and top heaters on At this knob position the oven executes the cake function Con ventional oven with a f...

Page 22: ...s ac tive it enables grilling with the grill and with the top heater switched on at the same time This function allows a higher tem perature at the top of the cooking area which causes more intense browning of the dish and permits larger portions to be grilled Fan and combined grill on When the knob is turned to this position the oven activates the combined grill and fan function In practice this ...

Page 23: ... and bottom heaters use of such tins can result in undercooking the base of cakes before the cake is taken out of the oven check if it is ready using a wooden stick if the cake is ready the stick should come out dry and clean after being inserted into the cake after switching off the oven it is advisable to leave the cake inside for about 5 min the baking parameters given in Tables are approximate...

Page 24: ...rovided with the cooker Fruit cake crispy base Crumble cake Sponge roll Pizza thin base Pizza thick base Baking smaller items Buns Puff pastry Meringues 2 2 2 3 2 2 2 3 3 2 3 2 3 3 3 170 180 160 180 170 180 170 180 160 180 210 220 170 180 160 170 180 200 220 240 190 210 160 170 180 190 90 110 60 80 65 80 20 30 30 40 40 60 50 60 35 60 30 40 10 15 10 15 30 50 10 30 18 25 80 90 CAKE TYPE BAKING TIME ...

Page 25: ...owest level of the oven it is advisable to turn the meat over at least once during the roasting time and during roasting you should also baste the meat with its juices or with hot salty water do not pour cold water over the meat TABLE 1A Cakes Oven functions cake bottom and top heaters fan 80 150 150 150 150 150 150 150 60 70 65 70 60 70 25 35 40 45 30 45 40 55 30 40 BAKING TYPE TEMPERATURE C BAKI...

Page 26: ...s advisable to roast meat in heatproof ovenware BEEF Roast beef or fillet rare oven warmed up juicy medium oven warmed up well done oven warmed up Roast joint PORK Roast joint Ham Fillet VEAL LAMB VENISON POULTRY Chicken Goose approx 2 kg FISH 3 3 3 2 2 2 3 2 2 2 2 2 2 250 250 210 230 200 220 200 210 200 210 210 230 200 210 200 220 200 220 220 250 190 200 210 220 per 1 cm 12 15 15 25 25 30 120 140...

Page 27: ...4 4 3 4 4 4 4 3 4 3 4 250 250 250 250 250 250 250 250 250 250 250 250 250 8 10 10 12 7 8 8 10 12 15 8 10 6 8 8 10 10 12 25 30 6 7 5 8 2 3 6 8 6 8 6 7 8 10 10 12 6 8 5 6 6 8 8 10 20 25 5 6 5 7 2 3 SIDE 1 SIDE 2 TYPE OF DISH BAKING IN THE OVEN PRACTICAL HINTS During baking you should turn the meat over periodically as well as basting it with its juices or with hot salty water Caution The figures giv...

Page 28: ...y 1 0 1 5 2 0 2 0 1 0 1 0 2 0 3 0 2 0 3 0 2 2 2 2 2 2 1 2 2 2 1 2 170 190 170 190 170 190 170 190 180 200 180 200 170 190 140 160 180 200 160 180 80 100 100 120 120 140 90 110 30 40 50 60 85 90 110 130 110 130 150 180 LEVEL FROM THE BOTTOM TEMPERATURE C BAKING MINUTES WEIGHT kg TYPE OF MEAT Oven functions grill fan Caution The figures given in Tables are approximate and can be adapted based on you...

Page 29: ...aution Burner elements must always be clean Water particles may hamper gas flow and produce an incorrect burner flame Wash enamel elements of the cooker with light washing products When cleaning do not use cleaning agents with a strong abbrasive effect such as scouring pow ders containing an abrasive abrasive compounds abrasive stones pumice stones wire brushes and so on Before you start using the...

Page 30: ...ve materials for the cleaning and maintenance of the glass front panel Oven The oven should be cleaned after every use When cleaning the oven the lighting should be switched on to enable you to see the surfaces better The oven chamber should only be washed with warm water and a small amount of washing up liquid Steam cleaning pour 250ml of water 1 glass into a bowl placed in the oven on the first ...

Page 31: ...the safety catch should be carefully lowered down again If the safety catch is not set it may cause damage to the hinge when closing the door Removal of the internal glass panel Removing the inner panel 1 Use a cross head screwdriver to turn the side clamp bolts loose fig A 2 Push the clamps off with a flat screw driver Pull the upper door slat loose fig A B 3 Pull the inner glass panel from its s...

Page 32: ...upply soiled greasy gas ignitor knob not pressed in long enough knob released too quickly break in power supply the bulb is loose or dama ged ACTION close the gas by cutting off valve close burner knobs air the room take out and clean the burner blow on flame openings check the household fuse box if there is a blown fuse replace it with a new one open the gas supply valve clean the gas ignitor hol...

Page 33: ...symbol and the Declaration of Conformity has been issued to the manufacturer and is available to the competent authorities regulating the market Electrical supply 220 240V 50Hz Warmng This cooker must be earthed Maximum load 2 9 kW Appliance category GB II2H3 Hob small burner 1 0 kW medium burner x2 1 8 kW large burner 2 8 kW Oven bottom heater 1 3 kW top heater 0 9 kW grill 2 0 kW Usable capacity...

Page 34: ...34 ...

Page 35: ...35 ...

Page 36: ......

Reviews: