ameriwoodhome.com
STEP
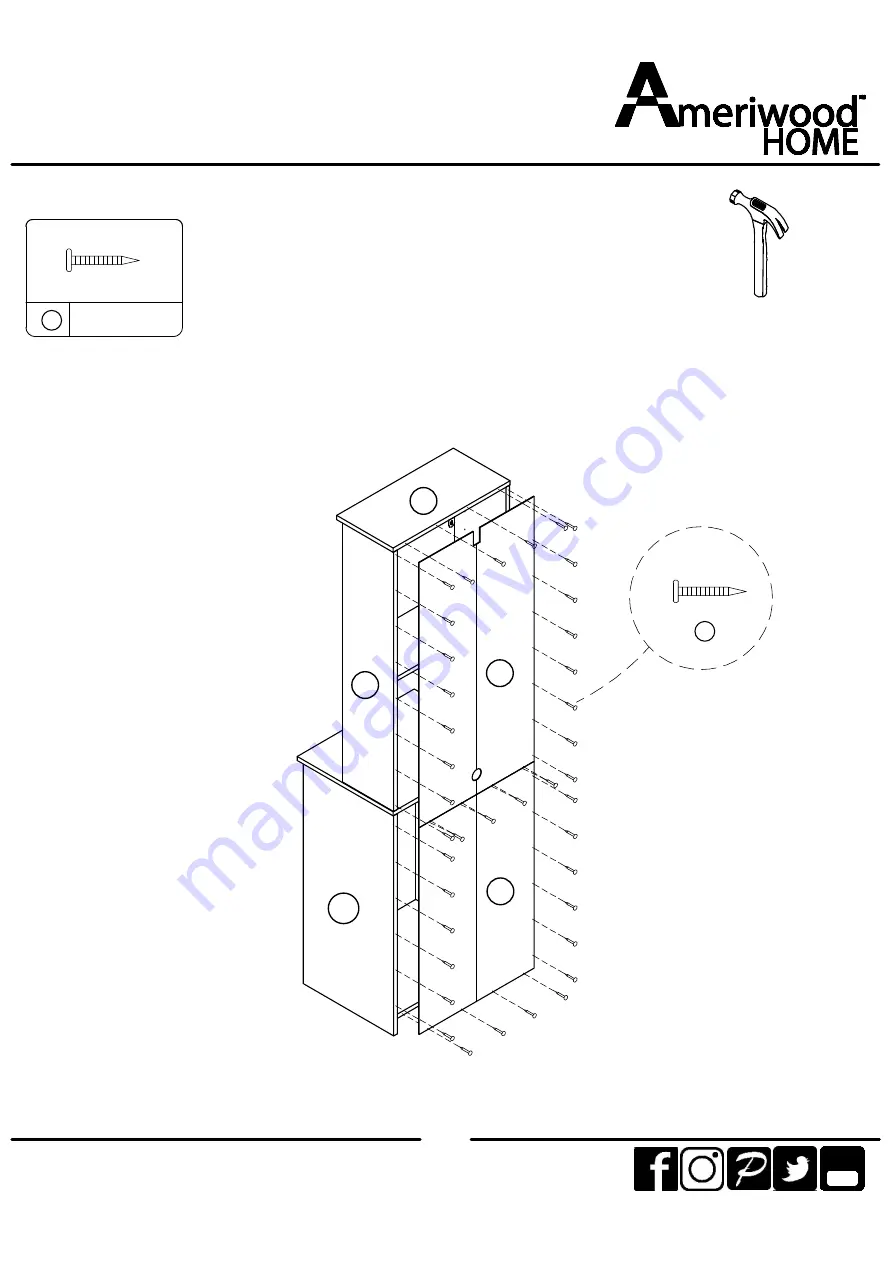
14
7
Tube
You
7.1 Attach (N), (O) into (A), (B), (C), (E), (F) and (D) with (5) as illustrated.
F
C
A
N
O
5
×44
Page 1: ...NING THIS INSTRUCTION BOOKLET CONTAINS IMPORTANT SAFETY INFORMATION PLEASE READ AND KEEP FOR FUTURE REFERENCE Do Not Return This Product Contact our customer service team for help first Call 1 800 489 3351 toll free Monday Friday 9am 5pm CST Visit www ameriwoodhome com Follow Ameriwood Home Date of Purchase ___ ___ ___ Lot Number 9981015COM COFFEE BAR Tube You Assembly Difficulty Meter Easy Tough ...
Page 2: ...ghtly tapped in with a hammer Slides are labeled with a R right and L left for proper placement Make sure to always face the point on the top of the Cam Lock towards the outer edge Use all the nails provided for the back panel and spread them out equally Back panel must be used to make sure your unit is sturdy Do NOT use harsh chemicals or abrasive cleaners on this item Never push pull or drag you...
Page 3: ...cess Have the following tools Flat Head Screwdriver 2 Phillips Head Screwdriver and Hammer Caution If using a power drill or power screwdriver for screwing please be aware to slow down and stop when screw is tight Failure to do so may result in stripping the screw P Before You Start Cam Lock Fastening System This Cam Lock Fastening System will be used throughout the assembly process 1 3 2 4 Tube Y...
Page 4: ...HUTCH RIGHT PANEL T9981015030GO QTY 1 PC D HUTCH TOP T9981015010GO QTY 1 PC TOP T9981015040GO QTY 1 PC E LEFT PANEL T9981015050GO QTY 1 PC RIGHT PANEL T9981015060GO QTY 1 PC F G UPPER ADJ SHELF T9981015070GO QTY 1 PC UPPER DIVIDER T9981015080GO QTY 1 PC UPPER DOOR T9981015090GO QTY 1 PC I B Tube You H ...
Page 5: ...oodhome com 5 Tube You LOWER ADJ SHELF T9981015100GO QTY 1 PC J BOTTOM T9981015110GO QTY 1 PC LOWER DOOR T9981015130GO QTY 1 PC K KICK T9981015120GO QTY 1 PC L M UPPER BACK PANEL T9981015140GO QTY 1 PC LOWER BACK PANEL T9981015150GO QTY 1 PC N O ...
Page 6: ...Board Identification Not actual size ameriwoodhome com 6 Tube You A C B D E F G H I J K L M N O ...
Page 7: ...2 x 45mm Ø8 x 30mm Ø15 x 12mm 1 3 5 Tube You 18 Ø6 x 25mm CAM BOLT TGO2001 2 x1 Ø4 2 x 13mm SCREW TGO1304 1 SCREW TGO1314 7 8 Ø4 2 x 28mm Not Actual Size 1 9 WALL ANCHOR TGO6501 Ø6 x 30mm 1 10 WALL BRACKET TGO3502 30x50x20mm 12 11 COVER TGO2219 Ø 20mm 4 Ø3 5 x 14mm 24 6 SCREW TGO1005 8 SHELF SUPPORT TGO2810 2 13 KNOB TGO5515 4 15 DOOR HINGE TGO4312 12 2 14 BOLT TGO1608 M4x19 ...
Page 8: ...ameriwoodhome com STEP 8 1 1 1 Insert 3 into H L and K as illustrated 1 2 Attach 10 into A with 7 as illustrated 1 3 Attach 2 into A D as illustrated Tube You 3 8 1 7 1 10 10 7 A H K L 3 8 2 2 2 D ...
Page 9: ...ameriwoodhome com STEP 9 2 2 1 Insert 3 into B C E and F as illustrated 2 2 Attach 2 into B C E and F as illustrated Tube You 10 2 3 8 B C E F 2 3 2 ...
Page 10: ...tach H into B C with 1 as illustrated 3 2 Attach A into B C with 1 as illustrated Tube You FINISHED EDGE B B C C H H A 1 11 1 8 11 8 Proper orientation of CAM LOCK Tip Quick Assembly UNLOCK LOCK FINISHED EDGE FINISHED EDGE FINISHED EDGE ...
Page 11: ...ameriwoodhome com STEP 11 4 4 1 Attach D into B and C with 4 as illustrated Tube You 4 4 4 B C H A D FINISHED EDGE FINISHED EDGE FINISHED EDGE ...
Page 12: ...TEP 12 5 5 1 Insert L into K as illustrated 5 2 Attach L K into E F with 1 as illustrated Tube You 1 6 Proper orientation of CAM LOCK Tip Quick Assembly UNLOCK LOCK L K K L E F 1 FINISHED EDGE FINISHED EDGE FINISHED EDGE ...
Page 13: ...ameriwoodhome com STEP 13 6 Tube You 6 1 Attach D into F E with 1 as illustrated E F D 1 4 11 4 1 11 FINISHED EDGE FINISHED EDGE ...
Page 14: ...ameriwoodhome com STEP 14 7 Tube You 7 1 Attach N O into A B C E F and D with 5 as illustrated F C A N O 5 44 5 ...
Page 15: ...ameriwoodhome com STEP 15 8 Tube You 8 1 Insert 12 into B C D and F as illustrated 8 2 Put G and J as illustrated 8 3 Attach 15 into I M with 6 as illustrated G J 12 12 8 15 4 6 8 I M 15 6 B E C F ...
Page 16: ...OR 6 16 13 14 13 2 14 2 6 B E C F C F E B 9 1 Attach 13 into I and M with 14 as illustrated 9 2 Attach I and 15 into C or B with 6 as illustrated 9 3 Attach M and 15 into E or F with 6 as illustrated I I M M 15 Note This is reversible door ...
Page 17: ...sont habituellement dans des fentes afin de vous permettre de les vis après l ajustement To adjust side ways Turning the screw C on BOTH hinges on each door Para ajustar los lados marcados Gire los tornillos C de ambas bisagras en cada puerta Pour régler latéralement Tournez la vis C sur les DEUX charnières de chaque porte To adjust the vertical height Loosen screw B and adjust door if the door ca...
Page 18: ...W THESE INSTRUCTIONS TO INSTALL THE ANTI TIPPING SAFETY BRACKET PROVIDED WITH THIS PRODUCT OPTION 1 Attachment into a wall stud preferred method Using a stud finder locate a stud in the wall Place your unit against the wall with the safety bracket 10 aligned in this location To make driving the screw easier you can drill a 1 8 diameter pilot hole 3mm through the safety bracket 10 into the stud Dri...
Page 19: ...reet South Wright City MO 63390 636 745 3351 4 Site of Manufacture Binh Duong Viet Nam 5 See front page of instruction manual for date of manufacture This unit has been designed to support the maximum loads shown Exceeding these load limits could cause sagging instability product collapse and or serious injury ameriwoodhome com 19 Tube You Warning Risk of injury to persons do not place a televisio...
Page 20: ... and discount codes Quick and easy replacement part service To register your product visit ameriwoodhome com Visit your local retailer s website rate your purchased product and leave us some feedback We would like to extend a big Thank You to all of our customers for taking the time to assemble this Ameriwood Home product and to give us your valuable feedback Tube You ...
Page 21: ...arquées d un R droit et d un L gauche pour un bon placement Assurez vous toujours de faire face la pointe situé sur le haut de la Serrure de Came vers le bord extérieur Utiliser tous les clous fournis pour le panneau arrière et les répartir également Le panneau arrière doit être utilisé pour vous assurer que votre appareil est robuste N utilisez pas de produits chimiques agressifs ou de nettoyants...
Page 22: ...d étagère 13 Bouton 14 Boulon 15 Charnière de porte Page 8 1 1 Insérez 3 dans H L et K comme illustré 1 2 Fixez 10 dans A avec 7 comme illustré 1 3 Fixez 2 dans A D comme illustré Page 9 2 1 Insérez 3 dans B C E et F comme illustré 2 2 Fixez 2 dans B C E et F comme illustré Page 10 3 1 Fixez H dans B C avec 1 comme illustré 3 2 Fixez A dans B C avec 1 comme illustré Page 11 4 1 Fixez D dans B et C...
Page 23: ...portes ou aux étagères N ouvrez jamais plus d un tiroir à la fois L utilisation de restarints de renversement peut seulement réduire mais pas éliminer le risque de renversement OPTION 1 Fixation dans un poteau mural méthode préférée À l aide d un détecteur de montants localisez un montant dans le mur Placez votre appareil contre le mur le support de sécurité 10 étant aligné à cet endroit Pour faci...
Page 24: ...evoir les éléments suivantes Détails sur les nouvelles tendances un aperçu sur les nouveautés Sondages avoir une voix au sein de notre communauté Offres exclusives et codes promo Service de pièces de rechange rapide et facile Pour enregistrer votre produit visitez ameriwoodhome com 5 Étoiles Visitez le site Web de votre détaillant local évaluez votre produit acheté et laissez nous quelques comment...
Page 25: ...s con una R derecha y L izquierda para la colocación correcta Asegúrese de que siempre este el punto locaizado en la parte superior de bloqueador de leva este volteadohacia borde exterior Utilizar todos los clavos para el panel de atras y distribuirlos por igual El panel de atras debe utilizarse para asegurarse de que la unidad quede fija y firme No use quimicas fuertes ni limpiadores abrasivos en...
Page 26: ...o se ilustra Página 15 8 1 Inserte 12 en B C D y F como se ilustra 8 2 Ponga G y J como se ilustra 8 3 Adjunte 15 a I M con 6 como se ilustra Tube You Página 7 Lista de Tamaño real 1 Bloqueo de la leva 2 Perno de leva 3 Taco de madera 4 Tornillo 5 Uña 6 Tornillo 7 Tornillo 8 Tornillo 9 Ancla de pared 10 Soporte de pared 11 Cubrir 12 Soporte de estante 13 Mando 14 Tornillo 15 Bisagra de la puerta P...
Page 27: ... que los niños trepen o colgar en cajones puertas o estantes Nunca abra más de un cajón a la vez El uso de restricciones de vuelco solo puede reducir pero no eliminar el riesgo de vuelco OPCIÓN 1 Fijación en un montante de pared método preferido Usando un buscador de montantes ubique un montante en la pared Coloque su unidad contra la pared con el soporte de seguridad 10 alineado en esta ubicación...
Page 28: ...guiente Detalles de nuevas tendencias Vistazo a lo nuevo Encuestas alec su voz entre su comunidad Códigos de ofertas y descuentos exclusivos Fácil y rápido servicio de partes de remplace Para registrar su producto visite ameriwoodhome com Clasificasión de 5 estrellas Visite el sitio web de su tienda local califique su comprado y denos sus comentarios Nos gustaría enviar un gran Agradecimiento a to...