13
B345984303WCOM
0
19 /25
11
12
x 8
x 4
M
J
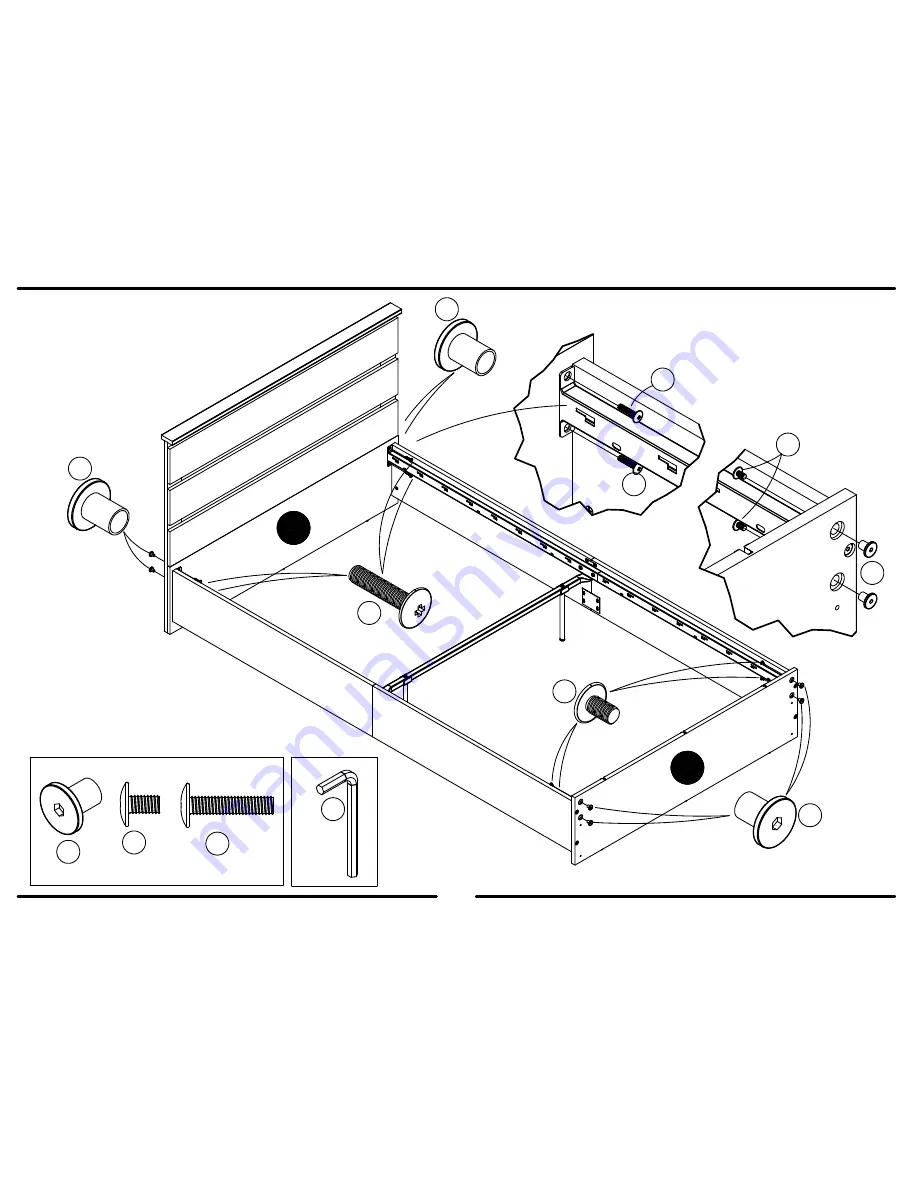
Fasten the bolts (12&13) snug, but do
not overtighten
21
Page 1: ...to have an extra hand Estimated assembly time is 2 hours Se localizan las traducciones espa olas en el centro de este manual THIS INSTRUCTION BOOKLET CONTAINS IMPORTANT SAFETY INFORMATION PLEASE READ...
Page 2: ......
Page 3: ...RD UPPER PANEL 35984303080 1 H HEADBOARD CENTER PANEL 35984303090 1 I HEADBOARD LOWER PANEL 35984303100 1 J HEADBOARD SLAT 35984303110 3 K FOOTBOARD TOP 35984303120 1 L FOOTBOARD 35984303130 1 M FOOTB...
Page 4: ...oss bar A97020 4 Qty 16 leg A97020 5 Qty 2 14b 14c 14d 14e 14f 14g 14h 14i 1 4 20 x 1 1 4 bolt A97020 6 Qty 2 hex key A97020 9 Qty 1 locking clip A97020 8 Qty 32 1 4 20 x 5 8 bolt A97020 7 Qty 6 Metal...
Page 5: ...820 Qty 2 1 2 screw A12210 Qty 12 7 1 screw A12810 Qty 22 9 10 connector bolt A22910 Qty 5 connector A22920 Qty 5 1 4 20 x 1 2 barrel nut A20640 Qty 8 1 4 20 x 3 8 bolt A19170 Qty 4 1 4 20 x 1 bolt A1...
Page 6: ...funciona Lock Apretar Titu s Titu s T it u s Cross dowel fastening system Sistema de fijaci n de la clavija transversal Long slot points toward bolt La ranura larga apunta hacia perno Caution If usin...
Page 7: ...cabado finished edge borde acabado 3 Insert two wood dowels 3 into the end holes and press the side A and side B together After pressing the sides A B together secure together with connecting plate 19...
Page 8: ...2 B345984303WCOM0 8 25 2 x 2 x 2 x 2 You will need to tap the connector 10 with a hammer to fully insert Be sure the connector is positioned as shown before pushing into holes 9 10 2 2 9 10 10 G H...
Page 9: ...ats K as shown Using screws 8 attach the headboard upper panel H and headboard center panel I as shown DO NOT fully tighten the screws in this step End View Vista Lateral K K K K K K K K K H H I I raw...
Page 10: ...E F are flush with the edge of the headboard slats K Attach the left and right headboard panels E F to the headboard slats K with screws 8 as shown Do not overtighten screws Now tighten the screws tha...
Page 11: ...x 2 x 2 proper orientation posici n correcta proper orientation of cam lock posici n correcta de la cerradura de leva 1 1 3 3 Insert a cam lock 1 and wood dowel 3 into both the left and right headboa...
Page 12: ...he headboard panels E F and headboard upper panel H Turn the cam locks 1 clockwise to lock in place Turn the screw in the center of the connectors 10 clockwise to lock in place 1 1 10 After connector...
Page 13: ...will need to tap the connector 10 with a hammer to fully insert Be sure the connector is positioned as shown before pushing into holes 10 M L x 6 J raw edge borde crudo Hammer three tack glides 18 int...
Page 14: ...16 16 16 M M M With the help of another person attach the footboard M to the sides A B as shown using four cross dowel bolts 15 and fasteners 16 Fasten the bolts 15 snug but do not overtighten Refer t...
Page 15: ...rom step 6 and headboard lower panel J to the sides A B as shown using four cross dowel bolts 17 and fasteners 16 Fasten the bolts 17 snug but do not overtighten Refer to page 6 for the cross dowel fa...
Page 16: ...4g 14g x2 Notice hole locations Notice DO NOT fully tighten these bolts 14g Leave loose for now x 4 Attach rail A 14a and rail B 14b together with bolts 14g as shown You will repeat this two times Ref...
Page 17: ...11 B345984303WCOM0 17 25 14f 14i 14c 14e x 2 14e 14e 14c 14f 14f...
Page 18: ...12 B345984303WCOM0 18 25 14g 14i x 2 14a 14b 14a 14b 14g 14g 14e 14c 14e slots on the inside of the frame Notice DO NOT fully tighten bolts 14g Leave loose for now...
Page 19: ...13 B345984303WCOM0 19 25 11 12 13 x 8 x 4 x 4 13 11 13 13 11 11 12 12 11 M J Fasten the bolts 12 13 snug but do not overtighten 21...
Page 20: ...he frame to the sides A B with screws 5 as shown Do not overtighten the screws 5 silver A B A B 14h For locations shown only insert cross bar 14d into the left side insert right end of cross bar into...
Page 21: ...15 B345984303WCOM0 21 25 4 black 4 x 4 M N N N N Screw into groove in molding Do not overtighten screws 4...
Page 22: ...op L onto footboard panel M so the connector bolts 9 engage the connectors 10 Turn the screw in the center of the connectors 10 clockwise to lock in place 10 After connector bolt 9 engages connector 1...
Page 23: ...4h Insert cross bar 14d into the left side insert right end of cross bar into the right side Slide horizontal and then press down Repeat for all other cross bars 14d Press in locking clips 14h to hold...
Page 24: ...serious injury Your bed is now ready for your mattress Visit our website or call our toll free number for any assistance you should need www Ameriwood com parts 1 800 489 3351 Clean the product with...
Page 25: ...ction manual 2 This certificate applies to compliance of this product with the CPSC Ban on Lead Containing Paint 16 CFR 1303 3 This product is distributed by Dorel Home Furnishings Inc 410 East First...