Ameriwood HOME 1851335W Assembly Manual Download Page 18

9

B341851335W0

0

14 /19 

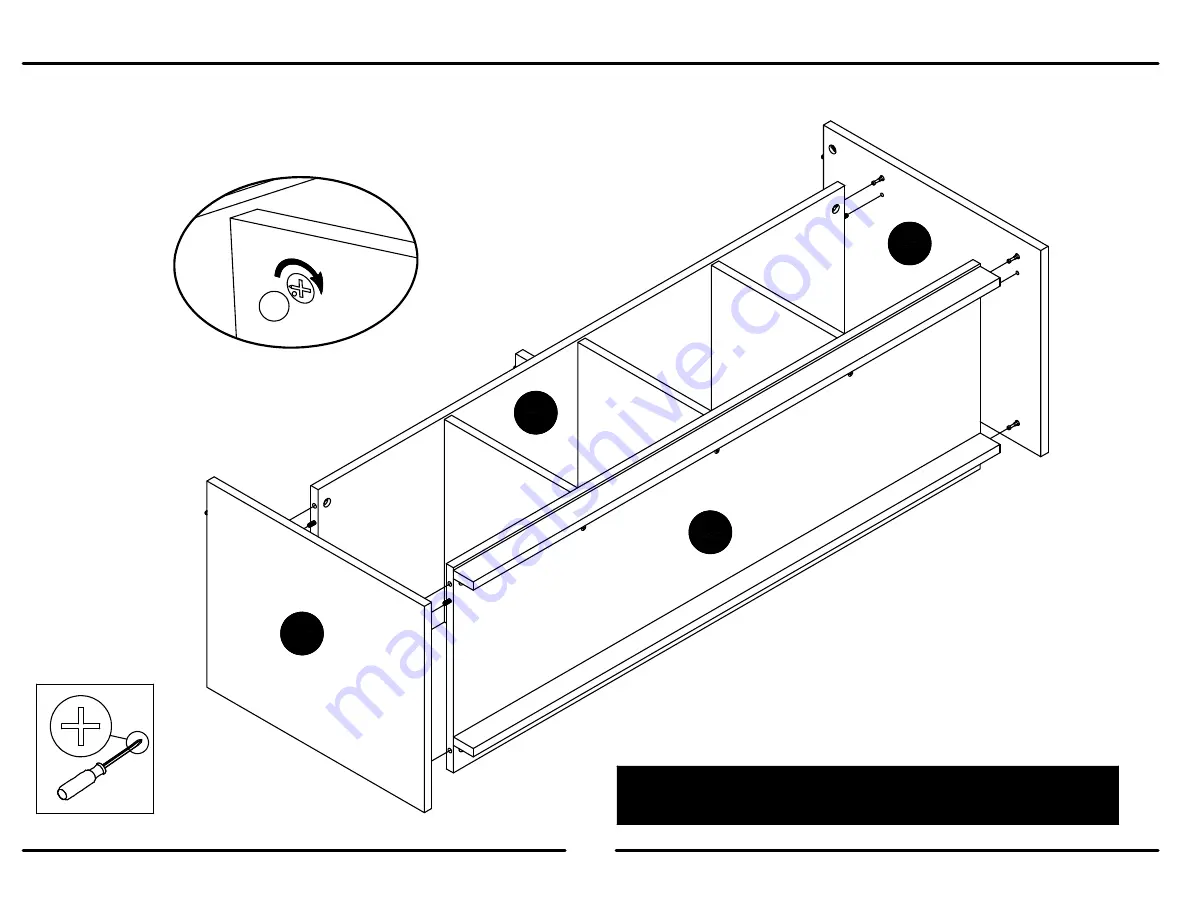
Fasten the Left Panel (A) and Right Panel (B) to the Shelf (F) and Bottom (G), and tighten cam locks.

A

B

F

G

all finished edges are facing upwards

todos los bordes acabadas estén mirando hacia arriba

LOCK

APRETAR

T

itu

s

2

x8

Summary of Contents for 1851335W

Page 1: ...ssembly manual ready DO NOT RETURN PRODUCT TO THE STORE Individual stores do not stock parts or call toll free Recommended of people needed for assembly 1 however it is always better to have an extra...

Page 2: ......

Page 3: ...31851335050 1 E SHELF 31851335060 1 F BOTTOM 31851335070 1 G KICK PANEL 31851335080 2 H BACK PANEL K185133500 1 I Parts shown are the base cabinet of your model Please note most parts are labeled with...

Page 4: ...ock A22570 Qty 12 cam bolt A22510 Qty 12 1 2 pan screw A12210 Qty 16 wood dowel A21660 Qty 14 angle bracket A53600 Qty 8 nail A21110 Qty 40 1 3 4 flat screw A13410 Qty 8 HARDWARE COMPARTMENT LAYOUT 1...

Page 5: ...works Esta ilustraci n muestra el sistema de fijaci n de leva y como funciona Lock Apretar Tit us Tit us T it u s Caution If using a power drill or power screwdriver for screwing please be aware to sl...

Page 6: ...6 19 Screw four Cam Bolts 1 into the Left Panel A Insert two Cam Locks 2 and tap one Wood Dowel 5 into the Left Panel A x4 1 x1 2 x2 A 1 2 proper orientation of cam lock posici n correcta de la cerrad...

Page 7: ...19 proper orientation of cam lock posici n correcta de la cerradura de leva 1 2 x4 x1 x2 1 Screw four Cam Bolts 1 into the Right Panel B Insert two Cam Locks 2 and tap one Wood Dowel 5 into the Right...

Page 8: ...3 B341851335W00 8 19 x4 Screw four Cam Bolts 1 into the Top E 1 1 E...

Page 9: ...Insert four Cam Locks 2 and tap two Wood Dowels 5 into the Shelf F 2 proper orientation of cam lock posici n correcta de la cerradura de leva proper orientation of cam lock posici n correcta de la cer...

Page 10: ...anels H to the Bottom G with Angle Brackets 4 and Screws 3 5 x2 x16 x8 G H 5 5 4 4 3 3 3 x4 proper orientation of cam lock posici n correcta de la cerradura de leva proper orientation of cam lock posi...

Page 11: ...ciosa preferentemente en una alfombra cerca del lugar la unidad se usar Tenga las herramientas siguientes cerrar a mano No use las herramientas de poder para congregar su mobiliario Las herramientas d...

Page 12: ...valido en U S y Canada PAGINA 3 Piezas mostradas son la base del gabinete de su modelo Tenga en cuenta las mismas partes se etiquetan con una etiqueta engomada y algunas partes tienen una carta impre...

Page 13: ...y Tornillos 3 PASO 6 Toque una Clavija de Madera 5 dentro el Partici n Superior C y cada Partici n D PASO 7 Fijar el Partici n Superior C al Estante F con los Tornillos 6 PASO 8 Fijar las Partici nes...

Page 14: ...e ocultar la etiqueta Despegue el respaldo y aplique la etiqueta como se muestra NOTA esta es una etiqueta permanente destinada a durar por la vida til del producto Una vez aplicado no intente elimina...

Page 15: ...6 B341851335W00 11 19 Tap a Wood Dowel 5 into the Upper Partition C and each Partition D 5 5 x8 x3 C D...

Page 16: ...7 B341851335W00 12 19 Fasten the Upper Partition C to the Shelf F with Screws 6 x2 all finished edges are facing upwards todos los bordes acabadas est n mirando hacia arriba C F 6 6...

Page 17: ...asten the Partitions D to the Shelf F with the Wood Dowels Fasten the Bottom G to the Partitions D with Screws 6 x6 6 6 x6 G D D D F all finished edges are facing upwards todos los bordes acabadas est...

Page 18: ...19 Fasten the Left Panel A and Right Panel B to the Shelf F and Bottom G and tighten cam locks A B F G all finished edges are facing upwards todos los bordes acabadas est n mirando hacia arriba LOCK...

Page 19: ...19 Fasten the Top E to the Left Panel A Right Panel B and Upper Partition C and tighten cam locks all finished edges are facing upwards todos los bordes acabadas est n mirando hacia arriba LOCK APRETA...

Page 20: ...is attached securely WARNING Por favor aseg rese que el Panel Trasero se atan firmemente Todos los clavos deben manejarse en las partes recto y centro El fracaso para hacer para que podr a causar ine...

Page 21: ...uld be able to read the label when the TV is removed from the unit When the TV is in place it should hide the label Peel off the backing and apply the label as shown NOTE this is a permanent label int...

Page 22: ...port the maximum loads shown Exceeding these load limits could cause unit sagging instability product collapse and or serious injury Additional parts are available for a nominal fee 1 800 489 3351 www...

Page 23: ...ion manual 2 This certificate applies to compliance of this product with the CPSC Ban on Lead Containing Paint 16 CFR 1303 3 This product is distributed by Dorel Home Furnishings Inc 410 East First St...

Reviews: