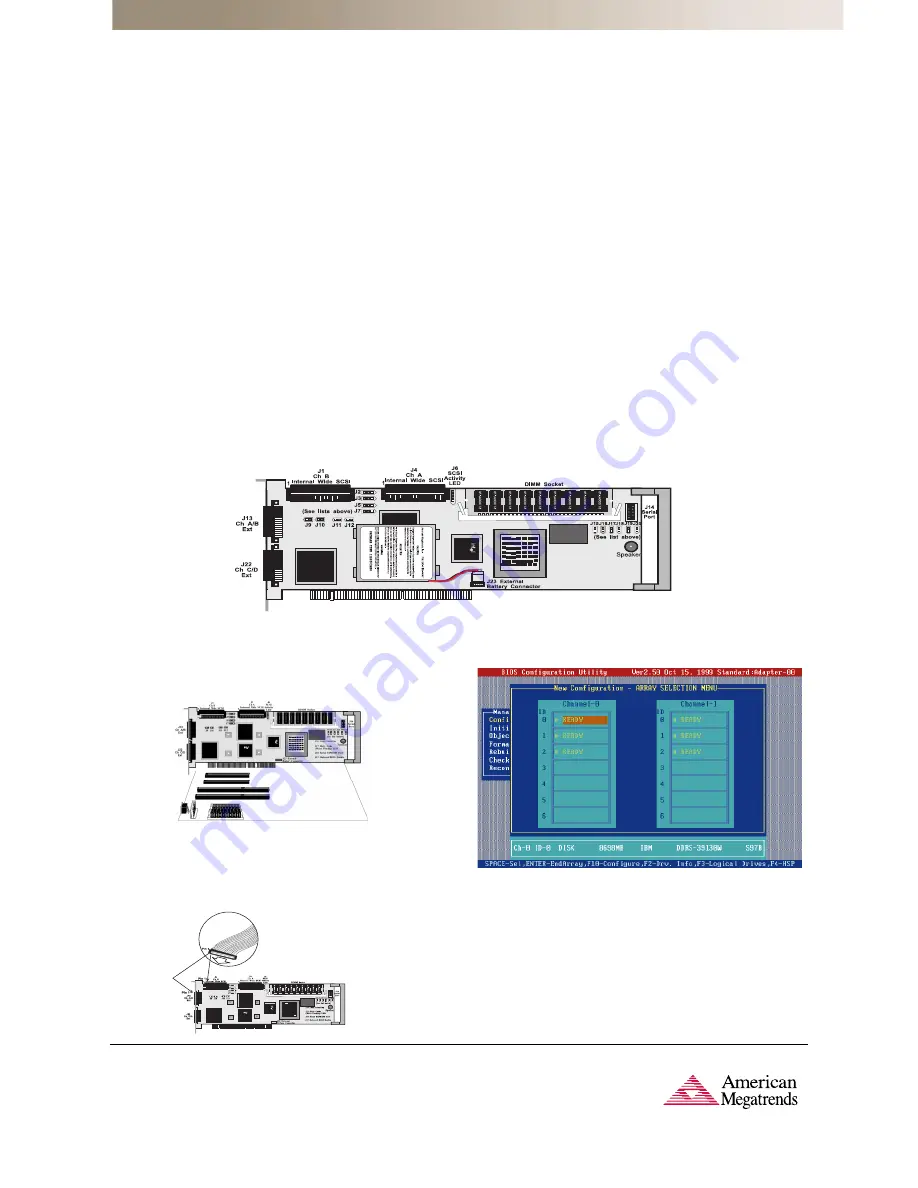
MegaRAID Enterprise 1600 Card Layout
Step 10 - Connect the SCSI Cables to the SCSI Devices
Connect the SCSI cables to the SCSI devices. The MegaRAID Enterprise 1600
controller provides two types of connectors: two internal high-density 68-pin
SCSI connectors and four external ultra high-density 68-pin SCSI connectors.
Offset connectors are needed for external connectors if stacked.
Step 11 - Set Target IDs
Set target identifiers (TIDs) on the SCSI devices. Each device in a specific SCSI
channel must have a unique TID in that channel. Non-disk devices, such as CD-ROM
or tape drives, should have unique SCSI IDs regardless of the channel to which they
are connected.
Step 12 - Power Up
Replace the computer cover and reconnect the AC power cords. Turn power on to
the host computer. Set up the power supplies so the SCSI devices are powered up
at the same time as or before the host computer. If the computer is powered up
before a SCSI device, the device might not be recognized.
During boot, the MegaRAID Enterprise 1600 BIOS message appears:
MegaRAID Enterprise 1600 Disk Array Adapter BIOS Version
x.xx date
Copyright (C) American Megatrends, Inc.
Firmware Initializing . . . [Scanning SCSI Device ...(etc)... ]
The firmware takes several seconds to initialize. During this time the adapter will
scan each SCSI channel. When it is ready, the following lines will appear:
host Adapter-1 Firmware Version
x.xx date DRAM Size 8 MB
0 Logical Drives found on the Host Adapter
0 Logical Drives handled by BIOS
Press <Ctrl><M> to run MegaRAID Enterprise 1600 BIOS Configuration
Utility
The <Ctrl> <M> prompt times out after several seconds.
The MegaRAID Enterprise 1600 host adapter (controller) number, firmware version
and cache DRAM size are displayed in the second portion of the BIOS message. The
numbering of the controllers follows the PCI slot scanning order used by the host
motherboard.
Step 5 - Set Jumpers
Make sure the jumper settings on the MegaRAID Enterprise 1600 card are correct.
Jumper setting details can be found in the
Enterprise 1600 Hardware Guide
.
Step 6 - Set SCSI Termination
Each MegaRAID SCSI channel can be individually configured for termination enable
mode by setting the J2, J3, J5 and J7 jumpers.
You must terminate the SCSI bus properly. Set termination at both ends of the SCSI
cable. The SCSI bus is an electrical transmission line and must be terminated
properly to minimize reflections and losses. Typical configuration is to set the
Termination Enable jumpers to allow software to set termination automatically.
Note:
The default jumper settings on the controller for both Termination and
TermPWR normally do not need to be changed.
Step 7 - Set SCSI Terminator Power (TermPWR)
Important -
All MegaRAID Enterprise 1600 SCSI channels need TermPWR to operate.
If a channel is not being used, make sure the TermPWR jumper for that channel is
set to supply TermPWR from the PCI bus. Jumpers J9, J10, J11, and J12 control
TermPWR on the Enterprise 1600.
Step 8 - Connect the Battery Harness (Optional)
You can install a battery pack onto the Series 471 MegaRAID Enterprise 1600 160M
RAID controller. Call Technical Support at 770-246-8645 for more information.
Quick Hardware Installation Guide
Step 13 - Run MegaRAID Enterprise 1600 Configuration Utility
Press <Ctrl><M> or <Ctrl><H> to run the MegaRAID Enterprise 1600 Configuration
Utility. A screen such as the one shown below displays. See the
MegaRAID Configura-
tion Software Guide
for information about running MegaRAID Configuration Utility.
Step 14 - Installing Software Drivers for the Desired Operating
Systems
For driver installation procedures, please refer to the
MegaRAID Operating Systems
Drivers Guide
on the Drivers and Documentation CD.
w w w . a m i . c o m
AMI Corporate Headquarters
American Megatrends Inc.
6145-F Northbelt Parkway,
Norcross, GA 30071-2976
Sales (800)828-9264 • [email protected]
Main (770)246-8600 • Fax (770)246-8790
Germany:
Carl-Zeiss-Ring 7a
85737 Ismaning, Germany
Tel [49]89-9699-9510 • Fax [49]89-9699-9519
United Kingdom:
9th Floor Hayes Gate House
27 Uxbridge Road
Hayes, Middlesex UB4 OJN, U.K.
Tel [44]208-848-8686 • Fax [44]208-848-8588
Japan:
2-5-15 Sotokanda K Bld. 6F
Sotokanda Chiyoda-ku
Tokyo, 101, Japan
Tel [81]3-3526-9708 • Fax [81]3-3526-9701
Taiwan:
Suite A, Floor 6, No. 150
Tun Hwa N. Road
Taipei, Taiwan, R.O.C.
Tel [886]2-2716-0036 • Fax [886]2-2718-1121
Korea:
Suite 3F-B, 773-6,
Ryucksam-Dong, Kangnam-Ku
Seoul, 135-080, Korea
Tel [82]2-569-5689 • Fax: [82] 2-569-4689
© 2000 American Megatrends Inc. All rights reserved. Printed in the U.S.A.
Step 9 - Install the MegaRAID 1600 Card
The MegaRAID card can plug into a 32-bit or 64-bit PCI slot that receives 5 V and,
optionally, 3.3 V through the motherboard. Choose a PCI slot and align the Mega-
RAID controller card bus connector to the slot. Press down gently but firmly to make
sure that the card is properly seated in the slot. The bottom edge of the controller
card should be flush with the slot.
Insert the MegaRAID card in a PCI slot as
shown below:


