


4
6
CEMENT BOARD INSTALLATION
TIME REQUIRED
1-
3
HRS
apply silicone
diagram 4
We recommend the use of ½" thick cement board as your shower backer. This is a common backer for stone and tile.
Using this backer will help comply with almost all city codes. A product like WonderBoard
®
or HardieBacker
®
may be used if
it meets your local codes. Some codes may also require a vapor barrier to be installed. We recommend using a 6 mil.
plastic water/vapor barrier and should be installed prior to the cement board. To do this, staple plastic so that it hangs 1"
above the floor.
DO NOT USE AN ELASTOMERIC WATERPROOFING MEMBRANE ON YOUR CEMENT BOARD (such as RedGard)
. Roofing
nails may be used to attach the cement board instead of screws, to prevent the plastic from wrapping around the screws.
I
MPORTANT
: Walls must be solid, plumb, and square within ⅛" of true. Use your
cement board as an indicator of squareness. If you see gaps or areas where the
cement board is not fitting flush, fix the problem by removing the cement board
and shimming the boards until it’s square and flush. This kit is designed with some
allowances for minor alignment issues.
1.
2.
3.
Cut cement board to fit "
inside
" the metal flange. Sanding or shimming out the 2 x 4's
may be required to flush, level and square the cement board. (
dia. 5
)
Place a bead of 100% silicone on the front INSIDE face of the shower pan flange. The
bead should be in a zig-zag pattern.
(dia. 5)
Install the cement board against the studs and rest it inside the shower pan against
the metal flange. Attach the cement board to the studs with screws or nails.
DO NOT
screw or nail into the metal shower pan flange.
4. Continue installing the remaining cement board. It is best to seal all joints at the
same
time you silicone the wall panels in to place.
5. Clean the wall surface with a damp cloth to remove any dust, dirt, or any other
contaminants.
silicone
5
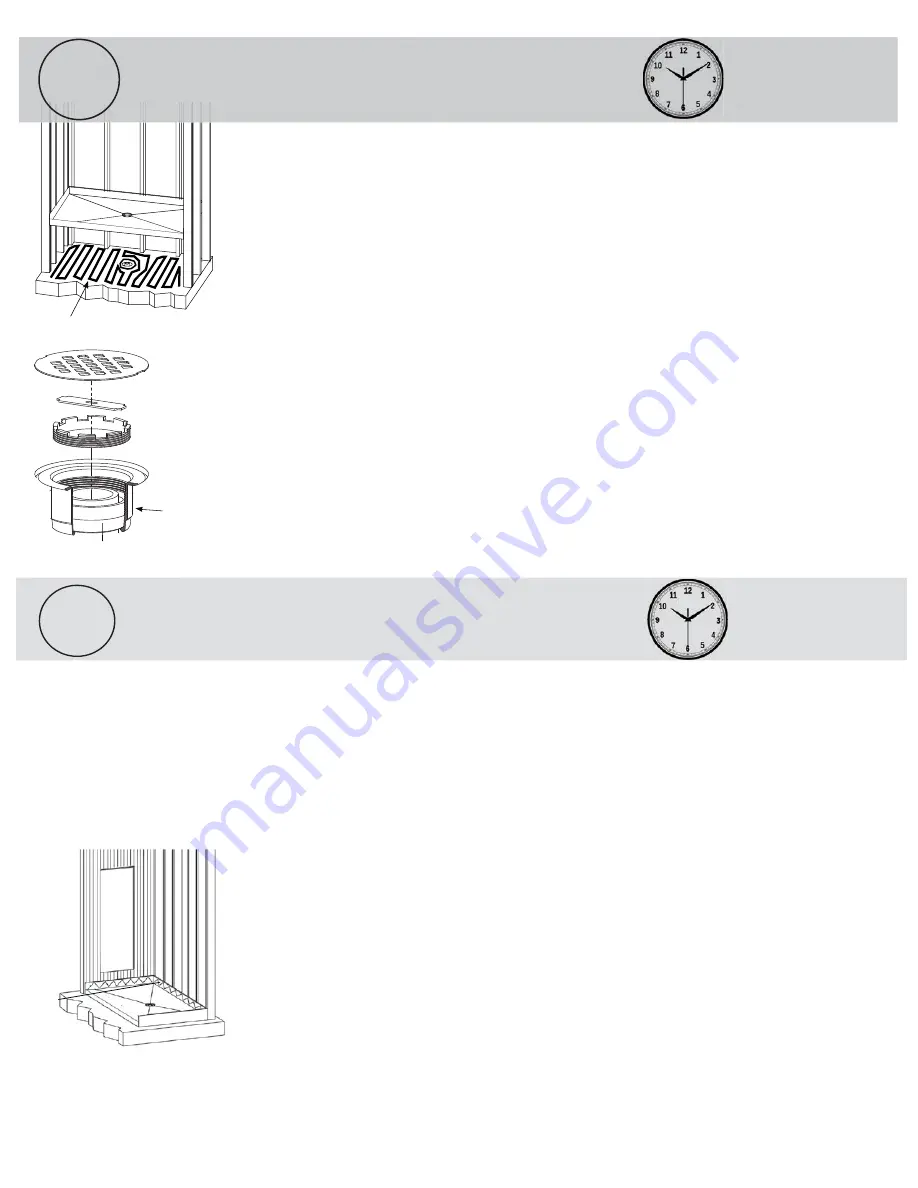
SETTING PAN
TIME REQUIRED
½ HR
cut out view
of drain
collar over
2" drain pipe
#1
trim plate
#2
drain tool
#3
pressure ring
#4
rubber seal
1.
Now that the drain is installed onto the pan and has dried, dry fit the pan and your drain
for alignment. Check to make sure the 2" drain pipe is in the center of the pan drain hole
and that the 2" drain pipe does not extend past the inside threads of the drain collar.
2.
Make sure the pan and drain fit level to the floor.
3.
Remove pan and apply 100% Silicone to floor. (
dia. 4
)
4.
Carefully lift the shower pan and set into place. Make sure the ABS pipe is still centered.
5.
6.
7.
Finish installing the drain assembly. Find the rubber seal #4 and slide onto the 2" ABS
pipe.
(You can use soapy water to help it slide down the pipe)
It should seat against the
bottom of the drain collar.
Next drop the pressure ring #3
into the drain collar and use the drain tool #2 and a flat
head screwdriver to screw it until it touches the rubber seal. Remove the drain tool
after the pressure ring is installed.
Test and snap that the decorative trim plate #1 sits into position. You may need to
adjust the tabs for a good fit.
(Remove the decorative trim plate and store in secure area
until installation is complete, drain will be grouted when shower is grouted)
After installing pan, cover with cardboard or drop cloth to protect pan from scuffs.
8.


