background image

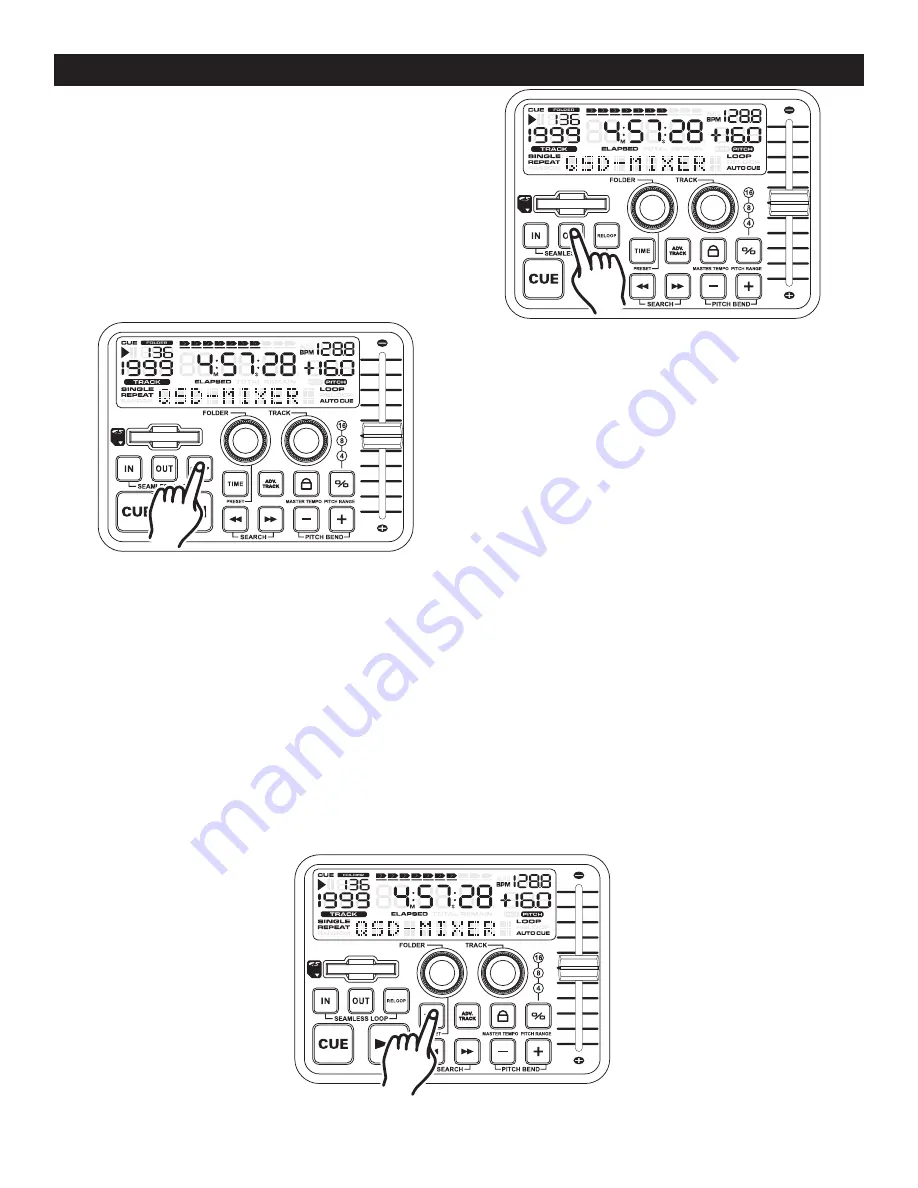
10. eXitinG a Loop

 - To exit a SEAMLESS 

LOOP,  press  the 

OUt  bUttOn  (35).

  The

  in 

bUttOn (35) 

and 

OUt bUttOn (35) 

LEDs will 

remain  on,  but  will  stop  flashing.  Music  play-
back will resume normal play (Figure 12). The 

in 

bUttOn (35) 

and 

OUt bUttOn (35) 

LEDs will 

remain on to remind you that a loop is stored.

Figure 12

11. repLaY Loop

 - The 

rELOOp (35)

 function allows 

you  to  return  to  your  stored  loop  at  any  time.  The

  in 

bUttOn  (35) 

and

  OUt  bUttOn  (35) 

LEDs  will  indicate 

a  loop  is  stored  in  memory,  and  may  be  played  at  any 
time.  To  replay  the  loop,  press  the

  rELOOp  bUttOn 

(35) 

(Figure 13)

.

 The

 in bUttOn (35) 

and 

OUt bUttOn 

(35) 

LEDs will again begin to flash indicating SEAMLESS 

LOOP mode has been activated and your stored loop will 
immediately begin to play. 

stutter effect:

 You can use your loop to create a stutter 

effect. When a loop is playing press the 

in bUttOn (35) 

repeatedly to create this effect.

Figure 13

©

American Audio

®

   -   www.americanaudio.us   -   Q-SD Instruction Manual Page 22

Q-SD                                                    SD PLAYER bASIC OPERATIONS (CONT.)

Figure 14

tiMe Bar inDicator 

- Details the time defined in the 

tiME MEtEr (46) 

as a visual bar icon. As with the 

tiME MEtEr (46) 

this bar is also dependent on the selected time function

.

 This bar will begin to flash when a 

track is ending regardless 

of which time func

t

i

on you are in. Use the flashing bar as a visual reminder that a 

track is ending.

12. chanGinG the tiMe DispLaY (46)\tiMe Bar (40):

DURINg NORMAL PLAYBACk, pressing the

 tiME bUttOn (32),

 will change the time display information (40  

& 46) in the

 LCd (10) 

see figure 14. The following is a break down of the time settings and their definitions: 

1)     eLapseD

 - This describes the time in the LCD (

46

) as the current TRACkS Elapsed running time. 

2)     reMain

 (48) - This describes the time in the LCD (

46

) as the current TRACkS remaining running time.  

Summary of Contents for Q-SD

Page 1: ...Q SD Q START MIXER SD CARD PLAYER EASY FAST RELIABLE 6122 S Eastern Ave Los Angeles Ca 90040 www AmericanAudio us User Guide and Reference Manual 1 08...

Page 2: ...l Voltage 2 Phono 4 Aux 4 Line 2 Mic Inputs SD Card Slot and Reader Reads 4GB Max Assign SD to any Channel Mini Plug Input for Mp3 Players 3 5mm Plug Q Start Compatible for use with American Audio CD...

Page 3: ...ANT OU UNE AUTRE SORTIE DE COURANT SAUF SI LES LAMES PEUVENT ETRE INSEREES A FOND SANS EN LAISSER AUCUNE PARTIE A DECOUVERT Q SD ELECTRICAL SAFETY PRECAUTIONS VOLTAGE SELECTOR switch Line Voltage Sele...

Page 4: ...ords should be routed so that they are not likely to be walked on or pinched by items placed upon or against them paying particular attention to cords at plugs conveniencereceptacles andthepointwhere...

Page 5: ...nce 7 Never disassemble or modify your unit in any way doing so will void your manufactures warranty Q SD SAFETY PRECAUTIONS 8 Never plug this mixer in to a dimmer pack 9 Do not let insecticides benze...

Page 6: ...y In the unlikely event your mixer may require service please contact American Audio customer support Do not discard the packing carton in the trash Please recycle when ever possible Q SD Introduction...

Page 7: ...allows you to connect either a 1 4 unbalanced jack or by a standard 3 pin XLR balanced connector The main mic also has an indepen dent volume control When feedback occurs when using the mic try loweri...

Page 8: ...This adjustment is used to adjust the audio source signal input gain for a channel Never use the gain control to adjust a channels output volume Setting the gain level properly will ensure a clean ou...

Page 9: ...the 12 o clock position 8 MASTER VOLUME LEVEL INDICATORS The dual MASTER LEVEL LED indicators are used to detail the master fader output level The meters will detail the output level of both the left...

Page 10: ...s the FADER Q START feature When in the ON position the FADER Q START automatically returns the CD player to the preset CUE POINT For example Assuming you have two compatible American Audio CD players...

Page 11: ...rease the amount of treble applied to the microphone signal turning the knob in a clockwise direction will increase the amount of treble applied to micro phone signal Microphone BASS control This knob...

Page 12: ...ER KNOB 37 if the next track you want to play is another folder or turn the TRACK KNOB 25 to search for the next track you want to play Press the TRACK KNOB 25 once you found your desired track The LC...

Page 13: ...E POINT is set The CUE but ton can be held down to momentarily play the CD When you release the CUE button it instantly returns to the CUE POINT 35 IN BUTTON cue ON THE FLY This function allows you to...

Page 14: ...ay the name of the track and album when a SD Card is loaded 48 elapsed Remain indicators When REMAIN is indicated in the LCD DISPLAY 10 the time described 46 in the LCD will define the current track s...

Page 15: ...vel instruments may only be connected to these jacks as long as the Line Level Selector Switch 55 is in the AUX 1 position Never connect line level instruments CD players tape decks etc to these jacks...

Page 16: ...ine 3 position to monitor any source connected to these jacks 62 CHANNEL 4 RCA LINE INPUT JACKS Do not connect turntables to these jacks These Jacks are used for line level inputs Connect CD players o...

Page 17: ...the included detachable power cord The power connection uses an I E C type connector use only the supplied polarized AC power cord Use only a power cord that matches this type of connection Be sure to...

Page 18: ...must be a regular SD Card The files must be Mp3 format When loading an SD Card into the player load with the SD Card label facing you To remove the card from the player gently press the card in until...

Page 19: ...point at which playback starts cue point will automatically be stored in the memory as the cue point The unit will return to this cue point the point at which playback started when the CUE BUTTON 34...

Page 20: ...ue point is the exact point playback will begin when the PLAY PAUSE BUTTON 33 is pressed A cue point may be created anywhere on a disc or in a track 1 You may press the IN BUTTON 35 on the fly while t...

Page 21: ...eate dramatic effect in your mixing This loop has no time limit and you could actually loop the entire length of the SD Card You create a seamless loop between two continuous points on a SD Card 2 Pre...

Page 22: ...er effect When a loop is playing press the IN BUTTON 35 repeatedly to create this effect Figure 13 American Audio www americanaudio us Q SD Instruction Manual Page 22 q sd SD Player BASIC OPERATIONS C...

Page 23: ...ill flash in the LCD Turn the FOLDER KNOB 37 to search for your desired folder Then turn the TRACK KNOB 25 to search for your desired track within the folder 2 Press the TRACK KNOB 25 to select your d...

Page 24: ...DER KNOB 37 for 2 secs to enter PRESET mode Figure 21 Figure 19 AUTO CUE Enter PRESET mode and then turn the FOLDER KNOB 37 until AUTO CUE is displayed Press the FOLDER KNOB 37 to toggle AUTO CUE betw...

Page 25: ...ER KNOB 37 until Q START is displayed Press the FOLDER KNOB 37 to toggle between Player A B or OFF Once you have selected press the FOLDER KNOB 37 to lock in your selection and exit PRESET mode Figure...

Page 26: ...DER PERCENTAGE RANGE on the next page This pitch adjustments will effect normal playback and loops only when the Pitch function is activated Figure 26 Figure 27 Activating the Pitch slider 26 To activ...

Page 27: ...continuously as in figure 31 the speed will increases and will continue to increase until it reaches a maximum of 16 speed gain When you release the Pitch bend button 29 the speed will automatically r...

Page 28: ...s can only be connected to the Phono Level RCA Jacks Be sure the Line Level SELECTOR Switches are in the PHONO position when using turntables Q SD typical mixer set up CASSETTE DECK TURNTABLE TURNTABL...

Page 29: ...e details a typical stereo output layout Note the use of the Balanced XLR Jacks on both the mixer and the amplifier Always use the balanced output jacks whenever possible The balanced output jacks sho...

Page 30: ...q start mixer q sd FLIP FLOP SET UP INSTRUCTIONS American Audio www americanaudio us Q SD Instruction Manual Page 30 After these connections are made please see the Flip Flop instructions in your Amer...

Page 31: ...hich means it may be replaced at any time even when power is applied Only replace with American Audio Part Feather Fader Plus Replacing with any other model fader may seriously damage your mixer Repla...

Page 32: ...ard the files must be in Mp3 format Make a folder for each artist this will make it easier for you to find your desired songs Using the Folder knob you can scroll to the your desired artist and with t...

Page 33: ...under this warranty shall be limited to the repair of the product or replacement thereof including parts at the sole discretion of American Audio All products covered by this warranty were manufacture...

Page 34: ...um Gain Load 100K OHM Line 10K OHM 14dBV 200mV AUX 47K OHM 14dBV 200mV Phono 47K OHM 54dBV 2mV Microphone 10K OHM 54dBV 2mV Output Impedence Sensitivity Rec Out RCA 2 2K OHM 10dBV 316mV 2dB MASTER Unb...

Page 35: ...ANNEL FADER More than 80dB at 1KHz For CHANNEL FADER CROSSFADER More than 70dB at 1KHz For CROSSFADER SD PLAYER SD CARD 4GB AND BELOW OUPUT LEVEL 0dBV 2dB TCD 782 TRK16 128Kbps THD N LESS THAN 0 01 1K...

Page 36: ...American Audio World Headquarters 6122 S Eastern Ave Los Angeles CA 90040 USA Tel 323 582 3322 Fax 323 582 3311 Web www americanaudio us E mail info americandj com...

Reviews: