Amerex 450 Installation, Operating & Servicing Instructions Download Page 9


PN 05605


04/2020


NOTE:  Proper  procedure  for  recharging  any  dry  chemical  extinguisher  includes  the  use  of  a 

closed  recovery  system  (NFPA  10).  Getz  Equipment  offers  several  systems  ideal  for  this 

application  that  provide  for  the  recovery  of  the  remaining  agent  by  direct  discharge  into 

the system, trapping the 

fines

” 

while allowing the nitrogen to escape and provides a more 

accurate fill of the extinguisher. 


IF A 

CLOSED

-

RECOVERY SYSTEM

” 

IS NOT AVAILABLE PROCEED AS FOLLOWS:


1. To depressurize:


a.


Close the nitrogen cylinder valve.


b.


Carefully  tip  extinguisher  over  until  it  rests  on  both  wheels  and  handle.  (In  this  position  much  of  the 

agent will remain in the cylinder.)


c.  Open  nozzle  valve  slowly  to  clear  hose  of  any  remaining  pressure  and  chemical  (be  prepared  for  a 

recoil and discharge of agent.) 


d. Insure that all pressure has escaped before further disassembly.


e. Stand extinguisher upright after complete depressurization.


2.


Complete  steps  1

-

6  of  Maintenance  Procedures.  Carefully  remove  the  fill  cap.  Detach  discharge  hose 

from the agent cylinder and the nozzle assembly from the hose. Blow out any chemical remaining in the 

hose.  While  performing  this  procedure,  all  parts  and  seals  shall  be  cleaned,  inspected,  and  replaced 

where necessary. 


3.


Remove shutoff nozzle assembly from discharge hose and clean thoroughly. Check to make sure that the 

valve is closed when the lever is in the forward position (toward the nozzle tip).


4.


Detach  hose  from  nitrogen  cylinder,  install  the  shipping  cap,  unscrew  the  wing  nuts,  and  remove  the 

nitrogen cylinder from the extinguisher.


5.


Remove the 

50’ 

discharge hose from the storage rack, and disconnect the hose from the agent cylinder 

fitting.  Blow  out  any  dry  chemical  agent  remaining  in  the  hose.  Clean  hose  –


remove  and  discard  the  

hose gasket from the female coupling.


6.


Remove  remainder  of  ruptured  moisture  seal from  the  agent  cylinder fitting.  Replace  with new  Moisture 

Seal  Assembly. 

Carefully  follow  the  installation  instructions  on  the  Moisture  Seal  Assembly 

package.


7.


Remove  the  agent  cylinder  fill  cap  and  gasket.  Clean  fill  cap  threads  and  vent  port,  lubricate  the  cap 

gasket,  and  set  parts  aside.  Check  the  condition  and  type  of  any  remaining  chemical  (replace  any  dry 

chemical that is contaminated or caked). Fill extinguisher with the type and amount of dry chemical shown 

on the extinguisher nameplate (label) –


verify gross weight. Clean agent cylinder collar threads. Install the 

fill cap and tighten securely.


WARNING:  DO  NOT  OVERFILL  THE  EXTINGUISHER.  THIS  COULD  CAUSE  A  MALFUNCTION.  DO 

NOT MIX TYPES OF AGENTS –


THIS CAN CAUSE A DANGEROUS PRESSURE BUILD 

UP AND REDUCE EXTINGUISHER EFFECTIVENESS.


8.


Install the proper nitrogen cylinder (pressurized to 2015 psi, 13.89 MPa), remove the shipping cap, place 

on the extinguisher, and attach the nitrogen hose. 
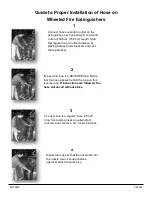
 

9.


Reattach the discharge hose to the extinguisher (tighten hand tight plus a ¼ turn). Properly coil the hose 

onto  the  storage  rack  (see  page  11).  Reattach  the  shutoff  nozzle  firmly  to  the  hose,  and  store  it  in  the 

mount with the shutoff lever in the 

closed

 (forward) position.


10.


Record the service date on the inspection tag, and place the extinguisher in its proper location.


Summary of Contents for 450

Page 1: ...D TITLE CT B002026 4 29 20 COVER SHEET DO NOT PRINT THIS PAGE FOR ACTUAL MANUAL INTERNAL USE ONLY NOTES 1 THIS COVERSHEET FOR INFORMATIONAL PURPOSES ONLY DO NOT PRINT THIS PAGE IN MANUAL 2 DESCRIPTION MANUAL OWNER S SERVICE FOR 45 46 47 WHEELED EXTINGUISHERS 3 ACTUAL PRINTED MATERIAL TO CONSIST OF ATTACHED 4 OVERALL SIZE OF PRINTED DOCUMENT PAGES 8 1 2 X 11 ON 20 LB PAPER 5 PRINTED MATERIAL TO MAT...

Page 2: ...None of these meet UL requirements and all of them void the Amerex extinguisher warranty and UL listing DO NOT SUBSTITUTE RECHARGE FIRE EXTINGUISHERS IMMEDIATELY AFTER ANY USE AMEREX CORPORATION DOES NOT SERVICE MAINTAIN OR RECHARGE FIRE EXTINGUISHERS THIS MANUAL IS PUBLISHED AS A GUIDE TO ASSIST QUALIFIED SERVICE PERSONNEL IN THE INSPECTION MAINTENANCE AND RECHARGE OF AMEREX FIRE EXTINGUISHERS ON...

Page 3: ... as it must be installed whenever the cylinder is transported Check the cylinder pressure The gauge shall read approximately 2015 PSI 13 9 MPa at 70 F 21 C ambient temperature The T handle valve shall have a pull pin and tamper seal Installed 8 Remove and save the safety vent plug installed on outlet of T handle gas cylinder valve Connect the gas supply hose firmly into the nitrogen cylinder valve...

Page 4: ...TO 60 SECONDS EFFECTIVE RANGE OF THE AGENT THROW 30 to 40 feet 9 TO 12 m HOSE LENGTH 50 feet 15 24 m SHUTDOWN 1 After making sure that the fire has been completely extinguished close the nozzle valve and close nitrogen cylinder valve push T handle to closed position Wheeled Extinguisher Tip over until it rests on both wheels and handle in this position much of the remaining chemical will stay in t...

Page 5: ...uisher will operate effectively and safely It includes a thorough examination for physical damage or condition to prevent its operation and any necessary repair or replacement It will normally reveal if hydrostatic testing is required NOTE NFPA 10 spells out wheeled extinguisher maintenance procedures NFPA requires that regulators on wheeled extinguishers be checked annually to meet manufacturer s...

Page 6: ...GULATED WHEELED EXTINGUISHERS NOTE Steps R a thru R d apply to models with a Regulator These procedures shall be performed only by professionally trained and qualified service personnel thoroughly familiar with industry service procedures and safety precautions All extinguisher and service equipment components fittings and adapters must be in good condition and properly connected The only regulato...

Page 7: ...Operate the discharge valve lever to ensure proper operation and to clear the hose of any obstructions if hose is obstructed refer to Troubleshooting section of this manual f Close the nitrogen pressure source and slowly relieve remaining pressure by fully opening the discharge valve lever 9 Remove the agent cylinder fill cap and examine it closely for any signs of damage cracks or thread wear Cle...

Page 8: ...LEASE THE SAFETY VENT PLUG SHIPPED WITH THE EXTINGUISHER OR THE TEST KIT SAFETY VENT PLUG MUST BE INSTALLED TO PROTECT SERVICE PERSONNEL FROM A HIGH VELOCITY DISCHARGE IN CASE THE LEVER IS ACCIDENTALLY OPENED 14 Install a new Amerex Moisture Seal per instructions in the package Securely connect the discharge hose to the extinguisher When assembling the hose to the agent cylinder or nozzle to the h...

Page 9: ...ipping cap unscrew the wing nuts and remove the nitrogen cylinder from the extinguisher 5 Remove the 50 discharge hose from the storage rack and disconnect the hose from the agent cylinder fitting Blow out any dry chemical agent remaining in the hose Clean hose remove and discard the hose gasket from the female coupling 6 Remove remainder of ruptured moisture seal from the agent cylinder fitting R...

Page 10: ...inders Valve seat has leaked and has pressurized the agent cylinder Follow Recharge Procedure for restoring the extinguisher to service 3 Nitrogen pressure is too low Valve is closed Tamper seal is intact No pressure observed in the agent cylinder Leakage in the nitrogen valve at other than the valve seal Replace with a properly charged nitrogen cylinder 4 Shutoff nozzle does not move freely Disas...

Page 11: ...acing between side brackets and over the top bracket 2 The second loop is a REVERSE loop Notice that the hose passes behind the loop on this reverse loop If instructions are followed the hose will uncoil without kinks 3 The next loop is a regular hose in front loop Succeeding loops are alternated reverse front reverse etc for six full loops 4 Adjust the loops so that the nozzle fits into the nozzl...

Reviews: