


Chapter 3
31
which is not in use, will be available for the system. For example, if 16MB is allotted
to the AGP card and the card only needs 8MB, the remaining 8MB will be available
for system use.
AGP Frequency
This function determines the amount of AGP frequency that is given to the AGP card.
Options range from
50 MHz
to
100 MHz
. (default [
Auto (66MHz)
])
AGP 8X Support
Enable this setting to utilize the 8X mode (twice as fast as 4X) offered by advanced
AGP cards. Your VGA card must support 8X mode in order to take advantage of the
faster speed.
AGP Fast Write Capability
Selecting [
Enabled
] to allow Fast Write Protocol for 8x/4x AGP to function.
Not all AGP cards support fast write.
System BIOS Cacheable
Enabling this function allows caching of the system BIOS ROM at F0000h-FFFFFh,
resulting in better system performance. However, if any program writes to this
memory area, a system error may result. Caching the system BIOS results in better
performance than shadowing the system BIOS.
Video RAM Cacheable
Enabling this function will allows caching of the video RAM, resulting in better
system performance. However, if any programs write to this memory area, a system
error may occur.
TV Mode Support
This option is for the available TV-Out setup, you can select the TV-out mode
according to your needs. Available options include: [
NTSC-M
], [
NTSC-J
], [
PAL-M
],
[
PAL-BDGHI
], [
PAL-N
] and [
PAL-NC
].
Flash BIOS Protection
The motherboard manufacturer developed BIOS protection technology that protects
the System BIOS from accidental corruption by unauthorized users or computer
viruses. When enabled, the BIOS data cannot be changed when attempting to update
BIOS with the FLASH utility. When disabled, the BIOS data can be updated by using
the FLASH utility.
Chapter 3
32
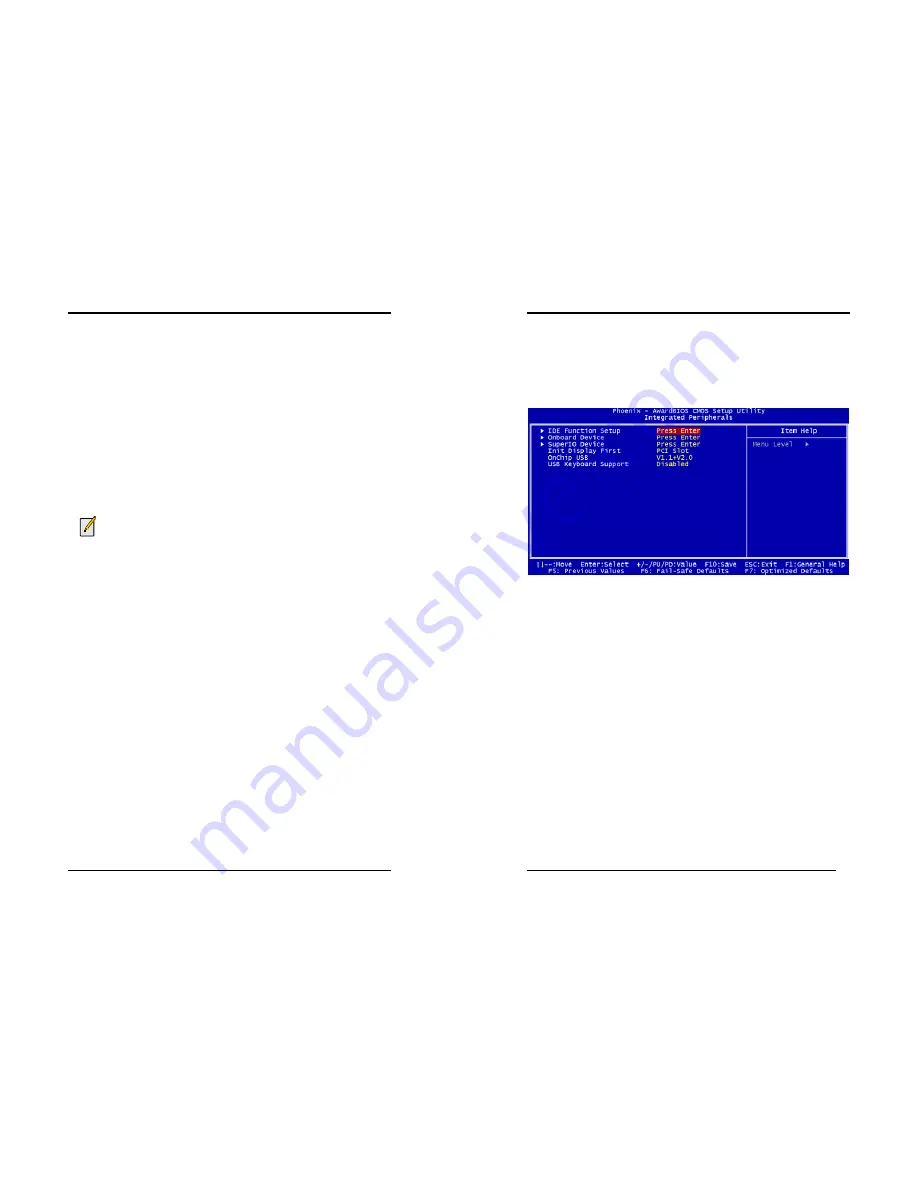
3-4 Integrated Peripherals
This section provides information on setting peripheral devices. By choosing the
Integrated Peripherals option from the CMOS Setup Utility menu (Figure 3-1), the
screen below is displayed. This sample screen contains the manufacturer's default
values for the motherboard.
Figure 3-5 Integrated Peripherals Screen
IDE Function Setup
Press [
Enter
] to enter the sub-menu, which contains the following items for advanced
control:
1.
On-Chip Primary IDE Channel 0/1:
You can set this to disable the On Chip IDE controller if you are going to add an
extra higher performance IDE board.
2.
IDE Primary/Secondary Master/Slave PIO:
The four IDE PIO (programmed Input/Output) fields let you set a PIO mode (0-4)
for each IDE device that the internal PCI IDE interface supports. Modes 0 through 4
provide successively increased performance. In Auto mode, the system automatically
determines the best mode for each device.
3.
IDE Primary/Secondary Master/Slave UDMA:
Ultra DMA implementation is possible only if your IDE device supports it and your
operating environment contains a DMA driver. If both your hard drive and software
support Ultra DMA, select [
Auto
] to enable BIOS support.
4.
IDE Prefetch Mode:
The onboard IDE drive interfaces supports prefetching, for faster drive accesses. Set
to [
Disabled
] if this primary or secondary.