Amcrest IP8M-2496EB-40MM User Manual Download Page 56


56      


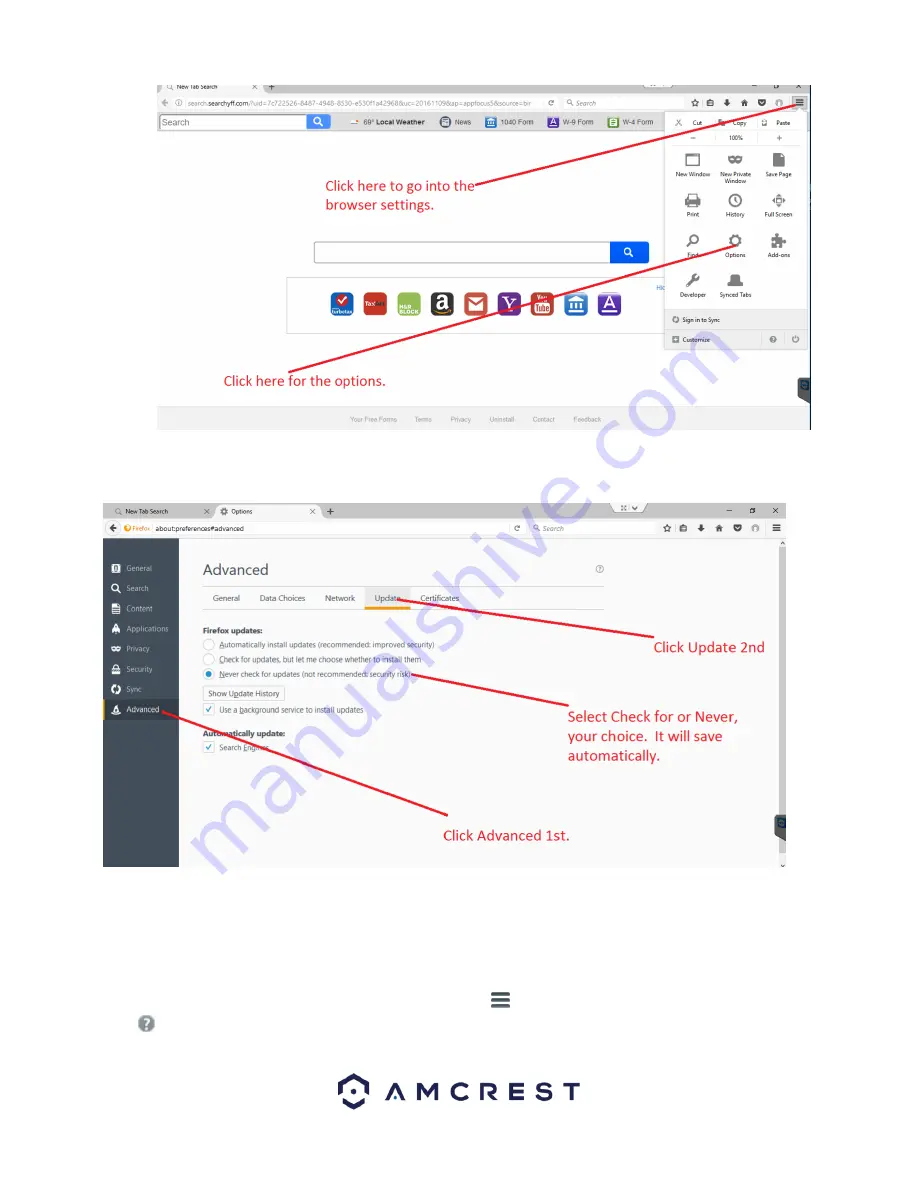
In the options menu, click on 

Advanced 

and then click on the 

Update 

tab. In the update tab, select the 

Never check for 

updates 

radio button. This will deactivate your browser from obtaining any future updates of the browser.  


How to Access the Web User Interface Using Firefox  

Before accessing your device using Mozilla Firefox, ensure you are using the correct version of Firefox. As discussed 

previously, later versions of Firefox may prevent the use of plugins which are needed to access your device.  

Verify the Correct Version of Firefox is Being Used 

To verify the correct version is being used, click on the settings 

 menu located at the top of your screen and click on the 

help 

 menu at the bottom of the settings menu  

Summary of Contents for IP8M-2496EB-40MM

Page 1: ...Amcrest IP8M 2496EB 40MM IP8M 2496EW 40MM 8MP UltraHD Outdoor POE Bullet Camera User Manual Version 1 0 4 Revised April 18th 2019 ...

Page 2: ...top Access Setup 13 4 4 1 Amcrest Surveillance Pro 13 4 4 2 Amcrest Blue Iris 31 4 4 3 Web Operation 39 4 4 4 Remote Web Access Setup 63 4 5 Amcrest Cloud Desktop Setup 66 4 6 Web Access Setup AmcrestView com 66 5 Operation and Interface 66 5 1 Live 67 5 2 Playback 69 5 3 Cloud Storage 70 5 4 Setup 71 5 4 1 Camera 71 5 4 2 Network 80 5 4 4 Storage 94 5 4 6 Information 104 5 5 Alarm 106 6 FAQs Trou...

Page 3: ...ecurity Warning To keep your Amcrest camera secure and prevent unauthorized access please make sure to follow the steps below Always make sure that your camera has the latest firmware as listed on www amcrest com firmware Never use the default password for your camera Always ensure that your password is at least 8 10 characters long and contains a combination of lowercase characters uppercase char...

Page 4: ...lance product that can be useful to a wide variety of users The camera connects to any router and uses an internet connection to allow the user to access all of its functionality from many internet connected devices It s easy to use and can be set up in a relatively small amount of time It has various functions such as recording playback and monitoring functionality These POE cameras adopt a high ...

Page 5: ...ote and local connection with a large variety of network hardware Note There may be slight differences in functionality due to the existence of different product series 2 Device Overview Please refer to the following chart for information about the camera and its ports 3 Connection Installation This section provides information about the connection and installation of Amcrest POE Bullet Cameras 3 ...

Page 6: ...ted within the ball joint 8 Adjust the device to the desired position 9 Using a Philip s head screwdriver not included tighten the adjusting screw near the base of the camera to lock the camera in position Note The process for mounting the eyeball camera is similar but some of the steps may vary 3 2 MicroSD Card Installation Guide To Install a microSD card into your camera please refer to the step...

Page 7: ...r camera in the way that works best for you 4 2 1 Setting up Your Camera for the First Time If you are setting up your camera for the first time or you are setting up your camera for mobile viewing please follow the instructions as outlined on section 4 3 Using the Amcrest Cloud app or Amcrest View app on your smartphone or tablet you can view your camera live from anywhere and access features suc...

Page 8: ...you ll find instructions on how to set up your camera up on the Amcrest cloud app as well as the Amcrest View Pro app 4 3 1 Amcrest Cloud App Setup Amcrest Cloud allows you to access your device from anywhere in the world Please note you will need an Amcrest Cloud account to proceed with Amcrest Cloud app setup You can register for a cloud account in the Amcrest Cloud app or from the Amcrest Cloud...

Page 9: ...the QR code on the back side bottom of the camera or manually enter the camera s serial number into the Enter camera S N serial number field Press Next to continue 6 If you are adding a new camera that does not have a set password the app will automatically detect that a new camera is being added Tap OK to proceed ...

Page 10: ...r camera When all settings have been confirmed tap Finish For more information about the Amcrest Cloud app and its features visit amcrest com support 4 3 2 Amcrest View Pro Setup To add your PoE camera to the Amcrest View Pro app follow these steps Make sure your camera is plugged into a power source and your Ethernet cable is connected from the camera to your router Make sure your camera and mobi...

Page 11: ...le of the screen to begin adding your PoE device 3 Tap on Add Device to add a new device to your app 4 Tap on PoE Camera 5 Next select a connection type Since we will be setting up a basic P2P connection with the device tap on P2P Connection to continue ...

Page 12: ...ve View to continue Note You can tap on the icon to verify the password Note Android users tap on Scan QR Code to access the QR code reader 8 The app will prompt you to change the password Enter a password between 8 and 32 characters and confirm the password Press OK to continue 9 Your camera is now set up and ready for use on the Amcrest View Pro app For more information about Amcrest View Pro an...

Page 13: ...essing all your devices in one central location without the use of a plugin or web browser Note Mac users Amcrest Surveillance Pro currently functions as a 32 bit platform and may not be compatible with certain 64 bit Mac operating systems Installation To install the Amcrest Surveillance Pro software on your computer please visit amcrest com downloads In the All Downloads page you will notice sepa...

Page 14: ...l utilize your hard drive HDD on your PC to store and access recorded video To proceed with the installation click Next Select the destination folder in which you would like recorded files to be retained To choose a folder click on the Browse button and select the folder Once a folder has been selected click the Install button to begin installing the software on your computer ...

Page 15: ...ew the release note and run the Amcrest Surveillance Pro software To view the release notes after pressing Finish select the Release note checkbox To begin running the software directly after pressing finish select the Run Amcrest Surveillance Pro checkbox When complete click the Finish button to proceed ...

Page 16: ...assword in the Confirm Password field and click OK to continue Type the created password into the Password field on the next screen and click Login to log into the software If you do not wish to have to retype your password every time you log into the system click on the Remember Password checkbox If you wish to exit the software click Exit Main Interface Overview When you first log into the softw...

Page 17: ... the IP address for your device it is recommended to download the Amcrest IP Config tool To get the Amcrest IP Config tool go to amcrest com downloads and click on the IP Config software link for either PC Windows or Mac OS Launch the IP Config tool and locate the IP address for your device The IP address will be listed in the IP field of the software After locating the IP address in the Amcrest I...

Page 18: ...mera as well as change the port number username and password To update the password remove the default password and type the new password in this field When done click on Save to save the information for the device Setting a Device to a Static IP For security purposes it is highly recommended to set the camera to a static IP address Setting your device to a static IP will ensure the stability and ...

Page 19: ...e device configuration menu under General click on the Network icon to access the network settings for your device In the Network Settings menu in the Mode section click on the Static radio button to set your device to a static IP Click Save and Apply to apply the network settings to your device ...

Page 20: ...20 Viewing an Added Device To begin viewing an added device navigate to the Home Page of the software and click on the LIVEVIEW icon located in the Basic section ...

Page 21: ... the features listed in this menu refer to the table provided below SN Item Function 1 Bit stream information and shortcut operation menu Please refer to the following contents for detailed information Enable disable local record Snapshot Enable disable audio Enable disable bidirectional talk Instant playback Digital zoom Close current window 2 Video window Real time video ...

Page 22: ...list Display device group and the corresponding channel Here you can create a new group and drag a device to it Right click a channel you can select main stream sub stream or quickly go to the device setup interface How to Setup PC NVR PC NVR allows your device to record directly to your computer s hard drive To setup PC NVR on your computer follow the instructions set provided below Note PC NVR i...

Page 23: ...pconfig to access the IPv4 Address for your computer When the IPv4 address for your computer has been located navigate back to the home page in the Amcrest Surveillance Pro software and click on the Devices icon located in the Settings menu ...

Page 24: ...he username and password will both be admin When complete press Save and Continue to proceed The PC NVR entry will then be added into the Devices menu To enable PC NVR navigate to the Home Page and in the Settings menu click on the PC NVR icon Once the PC NVR tab opens you will find your PC NVR details select Remote Device Click on the Plus button to add a camera from the cameras you have connecte...

Page 25: ...the right screen check the IPCamera check box Click Save How to Setup Storage for PC NVR Recording Access the PC NVR menu and navigate to the Disk Manager tab in the far left corner of the screen Disk Manager will appear showing you a list of drives that could be used to allocate storage space for your cameras through Amcrest Surveillance Pro ...

Page 26: ...er between the possible storage sizes click Allocate A prompt window will appear to warn you the allocation may take several minutes and the application will restart after completion Click OK to begin the allocation You will notice the disk you selected will now have the allocated space you selected and at any point in time you can select Free to free up the space by wiping that allocation ...

Page 27: ...ternally on the cameras main interface How to Setup Recording The Amcrest Surveillance Pro software allows you the opportunity to set your added device to record on motion or on continuous general recording You can also set recording schedules for your device Storage To begin setting up recording settings for your device a microSD card or PC NVR must be established to storage the recordings When a...

Page 28: ...lligent features to trigger recording Amcrest cameras do not currently support smart features However this is designated with an orange color in the software To begin setting a record schedule for your device click on the icon next to the day you want to schedule your record plan Clicking this button opens a screen that allows for recording periods to be set for each day and for each recording typ...

Page 29: ...ould like to view playback on Ensure the checkbox next to the device name and group name are checked In the Type dropdown box select which type of recording you would like to view To view all records make sure All is selected from the drop downbox Next ensure the correct stream is enabled in the Stream menu The default stream will be Main Stream Then select a specified date and time for the file a...

Page 30: ...era on the right hand side of the play back controls you will find a channel selection drop down menu to add or remove multiple channels as well as go full screen For more information on the Amcrest Surveillance Pro software and its functionality please refer to the full Amcrest Surveillance Pro user manual which can be found at amcrest com aspusermanual ...

Page 31: ...educe bandwidth consumption Use Amcrest Blue Iris to turn your existing Windows PC into a fully featured professional video surveillance system For more details about Blue Iris software and its features please visit http blueirissoftware com Installation Blue Iris is a Windows based software it is not available for Mac or Linux For this reason it is recommended for these users to use Amcrest Surve...

Page 32: ... to the I accept the terms in the license agreement statement Click Next to continue Choose a file destination in which you would like the Amcrest Blue Iris software to download If you would like to specify another path besides the default path click Change It is recommended to leave the default download path when installing the software To continue the installation click Next ...

Page 33: ...ct the features you do not want to install If your OS is 64 bit it is highly recommended to leave this option at 64 bit To continue click Next To begin installing the software click on the Install button and allow the software to download to your computer ...

Page 34: ... When the software has finished downloading click on the Finish button to launch the software Note if you do not wish to read the ReadMe file for the software uncheck the View the ReadMe file now checkbox ...

Page 35: ...and purchase a license To continue the free trial version of this software click Next to continue Amcrest offers two versions of the Blue Iris software Full and Lite The full version 59 95 allows you to use up to 64 cameras with all the added features of Blue Iris The Lite version allows you to use a single camera on the software with all the functionality of the software ...

Page 36: ...s blocked by Windows Defender How To Add a Device Into Blue Iris To add a device into the Blue Iris software locate the IP address for your device using the Amcrest IP Config Tool The Amcrest IP Config Tool can be downloaded at the following web page amcerest com downloads In the All Downloads menu click on IP Config Software to begin the free download Once the download has completed installing lo...

Page 37: ...e and enable the options associated with your device Click OK to continue Next enter the IP address of the device This is the IP address discovered in the IP config tool Enter the IP address in the Address field then enter the user name and password for your device If this is the first time using your camera the password will be admin Click OK to continue ...

Page 38: ...ngs menu for your device In this menu you can set Alerts Schedules PTZ Control General Video Audio and other settings associated with your device Click OK to continue The device will now be successfully connected to the Blue Iris software ...

Page 39: ...o use Pale Moon is only compatible with Windows and Linux systems Conversely both browsers will require the use of a plugin like other web browsers Note Pale Moon users please use the 32 bit version of the browser as the 64 bit version may be incompatible with our plugins You can also use the Amcrest Cloud to access your device from your computer Amcrest Cloud does not require the use of a plugin ...

Page 40: ...ode which itself grew out of Netscape Communicator and formed the base of Netscape 6 and Netscape 7 To download SeaMonkey on your computer visit https www SeaMonkey project org releases Select the download that applies to your computer and begin the installation process Click on the downloaded SeaMonkey Setup file and run the setup wizard For purposes of these instructions we will be using Windows...

Page 41: ...om In this case it is recommended to run the standard setup since it is the most common This is selected by default in the wizard To continue click the Next button The wizard will then prompt you to install the software onto your computer Click the Install button to install the browser ...

Page 42: ...nterface locate the IP address for your device using the Amcrest IP Config Tool The Amcrest IP Config Tool can be downloaded at the following web page amcerest com downloads In the All Downloads menu click on IP Config Software to begin the free download Once the download has completed installing locate the IP address associated with the device you would like to view in the browser ...

Page 43: ...ou will be prompted to modify the password for your device To modify the password enter the new password you would like to use in the New Password field and confirm The password used should be between 8 and 32 characters long with a combination of letters and numbers Click Ok when done to log into the web user interface To view your device on the browser you will need to download the plugin To dow...

Page 44: ...The browsers Download Manager will appear showing the plugin file that was just downloaded Double click on the file in the download manager to begin installing the plugin to the SeaMonkey web browser The browser will then show the live feed of your connected device in the web user interface ...

Page 45: ...s the higher megapixel camera since the higher megapixel camera s plugins will take precedence over the lower megapixel camera s plugin How To Install Pale Moon Like SeaMonkey Pale Moon is a free and open source internet browser that serves as an excellent means of implementing the plugins required to access your device via a web browser Pale Moon is only compatible with Windows and Linux operatin...

Page 46: ...om In this case it is recommended to run the standard setup since it is the most common This is selected by default in the wizard To continue click the Next button The wizard will then prompt you to install the software onto your computer Click the Install button to install the browser ...

Page 47: ...ing click on Finish to launch the browser How To Access a Device Using Pale Moon To access the web user interface locate the IP address for your device using the Amcrest IP Config Tool The Amcrest IP Config Tool can be downloaded at the following web page amcerest com downloads ...

Page 48: ... enter the login credentials for your device If this is the first time accessing the device the username and password will both be admin Click on Login If this is the first time logging into your device you will be prompted to modify the password for your device To modify the password enter the new password you would like to use in the New Password field and confirm The password used should be bet...

Page 49: ...ave File to being downloading the plugin and save the file to your computer The webplugin exe will then be downloaded to the downloads folder and be shown in the Download Manager in the upper right hand corner of the browser To launch the plugin click on the and click on the webplugin exe file in the download manager The browser will then show the live feed of your connected device in the web user...

Page 50: ...onversely this may pose a compatibility issue when accessing a lower megapixel camera in a web browser at the same time as the higher megapixel camera since the higher megapixel camera s plugins will take precedence over the lower megapixel camera s plugin How To Access a Device Using the Google Chrome Extension Web based access for Amcrest device can be utilized in Google Chrome using the Amcrest...

Page 51: ...ew to launch the app To access your device using the Google Chrome Extension please refer to the information provided below Locate the IP address for your device using the Amcrest IP Config Tool The Amcrest IP Config Tool can be downloaded at the following web page amcerest com downloads In the All Downloads menu click on IP Config Software to begin the free download Once the download has complete...

Page 52: ... If this is the first time logging into your device you will be prompted to modify the password for your device To modify the password enter the new password you would like to use in the New Password field and confirm The password used should be between 8 and 32 characters long with a combination of letters and numbers Click Ok when done to log into the web user interface The app will then show th...

Page 53: ...anent solution to the issue but currently we recommend using a previous version of Firefox such as Firefox 49 0 2 For more information on how to revert to Mozilla Firefox 49 0 2 refer to the instructions provided below Reverting to FireFox 49 0 2 To use the Firefox web browser with your device a previous version such as 49 0 2 is recommended You can download the previous version of Firefox by clic...

Page 54: ...om In this case it is recommended to run the standard setup since it is the most common This is selected by default in the wizard To continue click the Next button The wizard will then prompt you to install the software onto your computer Click the Install button to install the browser ...

Page 55: ...g it is recommended to make sure that no future automatic updates are applied to the browser If an automatic update were to occur the browser will revert to the most current version of the FireFox web browser which will prevent the use of plugins on your browser To prevent automatic updates from occurring please refer to the following In the web browser click on the settings menu located at the to...

Page 56: ...ce Using Firefox Before accessing your device using Mozilla Firefox ensure you are using the correct version of Firefox As discussed previously later versions of Firefox may prevent the use of plugins which are needed to access your device Verify the Correct Version of Firefox is Being Used To verify the correct version is being used click on the settings menu located at the top of your screen and...

Page 57: ...57 In the help menu select About Firefox The version being used will be displayed in the About Mozilla Firefox menu as displayed in the image below ...

Page 58: ...be downloaded at the following web page amcerest com downloads In the All Downloads menu click on IP Config Software to begin the free download Once the download has completed installing locate the IP address associated with the device you would like to view in the browser Enter this IP address into the Firefox web browser to load the web user interface In the web user interface enter the login cr...

Page 59: ... confirm The password used should be between 8 and 32 characters long with a combination of letters and numbers Click Ok when done to log into the web user interface To view your device on the browser you will need to download the plugin To download the plugin click on the Please click here to download and install the plugin prompt in the middle of the screen Click on Save File to being downloadin...

Page 60: ...een installed close out of the browser completely and then reopen the browser Type in the IP address for your device into the browser and log into the web user interface with your device s login credentials Click on the Activate MMX icon in the middle of the screen to activate the plugin The browser will then need to run the MMX plugin Click on Allow and Remember to allow the browser to run the MM...

Page 61: ...the Web User Interface Using Internet Explorer To access your device using the Google Chrome Extension please refer to the information provided below Locate the IP address for your device using the Amcrest IP Config Tool The Amcrest IP Config Tool can be downloaded at the following web page amcerest com downloads In the All Downloads menu click on IP Config Software to begin the free download Once...

Page 62: ...r device you will be prompted to modify the password for your device To modify the password enter the new password you would like to use in the New Password field and confirm The password used should be between 8 and 32 characters long with a combination of letters and numbers Click Ok when done to log into the web user interface To view your device on the browser you will need to download the plu...

Page 63: ...For more information on the web user interface and the features it provides please refer to the user manual for your device User manuals can be found at amcrest com support or on the original listing of your device 4 4 4 Remote Web Access Setup There are two main methods for setting up remote access UPnP DDNS and Port Forwarding ...

Page 64: ...n the bottom right 8 To set a custom DDNS name fill out the Domain Name field and click Save 9 Write down the entire Domain Name field including the white text that says AmcrestDDNS com 10 Click the UPnP menu item on the left hand menu and click the enable checkbox at the top 11 While in the UPnP menu double click the HTTP port and change both the internal and external HTTP ports to match the numb...

Page 65: ...ecified in step 10 is open 12 Write down the manufacturer name brand and model name for the router that the camera is connected to and then proceed to http www portforward com on your web browser 13 Open the port forwarding guide section on the left hand side menu 14 Find the router brand name in the list and click it 15 Find the router model number and click it 16 Click the Default Guide link nea...

Page 66: ...ntact us at www amcrest com or give us a call at 1 888 212 7538 Step by step video tutorials available at http www amcrest com videos 4 6 Web Access Setup AmcrestView com 1 Connect the camera to power and wait 30 seconds for the camera to start up and initialize 2 Using Internet Explorer or Safari go to www AmcrestView com and register an account You will be required to activate your account by e ...

Page 67: ...e plugins are necessary for using the camera s interface Click install to download the plugin and then click on the plugin installation file to install the plugin If the browser prompts you to allow the plugin to work on the computer hit Allow to ensure the plugin can run successfully The camera is now successfully set up for live viewing For additional assistance please contact us at www amcrest ...

Page 68: ...t of the live feed The picture is saved at the path specified in Setup Camera Video Path Triple Snapshot Click this button to take 1 screenshot per second for 3 seconds The pictures are saved at the path specified in Setup Camera Video Path Manual Record Click this button to manually record video The video is saved at the path specified in Setup Camera Video Path Section 3 This bar allows the user...

Page 69: ...on allows the user to change the stream fluency There are 3 options Realtime reduces delay and decreases fluency and Fluency has a larger delay but the video stream becomes more fluid Section 4 This section of the Live tab shows the picture that the camera is broadcasting The bitrate is shown in the top left corner the native resolution is shown in the top right corner the time stamp is shown belo...

Page 70: ...m down 6 Recorded Video Panel This panel allows the user to specify what type of video they would like to playback and it also allows the user to select where to start playback from The buttons on the bottom right allow the user to select a zoom level 7 Playback Bar This panel allows the user to control playback It also allows the user to control playback speed and playback volume Clicking the Fil...

Page 71: ...nu Items These menu items each open a different menu that allows the user to change specific settings for the camera 3 Menu Tab These tabs open menu options for certain menu items 5 4 1 Camera This menu section allows the user to change different camera settings for video audio and to manage image profiles 5 4 1 1 Configuration This menu allows the user to configure image profiles for normal day a...

Page 72: ... whole video The video color may become too strong if the value is too high For the grey part of the video distortion may occur if the white balance is not accurate Please note the video may not be clear if the value is too low The recommended value ranges from 40 to 60 Sharpness This slider is used to adjust the sharpness of the video The value ranges from 0 to 100 The larger the value is the cle...

Page 73: ...t setting without sacrificing exposure timing Shutter Priority This setting will maximize the fastest shutter speed and will sacrifice the gain in return Manual This setting lets you select your shutter speed and have the gain adjust automatically Selecting customized range will let you both the shutter speed an adjust the gain manually 3D NR This radio button allows the user to turn the 3D Noise ...

Page 74: ...feature that came out of necessity due to overexposure from strong light sources like headlights or spotlights To reset to default settings click the Reset Defaults button To refresh the screen click on Refresh To save the settings click the Save button 5 4 1 1 4 WB This dropdown box allows the user to select the white balance for the video feed The different options are Auto Sunny Night Outdoor a...

Page 75: ...hite however when illumination is too dark it switches on IR mode Sensitivity This option allows the user to change the Day Night Sensitivity of the camera The three options are Low Middle and High The higher the sensitivity the quicker the camera will change into another mode depending on the light levels D N Delay This dropdown box allows the user to set a delay in seconds for how long it takes ...

Page 76: ...et the camera s IR lights to on and off positions based on Day Night conditions This setting is usually set by default within the camera To reset to default settings click the Reset Defaults button To refresh the screen click on Refresh To save the settings click the Save button 5 4 1 7 Indicator Light This menu box allows the user to select whether the indicator light in the camera is on or off f...

Page 77: ...allow the user to set what basis the profile management settings run on There are 3 options Normal Full Time and Schedule Normal means that the system can automatically alternate between night and day based on the profiles for each Full Time means that the system sticks to one profile the entire time it is running Schedule allows the user to dictate which times of the day are designated for the da...

Page 78: ...een tampered with Watermark Character This field allows the user to set the watermark s text The default string is Digital CCTV The maximum length is 85 characters This string can only include numbers characters and underscores Sub Stream is a lower quality stream that allows the feed to take up less resources and bandwidth when streaming The Main Stream and the Sub Stream have the same fields Sub...

Page 79: ...e button To remove all privacy filter boxes click the remove all button For Channel Title the radio button enables or disables the feature The Input Channel Title field allows the channel title to be modified For Time the radio button enables or disables the feature Clicking the Display Weekdays checkbox will show the weekday at the end of the timestamp For Text Overlay the radio button enables or...

Page 80: ...rowse button to select a different destination folder The Video Clips field allows the user to select where to save video clips to Click the Browse button to select a different destination folder To reset to default settings click the Reset Defaults button To save the settings click the Save button 5 4 2 Network This menu section allows the user to change network settings for the camera 5 4 2 1 TC...

Page 81: ...commonly a router When the DHCP function is enabled the user cannot modify the IP address Subnet Mask or Default Gateway as these values are obtained from the DHCP function To view the current IP address DHCP needs to be disabled Note When PPPoE is enabled modification of the IP Address Subnet Mask and Gateway becomes prohibited Note When connecting your device to an NVR or DVR set the camera to S...

Page 82: ... user to enable the P2P feature for the camera This feature must be enabled for the camera to connect to a smartphone or tablet via the Amcrest View app It is enabled by default Status This field displays the status of the P2P connection Once the camera is connected to a device this field should display the word Online S N This field displays the Token ID for the camera The Token ID can be used to...

Page 83: ...d designates the Real Time Streaming Protocol RTSP port number The default value is 554 HTTPS This field enables the use of the HTTPS protocol for accessing the camera HTTPS Port This field designates the Hypertext Transfer Protocol Secure HTTPS port number The default value is 443 To reset to default settings click the Reset Defaults button To refresh the page click the Refresh button To save the...

Page 84: ...S NO IP DDNS CN99 DDNS and Dyndns DDNS Based on which service is selected different options may show on this screen For purposes of this guide AmcrestDDNS will be used AmcrestDDNS is a free DDNS service provided by Amcrest and it must be renewed every year A renewal reminder email will be sent to the email entered in the username field below Below is a screenshot of the DDNS settings screen config...

Page 85: ...To refresh the page click the Refresh button To save the settings click the Save button 5 4 2 5 SMTP Email This screen allows for the configuring of email settings to permit the camera to send emails when an alarm is triggered Below is a screenshot of the email settings screen Below is an explanation of fields on the SMTP Email settings screen SMTP Server SMTP stands for Simple Mail Transfer Proto...

Page 86: ...tween sending emails This prevents multiple emails from being sent out Keep Alive This checkbox allows the user to enable a function to periodically check in with the SMTP server to ensure it can connect correctly Email Test This button causes the system to automatically send out an email to test the connection is OK or not Prior to the email test please save the email setup information To reset t...

Page 87: ... user to open a dialog box and edit the service s information To reset to default settings click the Reset Defaults button To refresh the page click the Refresh button To save the settings click the Save button 5 4 2 7 SNMP SNMP stands for Simple Network Management Protocol This protocol is used to provide a basic framework to allow connection between various network devices Below is a screenshot ...

Page 88: ...k the Save button 5 4 2 9 QoS QoS stands for Quality of Service and it refers to the overall performance of a computer network particularly the performance seen by the users of the network Below is a screenshot of the QoS screen Below is an explanation of the fields on the QoS screen Realtime Monitor This field allows the user to enter in a priority value for real time monitoring packets The range...

Page 89: ... HTTPS in the web user interface visit https www youtube com watch v gkjlaf Iuso 5 4 3 Event This menu section allows the user to change different settings for triggering events 5 4 3 1 Video Detection The video detection menu has two tabs Motion Detect and Video Tamper 5 4 3 1 1 Motion Detect This tab allows the user to modify motion detection settings Below is a screenshot of the Motion Detect t...

Page 90: ...00 seconds This time value controls how long the alarm signal lasts Based on motion detection a buzzer can go off a tour can begin a snapshot can be taken or the camera can begin recording o For example if the anti dither time is set to 10 seconds each alarm may last 10 seconds if the local alarm is activated During the process if the system detects another local alarm signal at the fifth second t...

Page 91: ...to leave the motion detection zone and will not save the zone setup Record This checkbox allows the user to enable the camera to record video when a motion detection alarm is triggered Record Delay This field specifies in seconds how long the delay between alarm activation and recording should be Relay Out This checkbox allows the user to enable the camera to trigger a connected alarm connected to...

Page 92: ...rt on the back of the camera when a video tamper alarm is triggered Alarm Delay This field specifies in seconds how long the delay between alarm activation and Relay alarm activation should be Send Email This checkbox allows the user to enable the camera to send an email when a video tampering alarm is triggered Snapshot This checkbox allows the user to enable the camera to take a snapshot when a ...

Page 93: ...ick the Reset Defaults button To refresh the page click the Refresh button To save the settings click the Save button 5 4 3 3 2 Network This tab allows the user to set the camera s response to a Network related abnormality Below is a screenshot of the Network tab screen Below is an explanation of the fields on the Network settings tab Event Type This dropdown box allows the user to select which Ne...

Page 94: ... Illegal Access abnormality event Relay Out This checkbox allows the user to enable the camera to trigger an alarm when illegal access is detected Alarm Delay This field specifies in seconds how long the delay between alarm activation and relay alarm activation should be Send Email This checkbox allows the user to enable the camera to send an email when illegal access is attempted To reset to defa...

Page 95: ...only footage when an alarm is activated Alarm recording is represented by the color red Video Recording Schedule To specify a video recording range first select the type of recording desired then click and drag on time bar for the desired date To edit multiple days at once drag the cursor further up or down to cover the other days o Setup Clicking this button opens a screen that allows for recordi...

Page 96: ...apshots when an alarm is activated Alarm recording is represented by the color red Snapshot Recording Schedule To specify a snapshot range first select the type of snapshot desired then click and drag on time bar for the desired date To edit multiple days at once drag the cursor further up or down to cover the other days o Setup Clicking this button opens a screen that allows for snapshot periods ...

Page 97: ...es To refresh the page click the Refresh button To save the settings click the Save button 5 4 4 2 Destination This menu controls where recorded media is stored There are 4 tabs in this menu Path SD Card FTP and NAS 5 4 4 2 1 Path This tab is where the user can designate a path for recorded video and snapshots to reside in Below is a screenshot of the Path tab Below is an explanation of the fields...

Page 98: ...amera Status This column designates the status of the SD card Attribute This column designates the read write attributes for the SD card By default this is Read Write Used Capacity Total Capacity This column shows the available memory on the SC card Read Only This button allows the user to designate an SD card as read only Hot Swap This button allows the user to physically remove the SD card and r...

Page 99: ... the FTP server is unavailable To reset to default settings click the Reset Defaults button To refresh the page click the Refresh button To save the settings click the Save button 5 4 4 2 4 NAS This tab is where the user can change NAS settings Below is a screenshot of the NAS tab Below is an explanation of the fields on the NAS settings tab Enable This checkbox allows the user to enable NAS uploa...

Page 100: ... stream to record The options are main stream and sub stream To reset to default settings click the Reset Defaults button To refresh the page click the Refresh button To save the settings click the Save button 5 4 4 4 Cloud Storage This menu redirects the user to the Amcrest Cloud web site At this website amcrestcloud com users can register for new accounts as well as view or modify existing accou...

Page 101: ... Current Time This field allows the user to enter in the date and time manually Clicking the PC Sync button allows the camera to sync with a Network Time Protocol NTP server Enable DST This checkbox allows the user to enable daylight savings time for the camera DST Type This radio button allows the user to select whether DST is based on the week or a specific day Start Time This dropdown box and f...

Page 102: ... available on the camera No This column shows the user s number on the user list User Name This column shows the usernames of the different accounts on the camera Group Name This column shows the group of the different accounts on the camera Description This column shows a description of the account Modify This column allows the user to modify the user account Delete This column allows the user to...

Page 103: ...settings click the Export button 5 4 5 5 Auto Maintain This screen allows the user to set auto maintenance settings for the camera Below is a screenshot of the Auto Maintain screen Below is an explanation of the fields on the Auto Maintain screen Auto Reboot This checkbox allows the user to enable the auto reboot function The dropdown box and field to the right of this checkbox allow the user to s...

Page 104: ... locate and import the firmware file you just downloaded Once the firmware file has been imported click Upgrade The device will reset return to the web user interface The upgrade is now complete Note When upgrading the camera s firmware do not disconnect the internet or power from the camera 5 4 6 Information This menu section allows the user to view information about the camera for reference purp...

Page 105: ... time fields choose the type of event system setting data event record manage users clear log and click search To backup the log click the Backup button To clear the log click the Clear button 5 4 6 2 1 Remote Log This tab allows the user to enable and access remote logs within the camera Below is a screenshot of this menu To use this menu check the enable check box to enable remote log functional...

Page 106: ...ere the alarm log is kept Below is a screenshot of the alarm screen The table on the right shows the alarm log and all the alarm instances that have occurred The checkboxes allow the user to narrow down which alarms they want to see in the alarm log Clicking the checkbox next to Prompt will cause the system to pop up a dialog box anytime an alarm is triggered Clicking the checkbox next to Play Cus...

Page 107: ...Date Time tab Click on PC Sync to sync the date and time Click Save to save and apply the new date and time settings 5 Motion detection does not work Below are a few possible reasons why this may be occurring The motion detection time period may be incorrectly configured Motion detection zone setup is not correctly configured Motion detection sensitivity is too low 6 Web Access isn t working Below...

Page 108: ... in time between alarm activation and Relay alarm activation Alternate Gateway The node on the computer network that the network software uses when an IP address does not match any other routes in the routing table and when the default gateway is not available Anti Dither This time value controls how long the alarm signal lasts The values in this field can range from 5 to 600 seconds Based on moti...

Page 109: ... for serial number The S N is unique to each camera and can be used to connect to different Amcrest apps and services to provide different methods of access to the camera Sensitivity Sensitivity is the amount of change required to increase the motion detected by a percentage The lower the sensitivity the more movement is required to trigger an alarm SMTP Simple Main Transfer Protocol is an Interne...

Page 110: ...s encouraged to try to correct the interference by one or more of the following measures Reorient or relocate the receiving antenna Increase the separation between the equipment and receiver Connect the equipment into an outlet on a circuit different from that to which the receiver is connected Consult the dealer or an experienced radio TV technician for help 4 RF exposure warning This equipment m...

Page 111: ...ls in the parts is above the relevant threshold of the SJ T11363 2006 standard During the environmental friendly use period EFUP period the toxic or hazardous substance or elements contained in products will not leak or mutate so that the use of these substances or elements will not result in any severe environmental pollution any bodily injury or damage to any assets The consumer is not authorize...

Page 112: ...ies to process according to your local government statutes Note To view setup videos for many of the steps outlined in this guide go to http amcrest com videos This user manual is for reference only Slight differences may be found in the user interface All the designs and software here are subject to change without prior written notice All trademarks and registered trademarks mentioned are the pro...

Reviews: