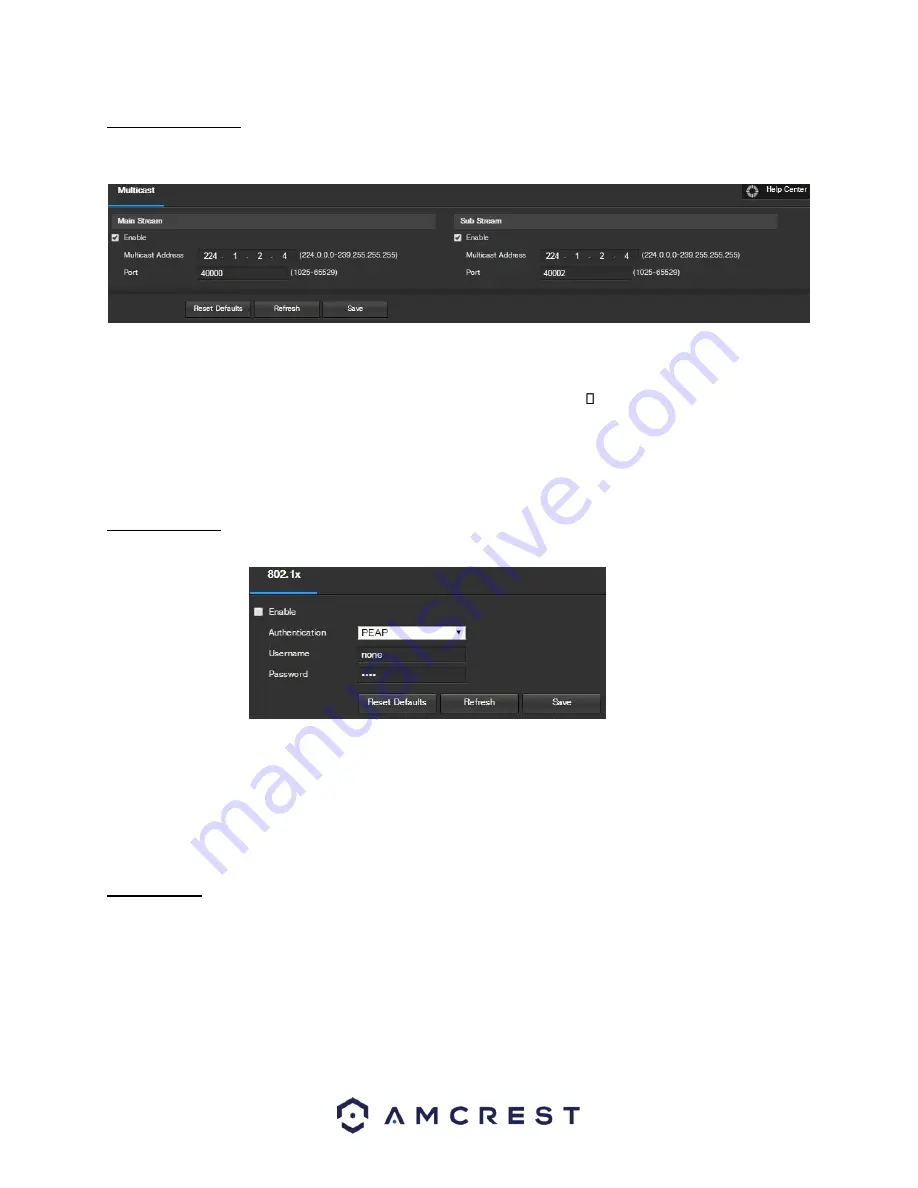
Amcrest IP2M-853E User Manual Download Page 66


66  

5.4.2.10 Multicast  

Multicast is a feature that enables the camera to broadcast its live view to multiple computers on the same 

network. Below is a screenshot of the multicast screen:  


Below is an explanation of the fields in the Multicast settings screen:  

• 

Enable

: This checkbox allows the user to enable Multicast functionality.  

• 

Multicast Address

: This field allows the user to enter a multicast address. 


Port

This field allows the user to enter a multicast port.  

  
To reset to default settings, click the Reset Defaults button. To refresh the page, click the Refresh button. To save 

the settings, click the Save button.  

5.4.2.11 802.1x  

802.1x is an authentication method for connecting to a network. Below is a screenshot of the 802.1x screen:   


To enable 802.1x, click the checkbox next to Enable. An authentication method can be chosen from the dropdown 

box, and a username and password can be entered in their respective fields.  

To reset to default settings, click the Reset Defaults button. To refresh the page, click the Refresh button. To save 

the settings, click the Save button.  


5.4.2.12 QoS  

QoS stands for Quality of Service and it refers to the overall performance of a computer network, particularly the 

performance seen by the users of the network. Below is a screenshot of the QoS screen:  

Summary of Contents for IP2M-853E

Page 1: ...1 Amcrest IP2M 853E Speed Dome PTZ Camera User Manual...

Page 2: ...ult Username and Password 11 4 2 Camera setup methods 12 4 2 1 Setting up your camera for the first time 12 4 2 2 Accessing your camera using multiple mobile devices 12 4 2 3 Configuring advanced sett...

Page 3: ...iew com browser plugin 31 4 6 2 User method 34 4 7 Remote Web Access Setup 42 4 7 1 UPnP DDNS Remote Web Access Setup 42 4 7 2 Port Forwarding Remote Web Access Setup 43 4 8 NVR Access 44 5 Operation...

Page 4: ...7 5 4 3 2 Audio Detection 70 5 4 3 3 Alarm 72 5 4 3 4 Abnormality 73 5 4 4 Storage 76 5 4 4 1 Schedule 76 5 4 4 2 Destination 79 5 4 4 3 Record Control 81 5 4 5 System 82 5 4 5 1 General 82 5 4 5 2 Ma...

Page 5: ...5 5 4 6 3 Online Users 87 5 5 Alarm 87 5 6 Logout 88 6 FAQs Troubleshooting 88 Glossary of Terms 92 FCC Statement 94 Appendix A Toxic or Hazardous Materials or Elements 95...

Page 6: ...lease do one of the following Visit http amcrest com contacts and use the email form Call Amcrest Support using one of the following numbers Toll Free 888 212 7538 International Callers Outside of US...

Page 7: ...pecified environments as stated above Do not aim the camera at a strong light source as it may cause overexposure of the picture and may affect the longevity of the camera s sensors Ensure that the ca...

Page 8: ...crest Cloud also allows the user to easily find and download recorded video for playback from any internet connected PC or Mac computer Advanced Playback Function This device supports real time record...

Page 9: ...oSD card slot for the camera The microSD card slot can be found on the board behind the reset switch 3 Connection Installation This section provides information about the connection and installation o...

Page 10: ...wiring POWER This connection is optional for this device since the device will draw power via an Ethernet cable PoE however the option is there The camera will require a basic 12V DC power adapter Th...

Page 11: ...efault Username and Password To login to the system for the first time use one of the following default username password combinations Once you ve successfully logged in it is highly recommended to ch...

Page 12: ...mera to enable advanced features such as motion detection e mail alerts FTP image adjustments scheduling and more please follow the instructions as outlined on section 4 4 Desktop access setup 4 2 4 U...

Page 13: ...ll find instructions on how to set up your camera as well as instructions on how to configure different settings on your camera such as motion detection and email alerts Every major app setup method...

Page 14: ...14 2 From the home screen tap the icon in the top right corner to open the Device List 3 Tap the Add Device button 4 Tap PoE Camera 5 Tap P2P Setup...

Page 15: ...ase the QR code cannot be scanned please tap Enter S N Manually to enter in the camera s serial number 6 Scan the QR code from the sticker on your camera 7 Double check to ensure that your S N Serial...

Page 16: ...best way to record events that are particularly of interest without needing to waste storage space by constantly recording However you can have motion detection set up along with 24 7 recording The m...

Page 17: ...re alarm system integration Snapshot Toggle this switch to take snapshot when motion is detected Follow the steps below to setup motion detection on your camera 1 From the home screen tap the icon in...

Page 18: ...18 3 Tap Motion Detect to open the motion detection settings menu 4 Select the camera that you want to modify motion detection settings for...

Page 19: ...ening when it s happening There are several options for configuring exactly how you receive these notifications or alerts through your smartphone as well as options for what type of events trigger a n...

Page 20: ...in menu 2 Tap Push Notifications to open the Push Notifications settings menu 3 Tap Configuration to open the push notifications settings menu Tap Event List to see a history of past push notification...

Page 21: ...push notifications active It is important to note that even though you can use the same email address as both the sender and receiver it is highly recommended that you create a brand new email prefera...

Page 22: ...22 1 From the home screen tap the icon in the top left corner to open the main menu 2 Tap Configuration Center to open the Configuration Center...

Page 23: ...scroll further down successful tap the Save button to save the email settings 4 4 Desktop access setup There are 2 ways to access your camera from a computer laptop or desktop which are locally or rem...

Page 24: ...nce you have the IP address your computer will be able to find and communicate with your camera A browser plugin is just like a translator By using the camera on your computer through a web browser yo...

Page 25: ...page for either Windows or Mac 4 Find the download in your Downloads folder and click it to open the installer 5 You will be asked to allow this program to make changes to your computer with a pop up...

Page 26: ...26 7 On the next page check the box next to I agree then click Install...

Page 27: ...o your router You will also see the IP address associated with your camera The e icon to the right allows you to launch directly into your web browser from this screen Note This e icon will automatica...

Page 28: ...ternet Explorer 1 On the main login screen you should see a popup in the center Click Install 2 An install button will appear on the bottom of the screen for the plugin webplugin exe Click Run then go...

Page 29: ...setup methods covered in section 4 3 and this is your first time logging into your camera please use the following default username and password Username admin Password admin Note After logging in fo...

Page 30: ...amera for local access on a computer laptop go to http www amcrest com videos click the Videos tab then watch the video titled Desktop Laptop Access Setup for ProHD HDseries WiFi Cameras Note This is...

Page 31: ...oid to add more cameras play recordings and view your camera live from anywhere 6 For additional assistance please contact us at www amcrest com or give us a call at 1 888 212 7538 Step by step video...

Page 32: ...is will take you to another page where you will need to click the Download Now button 4 You will be prompted by the browser to install the plugin Click Run 5 You may be prompted to verify this downloa...

Page 33: ...ght click the plugin then click Run Anyway 7 The plugin will close your browser sessions to install Save any pages then click Yes 8 On the next prompt it will say the install was successful and ask yo...

Page 34: ...the checkbox next to Do not show me the warning for this program again then click Allow Now the plugin has been installed successfully and you can continue on to register for an account for camera ac...

Page 35: ...rd then Confirm Password type your Email enter the Verification Code make sure the box is checked confirming you ve read the Amcrest Terms of Service then click Create an Account 3 You will see the Re...

Page 36: ...36 Check your email and click the confirmation email from AmcrestView com 4 Once you ve opened the email click the confirmation link inside to complete your registration...

Page 37: ...wn confirmation that your account has been activated Click Go to Login 6 You will be taken back to the login screen Enter your new AmcrestView com username and password then click Login 7 A popup will...

Page 38: ...hen fill in the S N serial number this can be found on the sticker attached to the bottom of your camera or through the web interface click the i icon in the top bar then click Version Enter your user...

Page 39: ...ra added to the device list on the main screen Click the eye icon to view the live feed 11 Your browser will give you a notification asking you to allow popups from AmcrestView com Click Options for t...

Page 40: ...ll the video feed through here Click the small arrow to the right of Allow then click Allow for all websites 13 A final popup will appear asking you to confirm that you allow this plugin on your brows...

Page 41: ...small square icon to enable your feed for an added camera to see the video feed Click the S to change it to an M which stands for Main Stream and will give you a full HD quality video stream To go bac...

Page 42: ...nd ensure that the HTTP port has changed 7 Click the DDNS menu item on the left hand menu pick Amcrest DDNS from the drop down box click the checkbox next to Server Type and then click the Save button...

Page 43: ...t to Static to change the mode to Static 8 Write down the IP Address that is currently in the IP address field 9 Click the Save button 10 Using the left hand menu go to the Connection menu and write d...

Page 44: ...ails into the username and password fields and click login If the process above is not working please contact Amcrest Support via one of the following options Visit http amcrest com contacts and use t...

Page 45: ...ell as all of the operations the camera can perform The main interface of the camera contains 6 major tabs on the top of the screen By default the interface opens on the Live tab 5 1 Live The Live tab...

Page 46: ...hold this button to enable bidirectional talk This feature allows the user to broadcast audio from their computer to the camera While this is active the camera s speaker is shut off to keep audio qua...

Page 47: ...in the top right corner the time stamp is shown below the native resolution and the camera type is shown in the bottom left corner 5 2 PTZ The PTZ tab allows the user to change the position of the cam...

Page 48: ...ic PTZ positions for the camera To create and manage presets follow the steps below Configure the camera positioning as needed Input the preset number and then click the Add button Click Del to delete...

Page 49: ...ic date range From here the user can download these videos to their PC 5 Trim Panel This panel allows the user to trim playback video for download By specifying time stamps the user can trim down 6 Re...

Page 50: ...to change specific settings for the camera 3 Menu Tab These tabs open menu options for certain menu items Note To view additional information about any of the information in the menu click the button...

Page 51: ...mber is the higher the contrast is You can use this function when the whole video brightness is OK but the contrast is not correct Please note the video may become hazy if the value is too low If this...

Page 52: ...t Sensitivity of the camera The three options are Low Middle and High The higher the sensitivity the quicker the camera will change into another mode depending on the light levels D N Delay This dropd...

Page 53: ...Time means that the system sticks to one profile the entire time it is running Schedule allows the user to dictate which times of the day are designated for the day profile and the night profile To re...

Page 54: ...and they can be selected from this dropdown list Frame Rate FPS This dropdown box allows the user to select a frame rate Frame rate settings are measured in frames per second FPS and can range from 1...

Page 55: ...o select a snapshot mode There are two snapshot modes general and event General snapshots are taken as scheduled Event snapshots occur when a motion detection alarm or a tampering alarm is triggered I...

Page 56: ...ables the feature The Input Channel Title field allows the channel title to be modified For Time the radio button enables or disables the feature Clicking the Display Weekdays checkbox will show the w...

Page 57: ...o select a different destination folder The Video Clips field allows the user to select where to save video clips to Click the Browse button to select a different destination folder To reset to defaul...

Page 58: ...s menu section allows the user to change network settings for the camera 5 4 2 1 TCP IP The TCP IP menu item has two tabs TCP IP and P2P 5 4 2 1 1 TCP IP TCP IP stands for Transmission Control Protoco...

Page 59: ...the IP version The two options are IPV4 and IPV6 IP Address This field allows the user to enter a custom IP address Subnet Mask This field allows the user to enter a custom subnet mask Default Gateway...

Page 60: ...Connection tab is where users can configure port connections Below is a screenshot of the Connection settings tab Below is an explanation of the fields on the Connection settings tab Max Connections...

Page 61: ...on To refresh the page click the Refresh button To save the settings click the Save button 5 4 2 4 DDNS DDNS stands for Dynamic Domain Name Server This technology is used to automatically update name...

Page 62: ...tings click the Reset Defaults button To refresh the page click the Refresh button To save the settings click the Save button 5 4 2 5 IP Filter This screen allows for the filtering of IP addresses eit...

Page 63: ...Simple Mail Transfer Protocol This field allows the user to enter the SMTP server used by the email service Port This field allows the user to enter the port that corresponds to the selected SMTP ser...

Page 64: ...r in an easy manner to quickly allow for remote access Below is a screenshot of the UPnP settings screen Below is an explanation of fields on the UPnP settings screen Enable This checkbox allows the u...

Page 65: ...k devices Below is a screenshot of the SNMP settings screen Below is an explanation of fields on the SNMP settings screen SNMP Version These checkboxes allow the user to select the SNMP version to use...

Page 66: ...ge click the Refresh button To save the settings click the Save button 5 4 2 11 802 1x 802 1x is an authentication method for connecting to a network Below is a screenshot of the 802 1x screen To enab...

Page 67: ...pen the WiFi MultiMedia WMM options Note WMM is not supported on this model To reset to default settings click the Reset Defaults button To refresh the page click the Refresh button To save the settin...

Page 68: ...et to 10 seconds each alarm may last 10 seconds if the local alarm is activated During the process if the system detects another local alarm signal at the fifth second the buzzer tour PTZ activation s...

Page 69: ...hould be Relay Out This checkbox allows the user to enable the camera to trigger a connected alarm connected to the alarm port on the back of the camera when a motion detection alarm is triggered Alar...

Page 70: ...ected to the alarm port on the back of the camera when a video tamper alarm is triggered Alarm Delay This field specifies in seconds how long the delay between alarm activation and Relay alarm activat...

Page 71: ...s of the week Also periods of audio detection can be set for each day and enabled using the period settings on the bottom half of the screen There are a total of 6 periods that can be set Anti Dither...

Page 72: ...an audio detection alarm is triggered PTZ This checkbox allows the user to enable the camera to activate a PTZ tour when an audio detection alarm is triggered Snapshot This checkbox allows the user t...

Page 73: ...the anti dither time has expired Sensor Type This dropdown box allows the user to select which sensor type to use The options are Normally Open NO and Normally Closed NC Record This checkbox allows th...

Page 74: ...the user to enable the camera to trigger an alarm when an SD Card abnormality is detected Alarm Delay This field specifies in seconds how long the delay between alarm activation and relay alarm activa...

Page 75: ...set Defaults button To refresh the page click the Refresh button To save the settings click the Save button 5 4 3 4 3 Illegal Access This tab allows the user to set the camera s response to an Illegal...

Page 76: ...e Snapshot Schedule and Holiday Schedule 5 4 4 1 1 Record Schedule This tab is where video recording settings are configured Below is a screenshot of the Record Schedule settings screen Below is an ex...

Page 77: ...o default settings click the Reset Defaults button To refresh the page click the Refresh button To save the settings click the Save button 5 4 4 1 2 Snapshot Schedule This tab is where snapshot record...

Page 78: ...ave the settings click the Save button 5 4 4 1 3 Holiday Schedule This tab is where holiday settings are configured Below is a screenshot of the Holiday Schedule settings screen Below is an explanatio...

Page 79: ...Path settings tab Event Type This column designates storage options available to the camera The options are SD Card FTP and NAS Record Type These columns designate which recording type should be reco...

Page 80: ...ow is a screenshot of the FTP tab Below is an explanation of the fields on the FTP settings tab Enable This checkbox allows the user to enable FTP uploading for the camera s recorded media Server Addr...

Page 81: ...ettings are configured Below is a screenshot of the record control menu Below is an explanation of the fields on the Record Control settings tab Pack Duration This field allows the user to set how man...

Page 82: ...elds on the General settings tab Device Name This field allows the user to change the device s name Language This dropdown box allows the user to change the language used in the camera Video Standard...

Page 83: ...time for DST End Time This dropdown box and field allow the user to enter in the end time for DST Synchronize with NTP This checkbox allows the user to enable the camera s synchronization with an NTP...

Page 84: ...the camera Description This column shows a description of the account Modify This column allows the user to modify the user account Delete This column allows the user to delete a user account Note Th...

Page 85: ...Auto Maintain screen Auto Reboot This checkbox allows the user to enable the auto reboot function The dropdown box and field to the right of this checkbox allow the user to specify what date and time...

Page 86: ...iew information about the camera for reference purposes 5 4 6 1 Version This screen allows the user to see various information about the camera s software versions as well as other information Below i...

Page 87: ...log and click search To backup the log click the Backup button To clear the log click the Clear button 5 4 6 3 Online Users This screen allows the user to see which users are online Below is a screens...

Page 88: ...r a custom alarm sound to use 5 6 Logout Clicking the logout button will log out the user 6 FAQs Troubleshooting 1 The camera does not boot up properly Below are a few possible reasons why this may be...

Page 89: ...t is malfunctioning The camera s firmware is incompatible with the recorded video The recorded files have been overwritten The recording function has been disabled 6 Playback video is distorted Below...

Page 90: ...one setup is not correctly configured Motion detection sensitivity is too low 11 Web Access isn t working Below are a few possible reasons why this may be occurring Windows version is pre Windows 2000...

Page 91: ...here may be a MAC address conflict The PC or camera network card may be defective The PoE cable is too long 14 The alarm signal cannot been disarmed Below are a few possible reasons why this may be oc...

Page 92: ...ernate Gateway The node on the computer network that the network software uses when an IP address does not match any other routes in the routing table and when the default gateway is not available Ant...

Page 93: ...ong the delay between alarm activation and recording should be Relay Out Relay Out triggers a connected alarm connected to the alarm port on the back of the camera when an alarm on the camera is trigg...

Page 94: ...hese limits are designed to provide reasonable protection against harmful interference in a residential installation This equipment generates uses and can radiate radio frequency energy and if not ins...

Page 95: ...oncentration of the hazardous substance of at least one of all homogeneous materials in the parts is above the relevant threshold of the SJ T11363 2006 standard During the environmental friendly use p...

Page 96: ...signs and software here are subject to change without prior written notice All trademarks and registered trademarks mentioned are the properties of their respective owners To contact Amcrest support p...

Page 97: ...97 Copyright Amcrest 2018...

Reviews: