


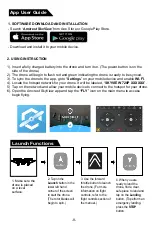


Charging
Drone
Remove the battery from the drone and insert one side of the USB connector into the battery, and
the other side into any computer USB port.
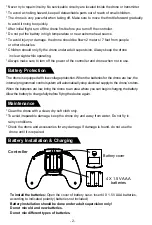
The drone will come with a set of 4 replacement
rotor blades. These rotor blades will be denoted by two
different types; (A) type and (B) type rotors. You will see
the “A” and “B” letters on the canopy of the unit. When
replacing the blades of the device be sure to replace the
new blades into the rotors on the motor according to
their specific rotor types.
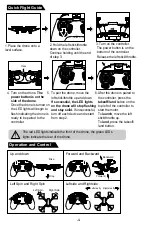
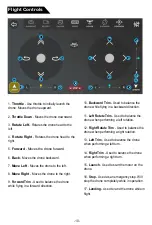
Throttle /Left Stick
Speed Select
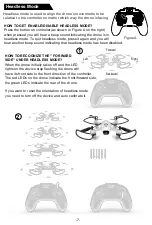
Headless mode
Right Stick/Rudder
Go Back
Power light
Push in once to change
speed (Listen to beeps)
Slow speed - one beep
Medium speed - two beeps
High speed - three beeps
Press one time to unlock the drone
press again for slowly landing
Press for 3 seconds for emergency stop
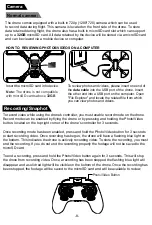
Take picture/record video
Camera light
Press one time for taking picture,
press for 3 seconds for recording video
The light will flash while taking picture
and remian on while recording video.
Press once to go into headless mode,
press again to quit headless mode. For
more information on Headless mode refer
to the “Headless Mode” section of this manual.
-3-
360° Stunt Flip
Press down once (one beep
sounds) and then control rudder
to perform flip function
Trim button
Trim button
Trim button
A
B
B
A
Takeoff/Land
Trim buttons on the
controller are used to help
balance the drone while in
flight. For more information
on trim, refer to pg. 5
Allow the battery to charge fully before operation
. A fully charged battery will provide
about
7 minutes
of flight time per charge. When the green light on the battery disappears,
the battery will be fully charged and ready for use. Charging a battery should take no longer
than 90 minutes.
Power On/Off
Turns the controller
on/off.
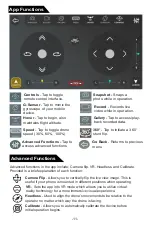
Note:
There are two ways you can operate the drone, one with the included controller and one
via the Amcrest SkyView app. For more information on how to setup your drone on the
Amcrest Skyview app refer to page 9.
Press once to automatically
direct the drone towards a
backwards direction.


