

2
Software Installation
1.
Insert the CD into the CD drive of your computer.
3
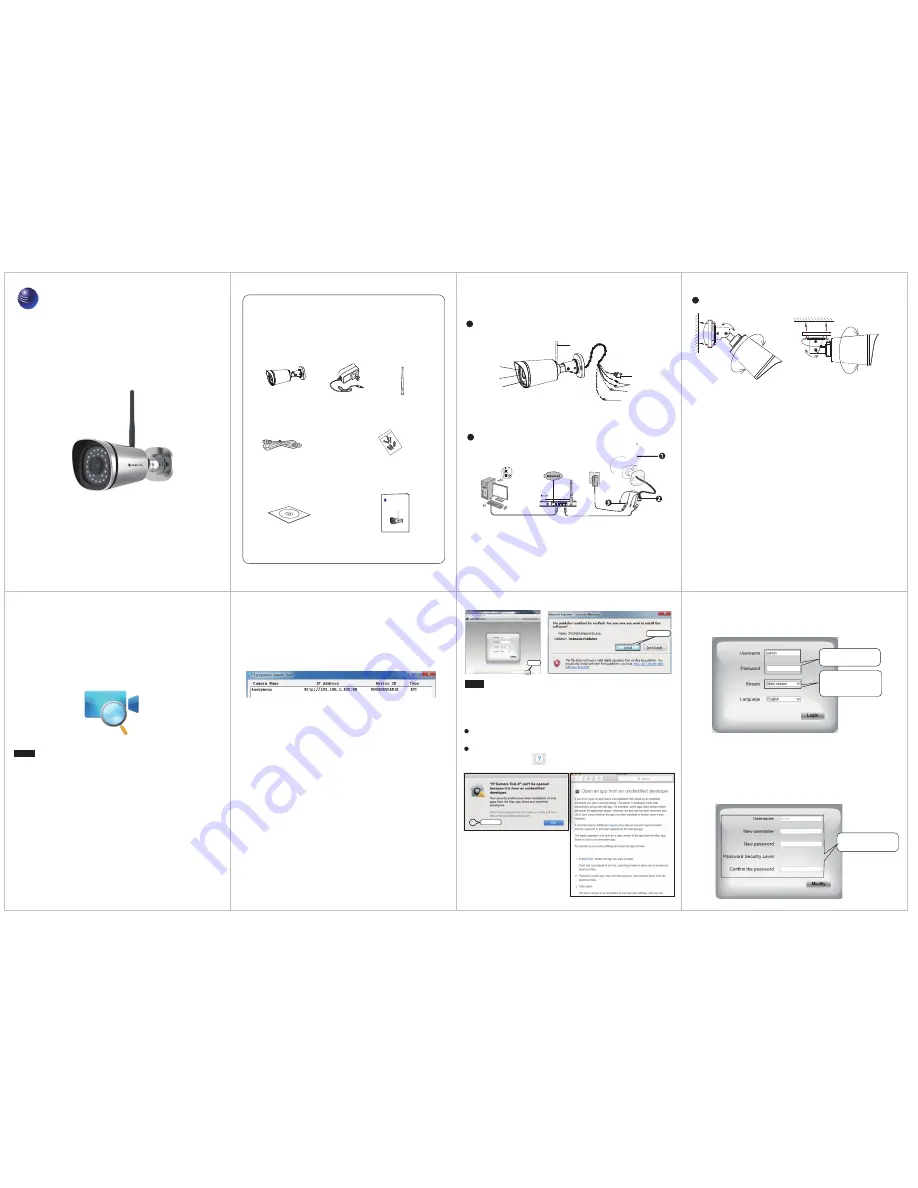
Access the Camera
1.
Enable the DHCP feature of your router (enabled by default
normally), then open the Equipment Search Tool program. It
should display the camera’s IP address in your LAN (Local Area
Network).
2
. Make a note of the IP address in this window. For example, the
camera IP address may be http://192.168.1.100:88 (this is an
example only, your results will vary). If you are running a PC,
launch Internet Explorer*, Chrome* or Firefox* and type this
address into the address bar at the top of the browser. If you are
running a Mac, launch Safari** and type this address into the
address bar at the top of the browser.
* Windows: The camera plug-ins only run on Microsoft Explorer,
Google Chrome and Mozilla Firefox.
The camera plug-ins do not run on Microsoft Edge.
* Mac: The camera plug-ins only run on Safari.
Change the following:
When logging in for the first time, you will need to download and
install the IPCWebComponents (exe for Windows, pkg for Mac).
Run the downloaded plugins, and allow the app to make changes
to your PC or Mac.
3.
After installing the IPCWebComponents, refresh the
browser and click
Login
.
1
Hardware Introduction
Package Contents
Quick Installation Guide
Wi-Fi Antenna
Resource CD
Ethernet Cable
Power Adapter
mounting bracket screws
and hex nut wrench
IP Camera
Physical Description
Hardware Connection
Hardware Installation
1.
Mount the antenna and make it stand vertically.
2.
Connect the camera to the LAN network (Router or Switch) via
ethernet cable.
3.
Connect the power adapter to the camera.
V1.0
Quick Installation Guide
(
For Windows & Mac OS
)
Outdoor HD IP Camera
WPS
LAN
Audio in/out
Power
Reset Button
Antenna
Induction IC
LENS
Infrared LED
Note:
Configure the WiFi settings before mounting the camera in
its final location.
1. Mount the camera to an exterior horizontal wall or surface with
the 3 mounting screws and anchors. Lock the camera bracket to
the desired angle with the hex wrench.
Note:
The mounting bracket is designed to point upwards
towards the sky. To reverse the mounting bracket to point
downwards, use the included hex wrench to detach the camera
from the mounting bracket, and reverse the camera in the
mount.
2. Connect the AC adapter to an AC outlet. The AC adapter block
is designed for indoor use. Install in a clean, dry place, such as a
weatherproof electrical box, or through an access hole inside the
house or facility. Extension cables are available from Ambient
Weather. To protect the power cable from the elements, it is
recommended the cables are run through electrical conduit.
0~90°
0~90°
0~360°
0~360°
0~360°
0~360°
4.
When setting up your camera for the first time, it will request
that you modify the default username and/or password if both
are still set to default. Input the
New username
,
New password
and
Confirm the password
, click
Modify
to complete the
modification. You will now use the new username and password
to log in to the camera in the future.
Note:
If your computer doesn't have a CD drive, you can download
the Equipment Search Tool from our website here:
http://www.AmbientWeather.com/ambientcamhd3.html
Model:AmbientCamHD3
Main stream offers the highest
quality video while Sub stream
offers less quality, but also less
delay when viewing.
Default username is admin
with no password.
Input the
New username
,
New password
and
Confirm the password
.
Find the folder “Equipment Search Tool” , then go to the folder
“For Windows OS”or “For Mac OS”. Copy and paste the IP camera
tool file to your computer, or drag it onto your desktop.
2.
ambient weather
Click Install
Click Install
Note
:
If you are running Firefox, you may be prompted to run
"nplPCReg DLL. Select Allow and Remember.
Mac Safari:
You may be prompted to run the H264 IPC web plugin. Select
Trust to continue.
You will be required to Open this app from an unidentified
developer. Press the button for instructions.
Press the button
Quick Installation Guide
(
For Windows & Mac OS
)
Outdoor HD IP Camera
ambient weather


