background image


Turn off the appliance completely and let cool before servicing. Only a qualified service person 
should service and repair this electric appliance. 

 
If it is necessary to hard wire this appliance, a qualified electrician must remove the cord connection, 
and wire the appliance directly to the household wiring. 

 
This appliance must be electrically connected and grounded in accordance with local codes, if hard 
wired.  In  the  absence  of  local  codes,  use  the  current  CSA  C22.1  CANADIAN  ELECTRICAL  CODE  in 
Canada or the current ANSI/NFPA 70 NATIONAL ELECTRICAL CODE in the United States.   

 
1.


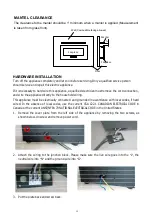
Remove  the  cover  plate  from  the  left  side  of  the  appliance  by  removing  the  two  screws,  as 
shown below. Unscrew and remove power cord.   


2.


Attach  the  wiring  to  the  junction  block.  Please  make  sure  the  live  wire  goes  into  the 

L

,  the 

neutral wire into 

N

 and the ground wire into 

G


3.


Put the plate back and screw back. 

HARDWARE INSTALLATION

MANTEL CLEARANCE


The clearance to the mantel should be 1” minimum when a mantel is applied (Measurement 

is taken from glass front). 


1"

Floor

Fireplace

Mantel

Wall

Fireplace

(Combustible facing allowed)

15

Summary of Contents for WM-FM-26-3623-BG

Page 1: ...in this manual to prevent personal injury or property damage Do not store or use gasoline or other flammable vapors and liquids in the vicinity of this appliance WM FM 26 3623 BG WM G190026 1 WM FM 34...

Page 2: ...EPLACE 5 WM FM 26 3623 BG WM G190026 1 6 WM FM 34 4423 BG WM G190034 1 7 WM FM 48 5823 BG WM G190048 1 8 WM FM 60 7023 BG WM G190060 1 9 WM FM 72 8123 BG WM G190072 1 10 WM FM 88 10023 BG WM G190088 1...

Page 3: ...it will not be tripped over 7 Do not modify this fireplace Use it as described in the manual Any other use not recommended by the manufacture may cause fire shock or injury to persons 8 Do not use th...

Page 4: ...y energy and if not installed and used in accordance with the instructions may cause harmful interference to radio communications However there is no guarantee that interference will not occur in a pa...

Page 5: ...t LOCATING THE FIREPLACE Plan where to locate and frame the fireplace This will save time and money later when you install the fireplace Before installation consider the following 1 Where the fireplac...

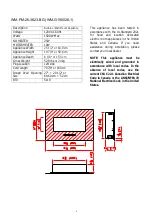
Page 6: ...60 cm 52 cm BTU 5118 This appliance has been tested in accordance with the UL Standard 2021 for fixed and location dedicated electric room appliances in the United States and Canada If you need assis...

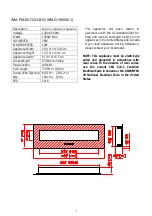
Page 7: ...8 9 cm 52 cm BTU 5118 This appliance has been tested in accordance with the UL Standard 2021 for fixed and location dedicated electric room appliances in the United States and Canada If you need assis...

Page 8: ...4 5 cm 52 cm BTU 5118 This appliance has been tested in accordance with the UL Standard 2021 for fixed and location dedicated electric room appliances in the United States and Canada If you need assis...

Page 9: ...r 154 cm 52cm BTU 5118 This appliance has been tested in accordance with the UL Standard 2021 for fixed and location dedicated electric room appliances in the United States and Canada If you need assi...

Page 10: ...84 cm 52 cm BTU 5118 This appliance has been tested in accordance with the UL Standard 2021 for fixed and location dedicated electric room appliances in the United States and Canada If you need assist...

Page 11: ...3 cm 52 cm BTU 5118 This appliance has been tested in accordance with the UL Standard 2021 for fixed and location dedicated electric room appliances in the United States and Canada If you need assist...

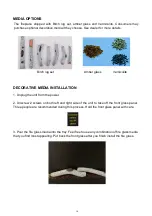
Page 12: ...hting from the unit This plug is located at the bottom left hand side behind the front of the glass 2 The screws are located on the sides of the unit Once located unscrew the two or four screws You ca...

Page 13: ...to be drilled Drill 8 or more holes 8mm diameter 40mm depth using a suitable size drill and put the wall plugs into the holes 4 Take out the hanger from the fireplace by unscrew the screw Referring t...

Page 14: ...plugging the power supply cord into a conveniently located 120 Volt grounded outlet The rough wall opening size of the fireplace W D H WM FM 26 3623 BG 27 6 1 2 20 1 2 WM FM 34 4423 BG 35 6 1 2 20 1...

Page 15: ...ent CSA C22 1 CANADIAN ELECTRICAL CODE in Canada or the current ANSI NFPA 70 NATIONAL ELECTRICAL CODE in the United States 1 Remove the cover plate from the left side of the appliance by removing the...

Page 16: ...from the power 2 Unscrew 2 screws on both left and right side of the unit to take off the front glass panel Three people are recommended during this process Hold the front glass panel with care 3 Pour...

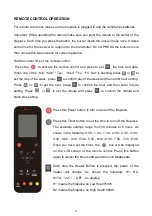
Page 17: ...ht brightness There are 11 brightness levels d11 d2 dynamic condition d1 and the OFF OF setting you can cycle through 4 Press to set the turn off time 30min 1h 2h 3h 4h 5h 6h 7h 8h t0 The indicator li...

Page 18: ...of the week and then enter hour setting Press or to set the hour press to confirm the hour and then enter minute setting Press or to set the minute and press to confirm the minute and finish time sett...

Page 19: ...conds to enter 7 day timer function When Sun flashes press or to select the day that you want to set press to confirm your setting Then ON will be display on the LCD screen of the remote control at th...

Page 20: ...da will disappears NOTE If the 7 day timing and the general timing are set at the same time the system will respond to an earlier shutdown time Press Refer button to check the settings of 7 day timer...

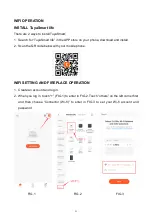
Page 21: ...one download and install 2 Scan the QR code below with your mobile phone WIFI SETTING AND FIREPLACE OPERATION 1 Create an account and log in 2 When you log in touch FIG 1 to enter in FIG 2 Touch other...

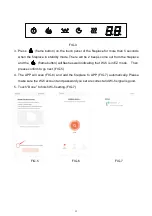
Page 22: ...om the fireplace and the flame button will flash as well indicating that Wi fi is in EZ mode Then please confirm to go next FIG 5 4 The APP will scan FIG 6 and add the fireplace to APP FIG 7 automatic...

Page 23: ...6 Now you are in the interface like FIG 7 You can operate the fireplace via Wi fi FIG 7 NOTE Turn off the flashing blue Wifi indicator light Touch the power button once the blue light will stop flashi...

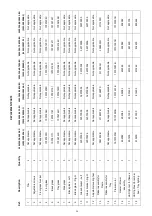
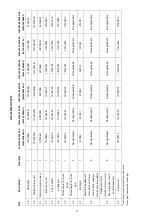
Page 24: ...ble Not applicable Not applicable 8 Black glass Left 0 Not applicable Not applicable Not applicable Not applicable Not applicable Not applicable 9 Black glass Right 0 Not applicable Not applicable Not...

Page 25: ...licable Not applicable Not applicable 27 WiFi card 1 212051 212051 212051 212051 212051 212051 28 Bluetooth speaker set Set includes Power circuit board speaker circuit board speaker 0 Not applicable...

Page 26: ...EXPLODED VIEW 26...
Page 27: ...ged into an electrical outlet Check plug and plug in Appliance has overheated and safety device has caused the thermal switch to disconnect Turn off the main switch allow appliance to cool for 10 minu...

Page 28: ...SERVICE HISTORY This heater must be serviced annually depending on usage Date Dealer Name Service technician Name Service Performed Special Concerns NOTES 28...

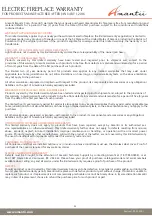
Page 29: ...ars from the date of the rst purchase of such products The limited five 5 year warranty period for products also applies to any implied warranties that may exist under applicable law Some jurisdiction...

Page 30: ...t apply to this limited warranty or the sale of products covered by this limited warranty GENERAL Amantii reserves the right to make changes at any time without notice in design material specification...

Reviews: