background image


12

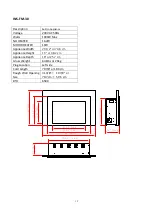
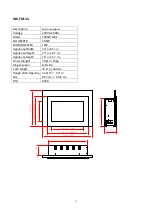
INS-FM-30 


Description 

Built-in Appliance 

Voltage 

240V AC 50Hz 

Watts 

1900W Max 

NO HEATER 

16.2W


MOTOR HEATER 

19W 

Appliance Width 

29 1/2” or 74.6 cm


Appliance Height 

19 ” or 48.2 cm


Appliance Depth 

10” or 25.7 cm


Gross Weight 

63.8lbs or 29kg


Plug Location 

Left side 

Cord Length 

70 7/8” or 180 cm 

Rough  Wall  Opening 
Size 

31 3/8”

×

  19 7/8“ or   

79.7 cm

×

  50.5 cm


2

5

"

[

6

3

3

]

38

965

" [

]

30 3 4

780

  / " [

]

2

0

3/

4

"

[

5

2

8

]

29 1 2

746 6

  / " [

. ]

1

9"

[

4

8

1

.

8

]

10

256 8

" [

. ]

8

1

/

2

"

[

21

5

.

8

]

1

5

1

/

2"

[

3

9

2

]

23 1 2

598

  / " [

]

BTU

6500

Summary of Contents for INS-FM-26

Page 1: ...information in these instructions are not followed exactly a fire or explosion may result causing property damage personal injury or loss of life Do not store or use gasoline or other flammable vapor...

Page 2: ...TIONS 16 DECORATIVE MEDIA INSTALLATION 16 OPERATION 17 MANUAL OPERATION 17 REMOTE CONTROL OPERATION STANDARD FLAME 18 CARE AND MAINTENANCE 21 REPLACEMENT PARTS 22 EXPLODED VIEW 23 TROUBLE SHOOTING 24...

Page 3: ...s may cause electric shock or fire or damage to the heater 11 Always unplug or disconnect the appliance from the mains power supply when not in use or when moving or cleaning it Do not pull the cord t...

Page 4: ...s Particular attention has to be given where children and vulnerable people are present 26 This appliance can be used by children aged from 8 years and above and persons with reduced physical sensory...

Page 5: ...can come into contact with the heater Don ts Never leave children unsupervised in a room where the heater is ON and unguarded Never obstruct or cover the fan outlet or force items into heater openings...

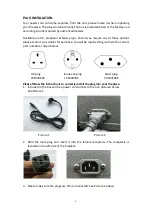
Page 6: ...for purchase You will be required to give them the correct part number as listed below UK plug European plug Swiss plug 10103060E 10103030E 10103109E Please follow the instructions to correctly insta...

Page 7: ...ble for connecting three blade grounding type plugs to two slot receptacles The green grounding lug extending from the adapter must be connected to a permanent ground such as a properly grounded outle...

Page 8: ...be placed within a framed enclosure that is level dry and capable of supporting the weight of the appliance and front glass It may be placed directly on wood or a non combustible surface not on linol...

Page 9: ...or 74 6 cm Appliance Height 24 3 4 or 63 2 cm Appliance Depth 10 1 4 or 26 1 cm Gross Weight 63 8 lbs or 29kg Plug Location Left side Cord Length 70 7 8 or 180 cm Rough Wall Opening Size 30 1 8 25 1 4...

Page 10: ...pliance Height 31 3 4 or 80 5 cm Appliance Depth 10 1 4 or 26 1 cm Gross Weight 92 4lbs or 42kg Plug Location Left side Cord Length 70 7 8 or 180 cm Rough Wall Opening Size 39 5 8 32 1 2 or 100 6 cm 8...

Page 11: ...NO HEATER 13W MOTOR HEATER 19W Appliance Width 25 1 4 or 64 2 cm Appliance Height 16 7 8 or 42 8 cm Appliance Depth 8 3 4 or 22 2 cm Gross Weight 61 6lbs or 28kg Plug Location Left side Cord Length 70...

Page 12: ...29 1 2 or 74 6 cm Appliance Height 19 or 48 2 cm Appliance Depth 10 or 25 7 cm Gross Weight 63 8lbs or 29kg Plug Location Left side Cord Length 70 7 8 or 180 cm Rough Wall Opening Size 31 3 8 19 7 8...

Page 13: ...nce Width 33 or 84 cm Appliance Height 23 or 58 7 cm Appliance Depth 10 or 25 7 cm Gross Weight 77lbs or 33kg Plug Location Left side Cord Length 72 6 or 180 cm Rough Wall Opening Size 33 3 4 24 or 85...

Page 14: ...suitable rain cap A Code Conforming jacketed grounded receptacle may be placed within the fireplace Do not place it above the fireplace insert The surround glass extends 1 below the base of the inser...

Page 15: ...bolts to provide adequate leveling Silicone The surround glass extends 1 below the base of the insert A Code Conforming jacketed grounded receptacle may be placed within the fireplace Do not place it...

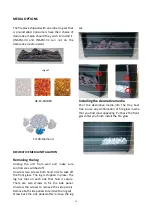
Page 16: ...e switched off Unscrew two screws both hand side to take off the front glass The log is shipped in place The log has tabs on each side that hold it secure There are two screws to fix the side panel Un...

Page 17: ...s for the third time the heating element turns off indicator extinguishes Note after the heating elements are turned on manually the heating elements work but are not controlled by the temperature sen...

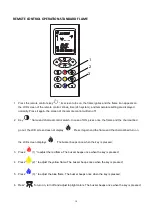
Page 18: ...in the screen of the remote control will turn off 2 Key flame and charcoal control switch In case of ON press once the flame and the charcoal bed go out the LCD screen does not display Press it again...

Page 19: ...etween 7 and 30 The buzzer beeps when the key is pressed 9 Press shift key Press once the corresponding figure flashes Press now to set current time and week The buzzer does not beep when the key is p...

Page 20: ...splays icon the indicator on the machine lights yellow Press again to turn it off the LCD screen does not display icon and the indicator on the machine goes off The buzzer beeps when the key is presse...

Page 21: ...ttery items in separate collection schemes which cater for the recovery and recycling of materials contained within Your co operation is vital to ensure the success of these schemes and for the protec...

Page 22: ...6 301506 301506 301506 REMOTE RECEIVER 1 8 386009D 387010D 3103009 391010D 3104012 PLASTIC GLASS 1 9 601136B 601136B 601137B 601136B 601137B 601136B 601136B FLAME LED STRIP 10 10702130D 10702132D 1070...

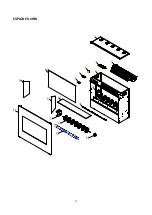
Page 23: ...23 EXPLODED VIEW...

Page 24: ...s fuse has blown Replace the fuse Appliance will not come on when switch is flipped to ON Appliance is not plugged into an electrical outlet Check plug and plug in Appliance has overheated and safety...

Page 25: ...25 SERVICE HISTORY This heater must be serviced annually depending on usage NOTES Date Dealer Name Service Technician Name Service Performed Special Concerns...

Page 26: ...26...
Reviews: