


01
02
03
04
05
06
07
08
09
10
11
12
13
14
15
16
17
18
19
20
21
22
23
24
IMPORTANT INSTRUCTIONS
Please read the following instructions carefully before using the appliance.
Caution
- Fire, electric shock, physical injury and material damage hazards:
To use the appliance, always follow the instructions for assembly, use and maintenance as well as usage cautions:
1. Carefully read and retain these instructions.
2. Before connecting the appliance, be sure that the mains voltage available matches that specified on the rating plate.
3. Do not use the appliance for other than its intended use. For domestic indoor use only.
4. There may be trace of odour during the first few minutes of initial use. This is normal and will quickly disappear.
5. The heater is hot when in use. To avoid burns, do not let bare skin touch any hot surface.
6. Keep combustible material such as furniture, cushions, bedding, paper, clothes, curtains etc. at least 1m away from
the heater.
7. Do not use the heater in areas where flammable liquids are stored or where flammable fumes may be present.
8. Do not cover or obstruct any of the heat outlet grilles or the air intake openings of the heater.
9. Do not use the heater in the rooms with explosive gas or while using inflammable solvents, varnish or glue.
10. Keep the heater clean. Do not allow any objects to enter any ventilation or exhaust opening as this may cause
electric shock, or fire or damage to the heater.
11. Always unplug or disconnect the appliance from the mains power supply when not in use or when moving or
cleaning it. Do not pull the cord to unplug the heater.
12. Do not immerse the cord, plug or any part of the appliance in water or any other liquid.
13. Do not attempt to repair, disassemble or modify the appliance. There are no user-serviceable parts inside.
14. The heater must not be located immediately below a socket-outlet.
15. Do not use this heater in the immediate surroundings of a bath, a shower or a swimming pool.
16. CAUTION: In order to avoid a hazard due to inadvertent resetting of the thermal cutout, this appliance must not be
supplied through an external switching device, such as a timer, or connected to a circuit that is regularly switched on
and off by the utility.
17. Do not use this heater with a programmer, timer, separate remote-control system or any other device that switches
the heater on automatically, since a fire risk exists if the heater is covered or positioned incorrectly.
18. WARNING: In order to avoid overheating, do not cover the heater.
19. WARNING! – DO NOT COVER THIS APPLIANCE WITH ITEMS SUCH AS CLOTHING, BLANKETS OR PLACE
NEXT TO CURTAINS OR NET/BLINDS.
20. If the supply cord is damaged, it must be replaced by the manufacturer, its service agent or similarly qualified
persons in order to avoid a hazard.
21. Do not use this heater in small rooms when they are occupied by persons not capable of leaving the room on their
own, unless constant supervision is provided.
22. If the glass is damaged, do not use the heater in order to avoid a hazard.
23. Children of less than 3 years should be kept away from unless continuously supervised.
24. Children aged from 3 years and less than 8 years shall only switch on/off the appliance provided that it has been
placed or installed in its intended normal operating position and they have been given supervision or instruction
concerning use of the appliance in a safe way and understand the hazards involved, Children aged from 3 years and
less than 8 years shall not plug in, regulate and clean the appliance or perform user maintenance.
25. CAUTION Some parts of this product can become very hot and cause burns. Particular attention has to be given
where children and vulnerable people are present.
26. This appliance can be used by children aged from 8 years and above and persons with reduced physical, sensory
or mental capabilities or lack of experience and knowledge if they have been given supervision or instruction concern-
ing use of the appliance in a safe way and understand the hazards involved. Children shall not play with the appliance.
Cleaning and user maintenance shall not be made by children without supervision.
27. The heater may emit a slight, harmless odour and smoke when first used. This odour and smoke is normal and it is
caused by the initial heating of internal heater parts and will not occur again.
28. DO NOT plug into an extension lead/cable or plug adaptor.
29. DO NOT cut off the plug and hardwire directly into the mains or via a fused fixed spur.
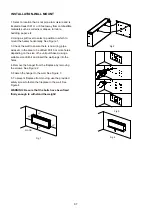
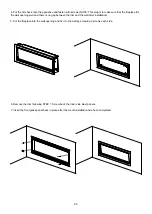
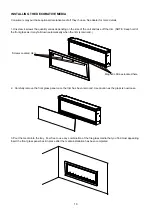
30. For details about installing the fireplace, please refer to “Installation” section.


