MTX-30P PUSH INSTALLATION & OPERATION GUIDE
Page 1: ...MTX 30P PUSH INSTALLATION OPERATION GUIDE...
Page 2: ...ng this manual be sure to store it in a safe place for further reference For more information about Amano s complete line of products visit our web site at www amano com For on line help please visit...
Page 3: ...nderstanding the MTX 30P Push Front Panel STARTUP 10 MTX 30P Push Startup Screen Power On OPERATION 11 12 Daily MTX 30P Push Use Punching with a Proximity Card Prox Punching with a Password Pwd View P...
Page 4: ...17 Voice DATA MANAGEMENT 18 19 Delete Data Backup Data Restore Data MORE OPTIONS 20 AUTOTEST 21 23 Test All Test LCD Test Voice Test Keyboard Test Clock RTC Test Relay SYSTEM INFORMATION 24 25 Device...
Page 5: ...automatically calculates and accumulates hours worked based on the company s payroll policies This system separates the hours worked into regular and overtime pay categories and displays them at the...
Page 6: ...Salt Damage Close proximity to a wall outlet 6 ft If using Ethernet close proximity to an Ethernet connection 6 ft or if connecting via WiFi check the location for a good signal Amano recommends the f...
Page 7: ...plate to the mounting bracket Make sure the two metal tabs are on top 6 Plug in power connector and Ethernet cable if using Ethernet into the terminal Also connect signal wiring if applicable 7 Slide...
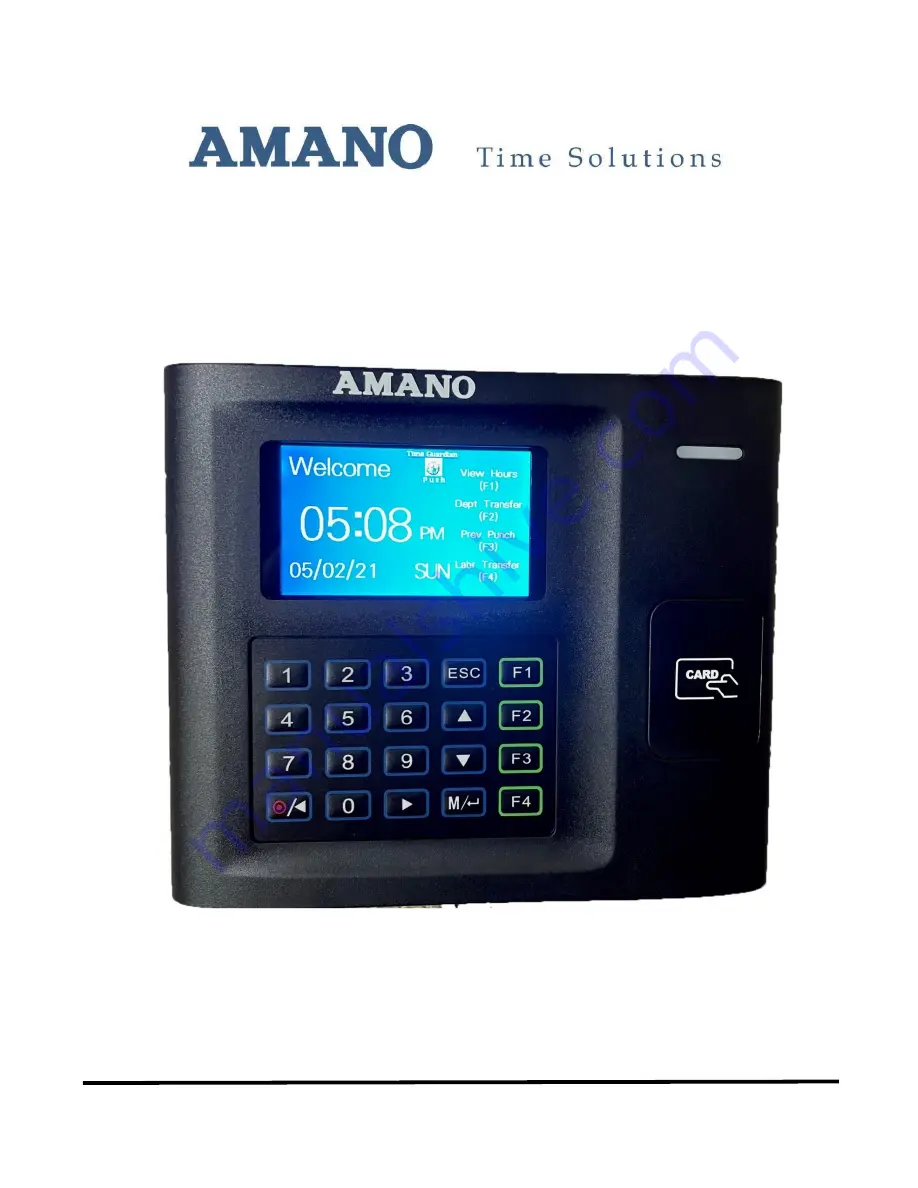
Page 8: ...audible voice verification of operations i e Thank you Incorrect Password Access Denied Invalid Id Please try again etc TFT Display Screen Displays time date day and operational information Proximity...
Page 9: ...space back Modify current item value to scroll down or up for menu operations F3 View Previous Punch ESC to perform exit cancel ignore when using the Menus Keypad Functionality Power On Off Left Arrow...
Page 10: ...to the terminal from the host PC or cloud utilizing Time Guardian software The information such as date time daylight saving time DST proximity card templates and hours worked sent from Time Guardian...
Page 11: ...rd entry will flash the error message Prox Verify fail The Red LED will momentarily stay on Punching with a Password Pwd From the Welcome screen enter your User ID using the keypad and press OK to con...
Page 12: ...lling the MTX 30P Push proximity card terminal and powering on you may begin enrolling users If this is the first enrollment in a new or empty clock system everyone will be able to enroll However if t...
Page 13: ...ew User and press OK 4 Highlight badge number and hit ok 5 Swipe badge Confirmation of Proximity Card Enrollment To confirm that you have successfully enrolled your Proximity Card use the back arrow t...
Page 14: ...ay Style 1 Select All Users 2 Press to select All Users Here you can Edit the user information If you would like to delete all users select Delete and the user will be deleted Select your desired Disp...
Page 15: ...on to display the Main Menu 2 Using the arrows highlight the User Role icon and then press OK 3 Click on Registrar From here you can select rights from the following options User Mgt Comm System Perso...
Page 16: ...IP address if necessary however it cannot be the same as that of the PC IP address Wireless Network 1 Click on Wireless Network 2 When you select the wireless network option the following window will...
Page 17: ...sound in response to every keyboard touch or not Select ON to enable the beep sound and select OFF to mute NOTE Use the OK button to toggle between ON OFF Personalize 1 Press the Menu button to displa...
Page 18: ...OK 2 Next click on Option 1 Backup to Device 3 Select the content you want to backup business data and or system data 4 Select Backup Start Option 2 Backup to USB disk This will enable Backup to a US...
Page 19: ...tion items to be restored and then save the selected items You can select the content you want to restore 3 If you choose Restore from USB Disk the operations are similar to those performed to Restore...
Page 20: ...ton to display the Main Menu 2 Using the arrows highlight the USB Manager icon and then press OK From this screen the following options are available Download Attendance Data User Data User Portrait S...
Page 21: ...on to display the Main Menu 2 Using the arrows highlight the Autotest icon and then press OK Highlight Test All and press OK The terminal automatically tests the LCD voice keyboard and clock Click OK...
Page 22: ...white and pure black It will also check to make sure the screen displays properly You can continue the test pressing OK or exit it by pressing ESC Test Voice Highlight Test Voice and press OK Here yo...
Page 23: ...ck works properly by checking the stopwatch of the clock Press OK to start the stopwatch counting and press OK again to stop the clock and check whether the counting is accurate Press ESC to exit the...
Page 24: ...stem Info icon is highlighted and then press OK Highlight Device Capacity and press OK From this screen you can see the following information Number of Users that are enrolled Number of Admin Users Nu...
Page 25: ...Device name serial number MAC Address platform information and MCU version are displayed here along with the manufacturer name and manufacture date Firmware Info Highlight Firmware Info and press OK H...
Page 26: ...5 H x 6 5 W x 1 8 D 140mm x 165mm x 46mm OPERATING ENVIRONMENT 32 F to 105 F 0 C to 45 C 20 to 80 relative humidity non condensing WEIGHT 1 35 lbs 0 61kg DISPLAY 3 in TFT LCD Color Screen POWER INPUT...
Page 27: ...www amano com MTX 30P Push Copyright 2021 Amano Cincinnati Inc Printed in U S A 5 2 2021...