background image

SERVICING

23

T

HERMOSTAT

 M

ENU

 S

CREEN

S

YSTEM

 S

TART

-

UP

 T

EST

O

N


INITIAL


POWER


START

-

UP

THE


OUTDOOR


UNIT


WILL


DISPLAY


CODE


E11, 

SIGNALING


THAT


INITIAL

 SYSTEM 

TEST


MUST


BE


RUN

. F

OLLOW


THE

 C

OMFORT

N

ET

™ 

SETUP


SCREEN


TO


ENTER


APPLICATION

-

UNIQUE


INFORMATION

.  S

EE

 C

OMFORT

N

ET


THERMOSTAT


MANUAL


FOR


DETAILED


INFORMATION

.

NOTICE

A system test is now required to check the equipment

settings and functionality.  Once selected, it checks the

equipment for approximately 5 - 15 minutes.  System test

may exceed 15 minutes if there is an error.  Refer to

the Troubleshooting section, if error code appears.

Before starting the SYSTEM TEST, turn off the electric heater

and gas furnace.

NOTE:

 If the unit is attempting to run SYSTEM TEST in under 20° F

ambient temperature, the unit may not be able to complete the
test due to low suction pressure.  In such a case, re-run the SYS-
TEM TEST when the ambient temperature exceeds 20° F.

1. Ensure the thermostat is installed.

2. Apply power to outdoor and indoor units.

3.

Start-up.

After the application information is entered,
the initial system test must be run.

F

OR


INVERTER

 H

EAT

 P

UMP

 C

ONDENSER


SYSTEM


USING

 C

OMFORT

N

ET

DO

 NOT 

INSTALL


A


TRANSFORMER

.

NOTICE

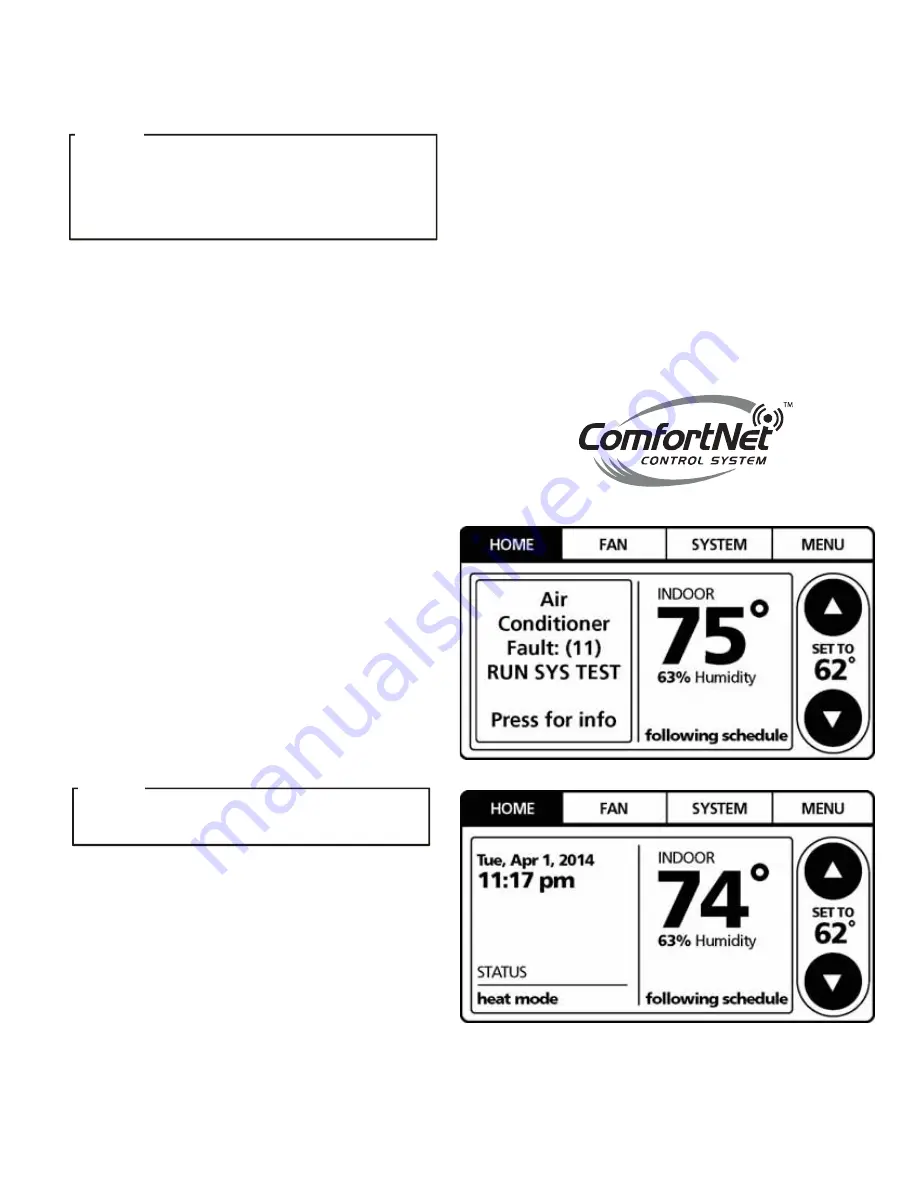
The HOME screen will be displayed showing
information similar to one of the adjacent screens.
Select MENU. Make sure the thermostat is in OFF mode
and select SYSTEM MENU.  Choose OFF before SYSTEM
VERIFICATION test.

NOTE:

 Either screen may be displayed.

SYSTEM TEST must be run for all installations.
System will not operate without a completed initial
SYSTEM TEST.

NOTE: 

The thermostat screen may indicate to run a SYSTEM

VERIFICATION test.

Summary of Contents for AVPVC02414A

Page 1: ...y The manufacturer does not assume any responsibility for property damage or personal injury due to improper service procedures or services performed by an unqualified person 2015 2016 Goodman Manufacturing Company L P is a registered trademark of Maytag Corporation or its related companies and is used under license All rights reserved Service Instructions RS6215002r7 October 2016 ...

Page 2: ...ther assistance please contact CONSUMERINFORMATIONLINE AMANA BRANDPRODUCTS TOLL FREE 1 877 254 4729 U S only email us at customerservice goodmanmfg com fax us at 713 856 1821 Not a technical assistance line for dealers Outside the U S call 1 713 861 2500 Not a technical assistance line for dealers Your telephone company will bill you for the call THIS UNIT SHOULD NOT BE CONNECTED TO OR USED IN CON...

Page 3: ... anyone providing the terminal protective cover is properly in place If however the terminal protective cover is not properly in place a venting terminal may discharge a combination of a hot lubricating oil and refrigerant b flammable mixture if system is contaminated with air in a stream of spray which may be dangerous to anyone in the vicinity Death or serious bodily injury could occur Under no ...

Page 4: ...on S Special SEER 18 SEER 20 SEER NOTE Not all feature sets compressors available at initial launch of product A V P V C 024 1 4 A Brand Engineering A Amana Brand Major Minor Revision Unit Application Refrigerant Charged V Multi Position Varible Speed 4 R410A Motor Communicating Voltage Cabinet Finish 1 208 230 V single phase 60 Hz P Painted Tonnage Nominal Expansion Device 024 2 0 ton T Expansion...

Page 5: ...n Number of turns from SS to tight spring Number of turns from SS to loose spring R22 7 25 4 25 R410A 9 5 2 EXPANSION VALVES R410A 0 6 C turn 1 1 F turn R410A Max 75 C 167 F Number of turns Number of turns from SS to from SS to TIGHT Spring LOOSE Spring R410A 9 5 2 ...

Page 6: ...shall be set to 1300 cfm speed tap of ON OFF ON Airflow for 5 kW up to 20 kW heater kits shall be set to 1500 cfm speed tap of ON OFF OFF 3 kW heater kit is not applicable for this indoor application AVZC20 1 Model Name TXV Kit AVZC200241 TXV V24 AVZC200361 TXV V36 AVZC200481 TXV V48 AVZC200601 TXV V60 Htr kW 9 10 11 AVPVC24C14 AVPVC36D14 AVPVC48D14 AVPVC60D14 3 ON ON ON 730 850 NR NR 5 ON ON OFF ...

Page 7: ...SE THE STATIC ELECTRICITY FROM YOUR BODY TO PREVENT FAILURE OF THE PC BOARD 3 MEASURE THE RESIDUAL VOLTAGE IN THE SPECIFIED MEASUREMENT POSITION USING A VOM WHILE PAYING ATTENTION NOT TO TOUCH THE CHARGED AREA 4 IMMEDIATELY AFTER MEASURING THE RESIDUAL VOLTAGE DISCONNECT THE CONNECTORS OF THE OUTDOOR UNIT S FAN MOTOR IF THE FAN BLADE ROTATES BY STRONG WIND BLOWING AGAINST IT THE CAPACITOR WILL BE ...

Page 8: ...RICITY FROM YOUR BODY TO PREVENT FAILURE OF THE PC BOARD 3 MEASURE THE RESIDUAL VOLTAGE IN THE SPECIFIED MEASUREMENT POSITION USING A VOM WHILE PAYING ATTENTION NOT TO TOUCH THE CHARGED AREA 4 IMMEDIATELY AFTER MEASURING THE RESIDUAL VOLTAGE DISCONNECT THE CONNECTORS OF THE OUTDOOR UNIT S FAN MOTOR IF THE FAN BLADE ROTATES BY STRONG WIND BLOWING AGAINST IT THE CAPACITOR WILL BE CHARGED CAUSING THE...

Page 9: ... ELECTRICITY FROM YOUR BODY TO PREVENT FAILURE OF THE PC BOARD 3 MEASURE THE RESIDUAL VOLTAGE IN THE SPECIFIED MEASUREMENT POSITION USING A VOM WHILE PAYING ATTENTION NOT TO TOUCH THE CHARGED AREA 4 IMMEDIATELY AFTER MEASURING THE RESIDUAL VOLTAGE DISCONNECT THE CONNECTORS OF THE OUTDOOR UNIT S FAN MOTOR IF THE FAN BLADE ROTATES BY STRONG WIND BLOWING AGAINST IT THE CAPACITOR WILL BE CHARGED CAUSI...

Page 10: ...plate with the electrical board behind the refrigerant tubing as shown Fixing screw A Cover Refrigerant Tubing Heat sink for cooling fixing screws B Install the electrical board When working on a service port ensure that no refrigerant and or compressor oil is sprayed onto the electrical board This could damage the board s functionality 1 Wipe the stale grease completely from the installed piping ...

Page 11: ...ired Model Name Compressor Oil AVZC200241 FVC50K AVZC200361 FVC50K AVZC200481 FVC50K AVZC200601 FVC68D COOLING The refrigerant used in the system is R 410A It is a clear color less non toxic and non irritating liquid R 410A is a 50 50 blend of R 32 and R 125 The boiling point at atmospheric pressure is 62 9 F A few of the important principles that make the refrigeration cycle possible are heat alw...

Page 12: ...uipment is running in BOOST MODE Dis abling BOOST MODE will provide the quietest and most effi cient operation NOTE BOOST MODE is applicable only for AVZC200 1AB or later revision BOOST MODE performance is most effective when paired with an electronic expansion valve enabled in door unit BOOST MODE is ON by default and is activated when the out door temperature reaches 105 F BOOST MODE can be dis ...

Page 13: ...is the thermostat date code and can be obtained by selecting the red Cancel but ton and selecting the Dealer Information but ton b Once recorded click the green OK button and return to previous step 4 Select YES to continue 5 Select HEAT PUMP 6 Select SYS SETUP COOL SET UP ...

Page 14: ... ON BOOST MODE is ON by default 8 BOOST TEMP adjusts the activation temperature from 70 F to 105 F Always ON option is also available to permanently engage BOOST MODE Factory default is 105 F Heat Pump SYS SETUP BOOST MD Heat Pump SYS SETUP BOOST TEMP 105F ...

Page 15: ...TION The thermostat reads the indoor humidity level from the CTK04 and allows the user to set a dehumidification target based on these settings The thermostat controls the humidity level of the conditioned space using the cooling system Dehumidification is engaged whenever a cooling demand is present and structural humidity levels are above the target level When this condition exists the circulati...

Page 16: ...ssor speed than required from thermostat to recover compressor oil that flows HEATING The heating portion of the refrigeration cycle is similar to the cooling cycle By de energizing the reversing valve solenoid coil the flow of the refrigerant is reversed The indoor coil now be comes the heat pump condenser coil and the outdoor coil be comes the evaporator coil The check valve at the outdoor coil ...

Page 17: ...an Motor Hex HP LP HP LP sensor Ta Thermistor HPS Outdoor unit Indoor unit TXV Accumulator Tm Thermistor T Thermistor Oil separator Filter Compressor Crankcase heater Capillary tube Reversing Valve Filter Filter Check valve EEV Hex Fan Motor Filter dryer Stop Valve Liquid Ball Valve Gas Fan Motor Hex HP LP HP LP sensor Tm Thermistor Ref cooling Ta Thermistor Outdoor unit Indoor unit TXV Check valv...

Page 18: ... Gas stop valve does not fully open X X X X X X Line set restriction X X X X X X X X X X Line set length is too long X X X X X Blocked filter dryer X X X X X X X X X X OD EEV coil failure X X X X OD EEV failure X X X Check valve failure Blocked X X X X X X X X X High Pressure switch failure X Pressure sensor failure X X X X X X X Discharge temp sensor failure X X X X X X X X X Coil temp sensor fai...

Page 19: ...X X X Gas stop valve does not fully open X X X X X X X X X Line set restriction X X X X X X X X X X Line set length is too long X X X Blocked filter dryer X X X X X X X X X X OD EEV coil failure X X X X X X X X X X X X X X X X OD EEV failure X X X X X X X X X X X X X X X X Check valve failure Leakage X X X X X X X High Pressure switch failure X Pressure sensor failure X X X X X X X X X X X X Disch...

Page 20: ... 43 S 15B CAPACITANCE CHECK 5 TON ONLY 43 S 17 CHECKING COMPRESSOR 43 S 17B GROUND TEST 44 S 18 TESTING CRANKCASE HEATER 5TONONLY 44 S 26 TESTINGTEMPERATURESENSORS AND EEV COIL RESISTANCE 45 SERVICING TABLE OF CONTENTS S 40A AVPVCHEATERCONTROL 45 S 50 CHECKING HEATER LIMIT CONTROL S 46 S 52 CHECKINGHEATERELEMENTS 46 S 60 ELECTRIC HEATER OPTIONAL ITEM 47 S 61A CHECKING HEATER LIMIT CONTROL S 48 S 6...

Page 21: ...EATH WARNING 1 Check wiring visually for signs of overheating damaged in sulation and loose connections 2 Use an ohmmeter to check continuity of any suspected open wires 3 If any wires must be replaced replace with comparable gauge and insulation thickness S 3 CHECKING THERMOSTAT AND WIRING ComfortNet Ready Models Communicating Thermostat Wiring The maximum wire length for 18 AWG thermostat wire i...

Page 22: ...nefits and features of the ComfortNetsystem Two way digital communications is accomplished using only two wires The thermostat and subsystem controls are powered with 24 VAC Thus a maximum of 4 wires between the equipment and thermostat is all that is required to operate the system CTK04WIRING NOTE A removable plug connector is provided with the control to make thermostat wire connections This plu...

Page 23: ...TEM TEST in under 20 F ambient temperature the unit may not be able to complete the test due to low suction pressure In such a case re run the SYS TEM TEST when the ambient temperature exceeds 20 F 1 Ensure the thermostat is installed 2 Apply power to outdoor and indoor units 3 Start up After the application information is entered the initial system test must be run FOR INVERTER HEAT PUMP CONDENSE...

Page 24: ...word The password is the Date Code located on the thermostat and is available by entering the EQUIPMENT STATUS menu and scrolling to the bottom 6 Select YES to continue 7 From the ComfortNet USER MENU select HEATPUMP NOTE Screen may show air handler or furnace depending on the type of system installed ...

Page 25: ... test to run for its duration 5 15 minutes EQUIP TEST SCREEN will show the system test is ON once selected System test will operate the outdoor unit and the indoor unit through a series of startup tests Please proceed to the next step and allow for startup tests to complete Do not interrupt power to outdoor unit indoor unit or thermostat during system test ...

Page 26: ...T THERMOSTAT TO CHARGE MODE Pleasefollow the following sequencetoenterCHARGE MODE CHARGE MODE allows for charging of the system System operates for a duration of approximately one hour while the equipment runs at full capacity After one hour the CHARGE MODE ends and the system resumes normal thermostat op eration Before starting the CHARGE MODE turn off the electric heater and gas furnace 1 On the...

Page 27: ...er Installer password The password is the Date Code located on the thermostat and is available by entering the EQUIPMENTSTATUSmenuand scrolling to the bottom 4 Select YES to continue 5 SelectHEATPUMP 6 SelectMAINTENANCE ...

Page 28: ...MODEfromtheSYSTEMmenuonthemain screen If charging is not complete after 1 hour repeat 7 and 8 Refer to S 103 for refrigerant charge level adjustment 9 To terminate CHARGE MODE select CHARGE MODE screen again Press OFF Press DONE to terminate CHARGE MODE 10 Once CHARGE MODE is complete and has been terminated navigate to HOME screen Enter normal operation with temperature offset or thermostat sched...

Page 29: ...ng ther mostat Maximum compressor speed can be changed to get the required capacity or efficiency Once the maximum speed is set the system operates between the set maximum speed and de fault low speed 1 On the HOME screen select MENU 2 FromtheMENUscreen selectCOMFORTNET USERMENU 3 Enter Installer password The password is the Date Code located on the thermostat and is available by entering the EQUI...

Page 30: ...EATPUMP 6 Select CL RUN VALUES for cooling mode HT RUN VALUES for heating mode 7 Select COOL HEAT RPS RANGE Press COOL RPS RANGE for cooling mode or HEAT RPS RANGE heating mode to select the range in which the desired Maximum compressor speed falls ...

Page 31: ...Maximum compressor speed 9 Once Maximum compressor speed is set navigate to HOME screen Enter normal operation with temperature offset or thermostat schedule as desired SET THERMOSTAT TO ADJUST INDOOR AIR CFM TRIM 1 On the HOME screen select MENU 2 From the MENU screen select COMFORTNET USER MENU ...

Page 32: ...d The password is the Date Code located on the thermostat and is available by entering the EQUIPMENT STATUS menu and scrolling to the bottom 4 Select YES to continue 5 SelectHEATPUMP 6 Select COOL SETUP COOLING MODE HEAT SETUP HEATING MODE ...

Page 33: ...ed cooling Cool Airflow Trim Low low speed cooling Heat Airflow Trim Hi high speed heating Heat Airflow Trim Int intermediate speed heating Heat Airflow Trim Low low speed heating Under each criteria a selection between 15 to 15 at the increment of the 3 can be made 8 Once COOL AIRFLOW TRIM is set navigate to HOME screen Enter normal operation with temperature offset or thermostat schedule as desi...

Page 34: ...1 Please follow the sequence 1 to 6 ofSET THERMOSTAT TO ADJUST INDOOR AIR CFMTRIM 2 Select Cool Set up for Cool Airflow Profile Cool ON Delay or Cool OFF Delay Heat Set up for Heat ON Delay or Heat OFF Delay Heat Airflow Profile DEFROST 3 Once Cool Set up Heat Set up settings are complete navigate to HOME screen ...

Page 35: ...t another 6 minutes before starting another force defrost cycle 1 On the HOME screen select MENU 2 FromtheMENUscreen selectCOMFORTNET USERMENU 3 Enter Installer password The password is the Date Code located on the thermostat and is available by entering the EQUIPMENT STATUS menu and scrolling to the bottom 4 Select YES to continue ...

Page 36: ...SERVICING 36 5 Select HEAT PUMP 6 Select EQUIP TEST 7 Select FORCE DF CYCLE 8 Select ON Press DONE to initiate FORCE DEFROST CYCLE ...

Page 37: ...gas valve and liquid service valve should be opened NOTE Manufacturer recommends to set PUMP DOWN using 7 segment display For more information see section Set 7 segment mode display to PUMP DOWN If difficulty is encountered using 7 segment display use the thermostat as an alternative method See section SET 7 SEGMENT MODE DISPLAY TO PUMP DOWN 1 On the HOME screen select MENU 2 FromtheMENUscreen sel...

Page 38: ...SERVICING 38 4 Select YES to continue 5 Select HEAT PUMP 6 SelectMAINTENANCE 7 Select PUMP DOWN ...

Page 39: ...ce valve immediately 9 To terminate PUMP DOWN select PUMP DOWN screen again Press OFF Press DONE to terminate PUMP DOWN 10 Once PUMP DOWN is set navigate to HOME screen After finishing PUMP DOWN operation unit will stop automatically Unit will show error code E11 after the PUMP DOWN operation starts NOTE Refrigerant cannot be collected to the outdoor unit completely if the system is overcharged or...

Page 40: ... SETTING THE MODE DISPLAY in this manual 2 Approximately one minute later the compressor should start operating Check the amperage at the compressor wiring to see the compressor operation status Unit display error code E11 System verification Test once the PUMP DOWN opera tions starts 3 Close liquid service valve approximately two minutes after compressor has come on 4 Compressor will come to a st...

Page 41: ...0 1AB or later revision PSD is shown in AVZC20 1AA revision Heat Pump With Outdoor Temperature Lockouts It is recommended to set the outdoor temperature lockouts during the initial thermostat set up This will enable the compressor to be turned off and switch heating source from refrigeration to aux iliary secondary heating under low ambient conditions Line set length range feet Compressor lockout ...

Page 42: ...e pressure in the compressor discharge line If abnormally high condensing pressures develop the contacts of the control open breaking the control circuit be fore the compressor motor overloads This control is automati cally reset 1 Using an ohmmeter check across terminals of high pressure control with wire removed If not continuous the contacts are open 2 Attach a gauge to the dill valve port on t...

Page 43: ...ort between the terminal and the compressor housing the terminal may be expelled venting the vapor and liquid contents of the compressor housing and system If the compressor terminal PROTECTIVE COVER and gasket if re quired are not properly in place and secured there is a remote possibility if a terminal vents that the vaporous and liquid dis charge can be ignited spouting flames several feet caus...

Page 44: ... the compressor 2 Identify the leads and using an ohmmeter on the R x 10 000 scale or the highest resistance scale on your ohmmeter check the resistance between each of the three leads separately to ground such as an unpainted tube on the compressor 3 If a ground is indicated then carefully remove the compressor terminal protective cover and inspect for loose leads or insulation breaks in the lead...

Page 45: ...nto the control Features The new air handler control includes advanced diagnostic fea tures with fault recall estimated CFM display via on board LED and ComfortNetTM ready Diagnostics includes heater kit selec tion diagnostics open fuse internal control fault data errors and blower motor faults Data errors are not included in the fault recall list Diagnostic error codes are displayed on a single r...

Page 46: ...ons data lines WARNING Disconnect ALL power before servicing 1 With power on to the unit measure voltage between terminal 1 and terminal C on control board s thermostat connector Voltage should be as noted in the table below 2 Measure voltage between terminals 2 and C 3 Measure voltage between terminals 1 and 2 4 If voltages are different than stated in the table below check thermostat wiring for ...

Page 47: ...emperature rise is 42 F Find the actual CFM Answer 24 0KW 42 F Rise 240 V 1800 CFM from the TEMPERA TURE RISE chart on the right Heating output at 220 V 24 0KW x 3 413 x 84 68 8 MBH Actual CFM 1800 x 84 Corr Factor 1400 CFM NOTE The temperature rise table is for sea level installations The temperature rise at a particular KW and CFM will be greater at high altitudes while the external static press...

Page 48: ...Brazing materials do not flow well on oxidized or oily surfaces 4 Clean the inside of all new tubing to remove oils and pipe chips 5 When brazing sweep the tubing with dry nitrogen to prevent the formation of oxides on the inside surfaces 6 Complete any repair by replacing the liquid line drier in the system evacuate and charge BRAZINGMATERIALS IMPORTANT NOTE Torch heat required to braze tubes of ...

Page 49: ...mp vacuum tight manifold set with high vacuum hoses thermocouple vacuum gauge and charg ing cylinder as shown 2 Start the vacuum pump and open the shut off valve to the high vacuum gauge manifold only After the compound gauge low side has dropped to approximately 29 inches of vacuum open the valve to the vacuum thermocouple gauge See that the vacuum pump will blank off to a maximum of 25 microns A...

Page 50: ...zed per startup instructions check subcooling as detailed in the following section In the event of system overcharge or undercharge refrigerant in the system must be adjusted to the appropriate subcooling and superheat as specified in the following sections Refrig erant amount should be adjusted within 0 5 lb if the out door ambient temperature is greater than 65 F and less than 105 F Manufacturer...

Page 51: ...the most common causes for evaporator malfunction CHECKINGSUPERHEAT Refrigerant gas is considered superheated when its temperature is higher than the saturation temperature corresponding to its pressure The degree of superheat equals the degrees of tempera ture increase above the saturation temperature at existing pres sure See Temperature Pressure Chart on following pages CAUTION To prevent perso...

Page 52: ...mpressor on the suction line Ensure the thermometer makes adequate contact and is insulated for best possible readings Use liquid line temperature to determine sub cooling and vapor temperature to determine superheat NOTE AN OPTIONAL METHOD IS TO LOCATE THE THERMOMETER AT THE SUCTION LINE SERVICE VALVE ENSURE THE THERMOMETER MAKES ADEQUATE CONTACT AND IS INSULATED FOR BEST POSSIBLE READINGS 3 The ...

Page 53: ...that a complete clean up is not neces sary If acid level is unacceptable the system must be cleaned by using the clean up drier method CAUTION Do not allow the sludge or oil to contact the skin Severe burns may result NOTE The Flushing Method using R 11 refrigerant is no longer approvedbytheMANUFACTURER S 120 REFRIGERANT PIPING The piping of a refrigeration system is very important in relation to ...

Page 54: ...rigerant lines must not touch wall Strap Sleeve Strap Sleeve Wire Tie Wire Tie PVC Pipe Caulk Outside Wall Armaflex Wrapped Suction Line Liquid Line Wood Block Between Studs IMPORTANT Refrigerant lines must NOT come into contact with structure Fiberglass Insulation Wood Block Figure 1 2 Installation of Refrigerant Piping Vertical New construction shown NOTE If line set is installed on the exterior...

Page 55: ...ON 3 OUTDOOR UNIT IS ABOVE THE INDOOR UNIT Heat Pump ABOVE Indoor Coil Maximum vertical separation of 200 ft Includes pressure losses of any elbows bends etc Maximum line set equivalent length of 250 ft The maximum line set actual length is 200 ft 1 Gas line must be sloped continuously towards the indoor unit 2 The maximum elevation vertical difference between the outdoor unit and indoor unit is 2...

Page 56: ...m line set actual length is 200 ft Includes pressure losses of any elbows bends etc 1 The maximum elevation vertical difference between the outdoor unit and the indoor unit is 90 feet 2 Gas line must be installed in a manner to prevent liquid migration to the outdoor unit from the indoor unit The heat pump condenser unit is shipped with a predetermined factory charge level as shown in the followin...

Page 57: ... ACROSSCOILS This minimum and maximum allowable duct static pressure for the indoor sections are found in the specifications section Tables are also provided for each coil listing quantity of air CFM versus static pressure drop across the coil Too great an external static pressure will result in insufficient air that can cause icing of the coil Too much air can cause poor humidity control and cond...

Page 58: ...probe above the coil 2 A direct reading can be taken of the static pressure drop across the coil 3 Consult proper table for quantity of air STATICPRESSUREDROP If the total external static pressure and or static pressure drop exceeds the maximum or minimum allowable statics check for closed dampers dirty filters undersized or poorly laid out duct work ...

Page 59: ...age is removed The error will be main tained in the equipment s fault history See FIGURE 15 on the following page for the connection location CIRCULATOR BLOWER This air handler is equipped with a variable speed circulator blower This blower provides several automatically adjusted blower speeds The Specification Sheet applicable to your model provides an airflow table showing the relationship betwe...

Page 60: ... e do not move or shuffle your feet do not touch ungrounded objects etc Ifyoucomeincontactwithanungrounded object repeat step 2 before touching control or wires 4 Discharge your body to ground before removing a new control from its container Follow steps 1 through 3 if installing the control on a blower Return any old or new controls to their containers before touching any ungrounded object DIAGNO...

Page 61: ...or Communication Error b2 Blower Motor Heat Pump Mismatch b3 Blower Motor Operating in Power Temp or Speed Limit b4 Blower Motor Current Trip or Lost Rotor b5 Blower Motor Rotor Locked b6 Over Under Voltage Trip or Over Temperature Trip b7 Incomplete Parameter Sent to Motor b9 Low Indoor Airflow FC Fan Cool FH Fan Heat F Fan Only H1 Electric Heat Low H2 Electric Heat High dF Defrost 7 SEGMENT LED ...

Page 62: ...kits specified in shared data set HTR TOO SMALL EC Heater kit selected via dipswitches is too small for heater kits in shared data set Verify electric heat dipswitch settings Verify the installed electric heater is valid for the air handler blower Check nameplate or Specification Sheet applicable to your model for allowable heater kit s Verify shared data set is correct for the specific model Re p...

Page 63: ...ndler message d0 Data not yet on network NO NET DATA d0 Air handler blower does not contain any shared data Populate shared data set using memory card Turn power OFF prior to repair Use memory card for the specific model Insert memory card BEFORE turning power ON Memory card may be removed after data is loaded Error code will be cleared once data is loaded Turn power off before removing memory car...

Page 64: ...blower motor horse power MOTOR MISMATCH b2 Incorrect circulator blower motor in air handler blower Incorrect shared data set in integrated control module Verify circulator blower motor horse power is the same specified for the specific air handler blower model Replace is necessary Verify shared data set is correct for the specific model Re populate data using correct memory card if required Turn p...

Page 65: ... temperatures Check power to air handler blower Verify line voltage to blower is within the range specified on the air handler blower rating plate See Installation Instructions for installation requirements Turn power OFF prior to repair Air handler blower fails to operate Integrated control module LED display provides indicated error code ComfortNet thermostat Call for Service icon illuminated Co...

Page 66: ...he defrost temperature sensor and outdoor liquid temperature sensor reading Current system operation mode COOLING COOLING STARTUP HEATING HEATING STARTUP DEFROST OIL RETURN STOP Displays ON or OFF status ON indicates that the reduction mode is operating and the compressor is running at a lower speed than the cooling load would normally require Displays a 0 100 value based on a ratio of the request...

Page 67: ...tly engage BOOST MODE SUBMENU ITEM INDICATION USER MODIFIABLE OPTIONS COMMENTS System Verification Test SYSTEM TEST ON or OFF System Verification Test must be run after installation This is approximately a 5 15 minute test If the thermostat is set to COOL mode the system will enter CHARGE mode upon completion otherwise it will stop Force Defrost Cycle FORCE DF CYCLE ON or OFF This will make the un...

Page 68: ...OL RPS RANGE menu Select the appropriate compressor RPS for the installed system configuration SUBMENU ITEM USER MODIFIABLE OPTIONS COMMENTS HT Reset YES or NO Selecting to default factory setting Heat Airflow Trim Hi 15 to 15 in 3 increments Selects the Heating airflow trim amount Heat Airflow Trim Int 15 to 15 in 3 increments Selects the Heating airflow trim amount Heat Airflow Trim Low 15 to 15...

Page 69: ...plays The 7 segment displays on indoor control board will display EE 1 HEATING EMERGENCY MODE Emergency Heating mode is to be used when communica tion between the indoor unit and thermostat are not func tioning properly This mode will run the electric heat strips independently of any thermostat in one of two modes High Heat Level or Low Heat Level Dip Switch Bank DS 6 specifically dipswitches S 21...

Page 70: ...5 15 15 ON OFF ON ON Sixth X 19 20 20 ON OFF ON OFF Seventh X X X 25 ON OFF OFF ON Heater Kit Selection Heater kW Switch Bank DS 3 Indoor Control Board Settings Dip Switch Setting S 21 S 22 OFF OFF ON OFF OFF ON ON ON S 1 S 2 ON ON ON OFF OFF ON OFF OFF Switch Bank DS 2 Outdoor Control Board Settings Function Normal operation Emergency Mode Cooling Emergency mode Low cool Level Cooling Emergency m...

Page 71: ...ed even if the compressor has stopped The indoor unit will continue to operate the electronic expansion valve for refrigerant super heat control and the compressor will cycle at the interval selected by dip switch bank DS 2 DS2 1 DS2 2 ON ON Normal Operation ON OFF Emergency Mode Low Cool Level OFF ON Emergency Mode Medium Cool Level OFF OFF Emergency Mode High Cool Level Dip Switch Position Funct...

Page 72: ... EEV Enable 16 OFF No Use 17 ON Emergency EEV Opening 18 OFF Emergency EEV Opening 19 OFF EEV Emergency Mode 20 OFF No Use 21 OFF Emergency mode Cooling Heating Emergency Mode 22 OFF Emergency mode Cooling Heating Emergency Mode 23 OFF No Use 24 OFF No Use 1 ON CT Communication Enable 2 ON CT Communication Enable 1 ON Cooling Emergency mode 2 ON Cooling Emergency mode ID DS 5 ID DS 6 OD DS 1 OD DS...

Page 73: ...wired when selecting a cooling airflow Note the blower will run continuously with this wiring which is required The outdoor unit will cycle as described in the Cooling Emergency Mode section when appropriate dip switch modes are set 1 2 R C G W1 W2 Y1 Y2 0 DEHUM Indoor Unit Integrated Control Module Note Emergency heating mode is not available with TXV applicable indoor units If communications sti...

Page 74: ...tion Each mode has its own corresponding Screen within the display itself which allows the user to navigate and use the features Example The Fault Code is accessed and displayed from Screen 0 of the 7 segment display The Fault History is accessed and display using Screen 1 of the display etc FAULT CODE FAULT HISTORY MONITORING SETTING MODE 1 SETTING MODE 2 MODE Fault Code Display Fault Code Histor...

Page 75: ... shows the most recent fault To access hold the RECALL button for 5 seconds at screen 0 To access hold the RECALL button for 5 seconds at screen 1 To access hold the RECALL button To access hold the RECALL and TEST buttons simultaneously To return to SCREEN 0 of the display press the LEARN button for 5 seconds at screen 2 for 5 seconds at screen 2 The first digit displays the SCREEN Hold RECALL Pr...

Page 76: ...SCREEN This mode will allow the user to see the six most recent system faults For a list of the fault codes please see the TROUBLESHOOTING tables in this document 1 SCREEN 0 SCREEN 1 The display will change to SCREEN 1 Displays 2nd most recent Fault code 6th most recent Fault Code Hold RECALL Press RECALL Press RECALL Press RECALL Press RECALL ...

Page 77: ...setting Press RECALL Press RECALL Item number Display flickers at 1 second intervals Value MONITORING MODE NAVIGATION SCR This screen allows the user to monitor system variables as shown in the tables at the end of this section EEN 2 OFF ON Blink interval 0 4 sec On 0 4 sec Off Hold RECALL Press RECALL Press RECALL Press RECALL ...

Page 78: ...stem settings as shown in the tables at the end of this section SCREEN 0 Press RECALL Press RECALL to increase the value Press TEST to change setting Press RECALL Press TEST to complete setting and return to setting mode SCREEN 2 Press LEARN SCREEN 3 Press RECALL Press RECALL OFF ON Blink interval 0 4 sec On 0 4 sec Off ...

Page 79: ...e the number Press RECALL Press TEST to change setting Press RECALL Press TEST to complete setting and return to setting mode Press RECALL Press RECALL Press RECALL SCREEN 0 OFF ON Blink interval 0 4 sec On 0 4 sec Off Press RECALL Press RECALL SCREEN 4 Setting Mode 2 allows the user to change system settings See table in back of this section ...

Page 80: ...e 0 Stop 1 Cooling Start up 2 Heating Start up 3 Oil Return Operation 4 Heating Operation 5 Defrost Operation 6 Cooling Operation 3 Compressor Reduction Mode 0 OFF 1 ON 4 demand unit Cut off the decimal first place 5 act demand unit Cut off the decimal first place 6 Requested ID CFM unit CFM Multiply by 10 7 Reported ID CFM unit CFM Multiply by 10 8 Outdoor FAN RPM unit RPM Multiply by 10 9 Ta Out...

Page 81: ... Low 0 15 1 12 2 9 3 6 4 3 5 0 6 3 7 6 8 9 9 12 10 15 11 Heat ON Delay 0 5sec 1 10sec 2 15sec 12 Heat OFF Delay 0 30sec 1 50sec 2 70sec 3 90sec Setting Setting No Contents Setting Installer Serviceman Notes 1 Maximum Defrost Interval 0 30min 1 60min 2 90min 3 120min 2 Set Maximum Current N A Future Use 3 Vertical Rise 0 Same Level 1 Outdoor Lower 2 Indoor Lower 4 System Verification Test 0 ON 1 OF...

Page 82: ...xperiencing frequent low pressure faults Control has determined continued operation is acceptable This indicates they may be a problem with the equipment Stop valve not completely open Restriction in refrigerant lines Low refrigerant charge Refrigerant leak Low pressure sensor inoperable or not properly connected Indoor fan motor not functioning correctly Faulty TXV Faulty control board Check the ...

Page 83: ...ed Check the compressor Repair replace if needed 32 E32 HI TEMP CTRL1 This error indicates the equipment is experiencing high temperature faults on the outdoor control board Ambient air conditions too high Cooling bracket screw s missing or not properly fastened 2 4 ton only No or poor thermal grease coating between cooling plumbing and cooling bracket on control board 2 4 ton only Outdoor fan low...

Page 84: ...epair if needed Replace control board if necessary 38 E38 COMP VOLTAGE The control has detected a voltage related issue with the compressor High or low voltage from supply The compressor wire is lost phase Faulty control board Correct low high line voltage condition Contact local utility if needed Check the wire between control board and compressor Replace control board if necessary 39 E39 OD CTRL...

Page 85: ...f needed Check ID fan motor Replace if needed B9 Eb9 LOW ID AIRFLOW Estimated airflow from motor is lower than the airflow requirement Failed indoor blower motor Indoor fan motor not properly connected Too much static pressure Check ID fan motor wiring and connectors Repair replace if needed Check ID fan motor Replace if needed D0 Ed0 NO NET DATA Control board does not have the necessary data for ...

Page 86: ...OFF to the outdoor unit 7 Remove the memory card from the unit 8 Connect the ClimateTalk CT connector to the outdoor unit 9 Turn the power ON to the outdoor unit 10 Continue the operation of the unit as desired NOTE 1 If there is an error E11 on the 7 segment display of the Outdoor unit after step 11 run the SYSTEM VERIFICATION TEST on the Outdoor unit using the thermostat menu AC Menu Air Conditi...

Page 87: ...87 TROUBLESHOOTING OUTDOOR UNIT ERROR CODES Red LED H1P Memory Chip Connector X52A Zoomed view of 20 SEER OD Control Board ...

Page 88: ...cates the LED status and the corresponding potential problem LEARNbutton Usedtoresetthenetwork Depressthebutton for approximately 5 seconds to reset the network TROUBLESHOOTING OUTDOOR UNIT ERROR CODES LED Status Indication Probable Causes Corrective Actions Off Nominal condition None none 1Flash Communications Failure Unknown packet is received Depress learn bu on 2Flash Out of box reset Control ...

Page 89: ...2 13 04 1 42 147 37 3 95 13 07 1 42 40 104 10 63 1 22 10 63 1 22 118 68 3 76 10 65 1 22 45 113 8 71 1 04 8 71 1 04 96 13 3 56 8 73 1 05 50 122 7 18 0 89 7 18 0 89 78 29 3 34 7 18 0 89 55 131 5 95 0 76 5 95 0 76 64 10 3 11 60 140 4 96 0 65 4 96 0 65 52 76 2 87 65 149 4 16 0 56 4 16 0 56 43 63 2 64 70 158 3 50 0 48 3 50 0 48 36 26 2 41 75 167 2 96 0 41 2 96 0 41 30 27 2 18 80 176 2 51 0 35 2 51 0 35...

Page 90: ... 9 364 110 0 466 0 128 7 596 148 4 60 8 6 162 57 0 264 87 4 366 110 4 468 0 129 0 600 149 0 62 10 0 164 57 7 266 87 9 368 110 8 470 0 129 3 604 149 5 64 11 3 166 58 4 268 88 4 370 111 2 472 0 129 7 608 150 1 66 12 6 168 59 0 270 88 9 372 111 6 474 0 130 0 612 150 6 68 13 8 170 59 8 272 89 4 374 112 0 476 0 130 3 616 151 2 70 15 1 172 60 5 274 89 9 376 112 4 478 0 130 7 620 151 7 72 16 3 174 61 1 2...

Page 91: ...0 78 76 299 88 86 84 82 80 78 308 90 88 86 84 82 80 317 92 90 88 86 84 82 326 94 92 90 88 86 84 335 96 94 92 90 88 86 345 98 96 94 92 90 88 354 100 98 96 94 92 90 364 102 100 98 96 94 92 374 104 102 100 98 96 94 384 106 104 102 100 98 96 395 108 106 104 102 100 98 406 110 108 106 104 102 100 416 112 110 108 106 104 102 427 114 112 110 108 106 104 439 116 114 112 110 108 106 450 118 116 114 112 110...

Page 92: ...URE TRANSDUCER H LPT HIGH PRESSURE SWITCH HPS DS1 DS2 DIP SWITCH SEG1 SEG3 7 SEGMENT DISPLAY Z1C Z4C FERRITE CORE BS1 BS3 PUSH BUTTON SWITCH RVC REVERSING VALVE COIL M1C COMPRESSOR MOTOR M1F FAN MOTOR NOTE 1 1 OFF ON DS1 1 OFF ON DS2 V W U Z3C COIL CIRCUIT LIQUID LINE DISCHARGE LINE DEFROST COLOR CODE RD RED BR BROWN GR GREEN BK BLACK WH WHITE YL YELLOW BL BLUE GY GRAY PU PURPLE 1 THE POSITION OF ...

Page 93: ...RD L2A L1A RD BK TRANSFORMER 208 240 V 3 1 2 24V L1C L2C TERMINAL BLOCK FIELD WIRING H LPT GND INVERTER BOARD COMPRESSOR TERMINAL ORIENTATION X32A X108A GR Z1C Z2C Z3C X12A COIL CIRC UIT DEFROST LIQUID LINE DISCHARGE LINE V W U GR BK BK WH BK 1 OFF ON DS2 2 NOTE 1 BS1 BS2 BS3 X52A SHARE DATA X111A FIN THERMISTOR SEE NOTE 3 NOTE 3 NOTE 1 1 OFF ON DS1 2 GY BK THERMISTOR TEMPERAT URE SENSOR MOTOR HIG...

Page 94: ... DISCHARGE LINE NOTE 1 1 OFF ON DS2 BR BK COLOR CODE RD RED BR BROWN GR GREEN BK BLACK WH WHITE YL YELLOW BL BLUE OR ORANGE GY GRAY CURRENT SENSOR 2 NOTE 1 1 OFF ON DS1 2 1 THE POSITION OF THE SELECTOR SWITCHES DS1 DS2 INDICATE FACTORY SE 2 MOTOR OVERLOAD PROTECTION PROVIDED BY INVERTER SEE TABLE 3 USE COPPER CONDUCTORS ONLY 4 CLASS 2 WIRE NOT ES THERMISTOR TEMPERATURE SENSOR MOTOR HIGH LOW PRESSU...

Page 95: ...CK OR ORANGE BL BLUE PK PINK GY GRAY RD RED WH WHITE PU PURPLE YL YELLOW BR BROWN COLOR CODES GN GREEN NOTES 1 PLACE RED W IRES ON TRANSFORMER TERMIN AL 2 FOR 208 VAC O PERATION 2 MANUFACTURER S S PECIFIED REP LACE MENT PA RTS MU ST BE U SED WHEN SERVICING 3 IF ANY OF THE ORIGINAL WIRES AS SUPPLIED WITH THIS UNIT MU ST BE R EPLACED IT MU ST BE R EPLACED WITH WI R ING M ATERIAL H AVING A TEMPER ATU...

Reviews: