Do not expose the camera to:
• dust or sand. These can damage the lens and the camera
components.
• high or low temperatures. Normal operating
temperature is 0°C to 40°C (32°F to 104°F).*
• strong sunlight (especially when using Motion
Detection)*
• damp and cold. Freezing, and thawing, of water can
cause damage.
• impacts such as from dropping the camera
• excessive vibration
• strong cleaners (including cleaning solution and high
concentration detergent) and chemicals. Use only a
slightly damp cloth for cleaning.
*Note that extreme temperatures can be achieved in
parked cars in direct sunlight.
Do not dismantle or open the casing. This may result in
electric shock as well as damage to the camera.
To update the camera to the latest operating system
(firmware) go to:
www.amacan.net
Extract the FIRMWARE.BIN file to the root folder of your
microSD card.
Insert your card into the camera and power ON.
The camera will auto-examine the FIRMWARE.BIN file and
popup a confirmation dialog box.
Press the UP or DOWN button to choose YES and press OK
to update.
The camera will auto shut down when updating is
complete.
• 4MP CMOS image sensor
• 135° angle view field, F2.0 aperture
• 1.5 TFT LCD screen
• cinema mode recording 2560 x 1080px; screen size ratio 21:9;
30 frames per second
• super HD recording 2304 x 1296px; screen size ratio 16:9, 30
frames per second
• full HD recording 1920 x 1080px; screen size ratio 16:9; 45
frames per second
• HD recording 1280 x 720px; screen size ratio 16:9; 60 frames
per second
• H .264 coding MOV file recording
• built in 3.7 V, 200 mAh Li-polymer battery
The camera supports:
• dual microSD card 128GB x 2
• high dynamic range boost
• GPS route logging
• G-sensor file protection
• SOS manual file protection
• parking guard (with parking guard mounting bracket)
• movement detection
• lane departure warning system
• forward collision warning system
• upside-down mounting
• HDMI output to TV and optional AV-out
• circular polarizing filters
• 160° rotation and 6° offset
• Windows XP or later or MAC OS10.1 or later
• Intel Pentium 4, 2.8 GHz CPU or above (recommended
3 GHz)
• at least 2GB RAM (recommended 4GB)
• internet connection (for GPS log playback)
• Can’t record video or take picture?
Check that there is enough storage space on the microSD card,
or if you have Loop T Recording switched on that the files are
not protected.
• Camera stops recording occasionally?
The data stream of HD video is huge, so please use a high-
speed Class x or Class 10 microSD card that is compatible with
SDHC.
• ‘File Error’ message when you want to play back?
Please use the FORMAT CARD Menu to format the microSD
card. (Please use a computer to format the card to FAT32 if it is
bigger than 32GB.)
• No image display on TV/DVD screen?
Please check that the AV, HDMI cable is connected correctly,
and the TV/DVD is set to the correct AV, HDMI mode.
• The image is blurred?
Maybe the lens or windshield is dirty. Use lens cleaner for the
lens. Please remember to remove the lens protecting film
before first use.
• Power indicator doesn’t work?
If the power supply is less than 600mA current then the camera
can’t be charged and the power indicator won’t work.
• Image has interference with horizontal stripes?
This is due to the wrong setting of FLICKER. Use the SETTINGS
menu to reset to match your power supply frequency.
• dash camera
• GPS logging mounting bracket
• 2° and 4° angle mounting wedges
• wedge mounting screws
• power lead for cigar lighter socket
• USB cable
• cable clips
• sticker pads
• lens cleaner
• manual
24mm CPL filter
The filter provides crisper outdoor scenes and deeper tones. It
reduces reflections from shiny surfaces such as vegetation, sweaty
skin, water, glass, and the road. Some light from the sky is also
polarized, producing high contrast clouds and dramatic sky.
Non GPS mounting bracket
This is a Spare mount for external GPS antenna or another mounting
location such as another car.
External GPS antenna
This works with the Non GPS mounting bracket for better GPS signal
sensitivity.
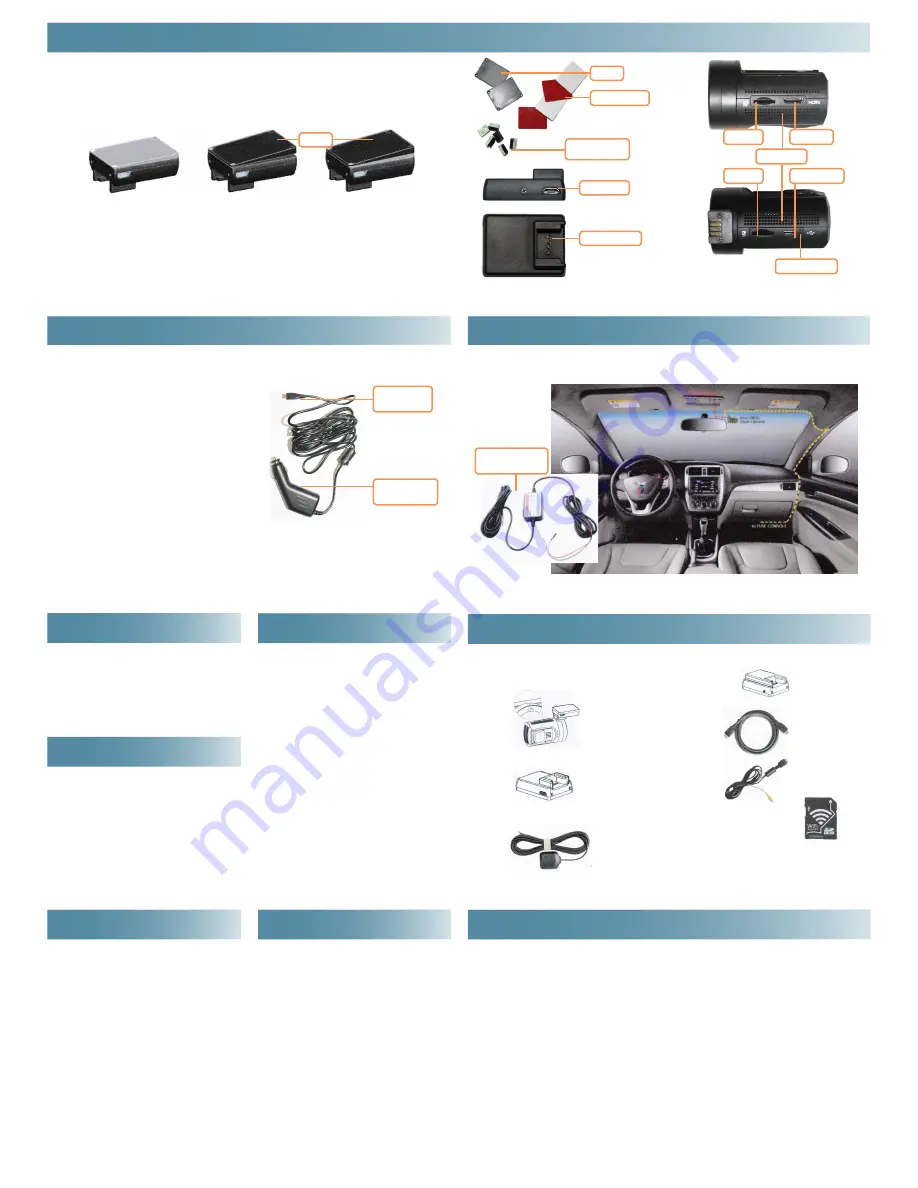
The camera is designed for quick and easy mounting to your windshield using a sticker pad.
1 Fit the camera in the mounting bracket with the power cable connected to either the mounting bracket or the camera itself.
2 Simulate use of the camera on your windshield to find the best mounting location. We recommend placing it at the center of
the windshield, just behind the mirror. That is the most discrete location, and will not interfere with driving vision.
3 You may need to fit wedges (supplied) if you want to mount other than at the center of the windshield. Screw the wedges to
the mounting bracket or use the VHB pads. The two wedges supplied offer angles of 2° and 4°, and can be used singly or together
to create a total angle of 6°.
4 Stick the sticker pad to the mounting bracket or wedges, and attach to your windscreen. Hold in place for a few seconds to
ensure good adhesion.
5 Turn on the camera and check its display again.
When you want to demount the camera just slide it out of the mounting bracket. There is no need to take the mounting bracket
down.
When you want to remove the mounting bracket from your windshield use a thin cord with a sawing motion to cut between the
sticker pad and the windshield. You can remove adhesive residue with ‘WD-40’
spray. Please don’t use a rigid crowbar or similar
since this may damage the mounting bracket or the windshield.
MOUNTING and CONNECTIONS
wedges
VHB sticker pads
pads for installation
of power cable
microUSB port
mounting contacts
microUSB port
HDMI socket
card A slot
card B slot
mount
cooling holes
wedges
mount
BOX CONTENTS
SYSTEM REQUIREMENTS
SPECIFICATION
OPTIONAL ACCESSORIES
TROUBLESHOOTING
• Camera doesn’t auto start recording when the
car engine is started?
Auto start will not work when LOOP RECORDING is OFF. Use
the SETTINGS menu to switch to 1/3/5 minutes. Also, please
check whether microSD card is full.
• The camera continues automatic recording and
won’t stop?
Maybe the camera is in MOTION DETECTION mode. When
MOTION DETECTION is on the camera starts recording when
there is a moving object within its range. When the motion
stops, the camera will automatically stop recording until it
detects new motion. Note that it is difficult to turn MOTION
DETECTION off with the camera held in your hands.
• AUTO POWER OFF setting doesn’t work?
Please ensure that MOTION DETECTION is turned off. If it is
on then the camera remains in STANDBY mode and will start
recording when a moving object is detected. It will not auto
shut down until the power goes off.
• The camera has locked and does not respond to
button presses?
Remove the camera from the mount or turn off the power.
Hold the power button for 20 seconds. The camera will auto
reset.
More questions?
Please get help from
www.amacan.net
You can also email us at:
UPDATING
PRECAUTIONS
You can buy a Hardwire Kit as an optional accessory. This allows direct connection to the car fuse console, and provides the most
convenient and fixed method of stowage of the cable itself. We advise that the Hardwire Kit should only be fitted by a professional
expert.
power lead,
camera end
power lead,
cigar-lighter end
POWER CONNECTION, standard option
The camera must be operated with an external power
supply, which is provided by the car during normal
recording.
Use the supplied lead for connection to a cigar lighter
socket. This is the simplest method of connection, but
means that the cigar lighter socket is not available for
other purposes.
POWER CONNECTION, accessory option
Parking Guard mounting bracket and power lead
This supports the Parking Guard with
a constant power supply.
HDMI cable
This connects the camera to a TV.
AV-out cable
microSD card(s)
microSD-USB card reader
microSD-SD adapter
microSD-WiFiSD adapter
A WiFi card allows wireless upload to a local computer or mobile
device.
microSD-microUSB OTG card reader
hardwire kit,
optional accessory
microphone holes


