background image

6

MAINTENANCE

 

Keep the tools clean using a soft, damp (not wet) cloth. Do not use solvents on 

the plastic parts.

 

Lubrication is not necessary. After long use, have an authorized service center 


maintain and lubricate the tool.

 

Should the drill chuck require replacement:

1.  Remove the battery pack

2.  Open the chuck jaws as widely as possible so you can access the chuck retain-

ing screw.

3.  Unscrew the chuck retaining screw with a philips screwdriver. Note that this is a 

left-hand-threaded screw and you must remove it by turning it clockwise.

4.  Clamp the shorter arm of a large allen wrench in the chuck, aligning it with the 

jaws so they grip three of its six flat sides.

5.  Place the drill on a 

at surface, and support the chuck with a piece of wood 

about 8mm or 3/8” above the surface.

6.  Strike the long arm of the wrench with a hammer so that the chuck turns 


counter-clockwise and unscrews from the spindle.  


This may require a fairly sharp blow.

7.  Repeat the process in reverse to install a new chuck.

•  To maintain the best performance of your rechargeable NiCd battery, prevent 

it from overheating, both from overcharging and during storage.  Occasionally 

charge the battery for 6 hours.  The battery may also benefit from a full discharge 

from time to time.

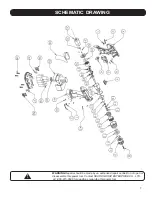
PARTS LIST 

NO.

DESCRIPTION

Screwdriver bit clip

Double-ended screwdriver bit

Housing(left)

Battery clip

Trigger switch

Forward/reverse butto

Decorate block 

Chuck retaining screw

Chuck


10 

Screws 

11 

Washer  

12 

Washer

13 

Torque setting ring

14 

Ring


15 

Spring 

16 

Snap ring 

17 

Washer

18 

Steel ball 

19 

Washer

20 

Bearing

21 

Washer

NO.

DESCRIPTION

22 

Steel ball  

23 

Gear box


24 

Shaft  

25 

Planet gear


26 

Star gear

27 

Planet gear

28 

Inner gear

29 

Washer

30 

Gear box cover

31 

Screws 

32 

Motor gear 

33 

D.C. motor

34 

Soft handle

35 

Battery housing

36 

Battery release button 

37 

Elastic clip

38 

Screws

39 

Battery 

40 

S-type spacer

41 

Housing(right)

Please refer to the schematic drawing on page 7.

42 

Screw


43 

Screw


Summary of Contents for 241-9899

Page 1: ...DLESS DRILL SAVE THIS MANUAL You will need this manual for safety instructions operating procedures and warranty Put it and the original sales receipt in a safe dry place for future reference Operator s Manual 18 VOLT ...

Page 2: ...ck that keys and adjusting wrenches are removed from any rotating tool before using 14 AVOID UNINTENTIONAL STARTING Don t carry the tool with a finger on the switch Be sure the direction switch is in the NEUTRAL position when not in use or when changing bits 15 STAY ALERT Watch what you are doing use common sense Don t operate any tool when you are tired 16 CHECK FOR DAMAGED PARTS Before using the...

Page 3: ... to give you dependable operation Please read this manual thoroughly before operating your new product as it contains the information you need to become familiar with its features and obtain the performance that will bring you continued use for many years WARNING The warnings cautions and instructions detailed in this manual cannot cover all possible conditions and situations that occur USE COMMON...

Page 4: ...nsformer 120 volt plug with a low voltage lead 2 a charging stand Insert the transformer plug into a 120V household current receptacle The step of the battery pack has positive and negative terminal markings on it Align these with the identical markings on the top of the charging stand and insert the battery pack into the base The pack will not insert properly if reversed The red light is the powe...

Page 5: ...crews from the spindle This may require a fairly sharp blow 7 Repeat the process in reverse to install a new chuck To maintain the best performance of your rechargeable NiCd battery prevent it from overheating both from overcharging and during storage Occasionally charge the battery for 6 hours The battery may also benefit from a full discharge from time to time PARTS LIST NO DESCRIPTION 1 Screwdr...

Page 6: ...IC DRAWING WARNING Repairs should be made by an authorized repair centre Do not open or disassemble this power tool Contact at 1 866 915 8626 for questions regarding this power tool SHARP GROUP ENTERPRISE CO LTD ...

Reviews: