


3
USER GUIDE (ENGLISH)
BOX CONTENTS
•
AEQ215
•
Power
Cable
•
User
Guide
•
Safety & Warranty Information Booklet
1.
Make sure all items listed in the BOX CONTENTS section are included in the box.
2.
READ THE SAFETY & WARRANTY INFORMATION BOOKLET BEFORE USING THE PRODUCT.
CAUTION!
Permanent hearing loss may be caused by exposure to extremely high noise levels. The U.S.
Government's Occupational Safety and Health Administration (OSHA) has specified permissible exposures to certain
noise levels.
According to OSHA, exposure to high sound pressure levels (SPL) in excess of these limits may result in hearing
loss. When using equipment capable of generating high SPL, use hearing protection while such equipment is under
operation.
INTRODUCTION
Thanks for purchasing the Alto Professional AEQ215! AEQ215 gives precise and reliable sound-shaping control. It’s
built to last and perfect for any pro audio application, offering the essential EQ features you need for either
straightforward spectral balancing or enhancing particular sonic characteristics. Use it for studio recording, live sound
and everything in between.
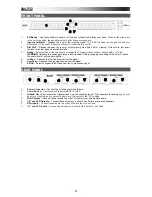
•
Balanced XLR, 1/4” TRS, and unbalanced RCA input and output connectors
•
Standard 20 mm center-detented sliders allow easy frequency adjustment
•
Constant Q filtering provides accurate and predictable EQ response
•
Selectable boost/cut range of 6 dB or 12 dB for more precise gain control
•
High-pass filter: 40 Hz (12 dB/octave)
•
Low-pass filter: 16 kHz (12 dB/octave)
•
2/3-octave spacing
•
Variable input level control
•
EQ bypass switch on both channels
•
Clip level indicators
•
Ground lift switch to disconnect signal ground from chassis ground
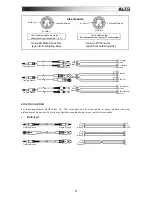
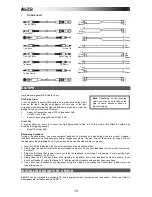
SETUP
1.
Plug all devices into an appropriate power source.
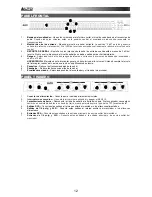
2.
Connect the left and right main outputs of a mixer into Channel 1 and Channel 2 XLR or 1/4” inputs on the back
of AEQ215.
3.
Connect another pair of cables to the Channel 1 and Channel 2 XLR or 1/4” outputs of AEQ215 and plug them
into your amplifier or a pair of powered speakers.
4.
Press the Power
switch on AEQ215 to power up the unit.
5.
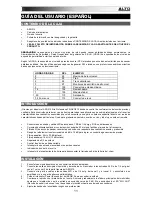
Begin playing your source material. Gradually bring up the mixer’s main faders until the Input Level meter lights
up near 0 dB. If the SIG CLIP LEDs light up, back the mixer’s output level down until they stop lighting up.
6.
Adjust the EQ bands to your taste.
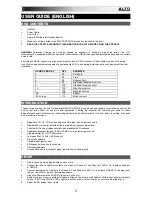
HOURS PER DAY
SPL
EXAMPLE
8 90
Small
gig
6 92
Train
4 95
Subway
train
3
97
High level desktop monitors
2
100
Classical music concert
1.5 102
Riveting
machine
1 105
Machine
factory
.50 110
Airport
.25 or less
115
Rock concert
Summary of Contents for AEQ215
Page 2: ......