Page-2
Page-3
Got Questions?
We are here to help.
Contact us at:
USA & Canada: 866-660-9434
International: +1 561-660-9434
Mounting Feet
Drill Locations
Inside of Enclosure
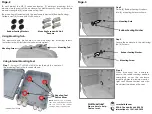
To wall mount the NP15 series enclosures, (1) external mounting tab is
provided on the rear of the enclosure. For better security, they can also be
mounted using the (4) internal mounting feet.
The mounting kit Included with the enclosure includes (4) Rubber Sealing
Washers and (4) Screws with Wall Anchors.
Rubber Sealing Washer
Mounting Hole
Mounting Screw
Step 2
Place (4) Rubber Sealing Washers
into (4) mounting holes as shown.
Mounting Screws with Wall
Anchors
Rubber Sealing Washers
Step 3
Secure the enclosure to the wall using
the (4) Screws.
Step 4
When mounting the enclosure,
ensure the rubber sealing washers
completely cover the enclosure
mounting holes to provide a water-
tight seal. Silicone sealant can also
be added to enhance the seal.
Rubber Sealing Washer
Using Mounting Tab
The enclosure can be secured to the wall using the mounting screws
included in the kit. Install wall anchors as required.
Using Internal Mounting Feet
Step 1
- Using a
¼”
drill bit, drill (4) holes through the center of
the mounting feet in the locations shown.
Mounting Tab
Mounting Screw
Note:
Bottom two mounting
feet must be drilled out wider
like top feet so the rubber
sealing washers can be used.


