background image

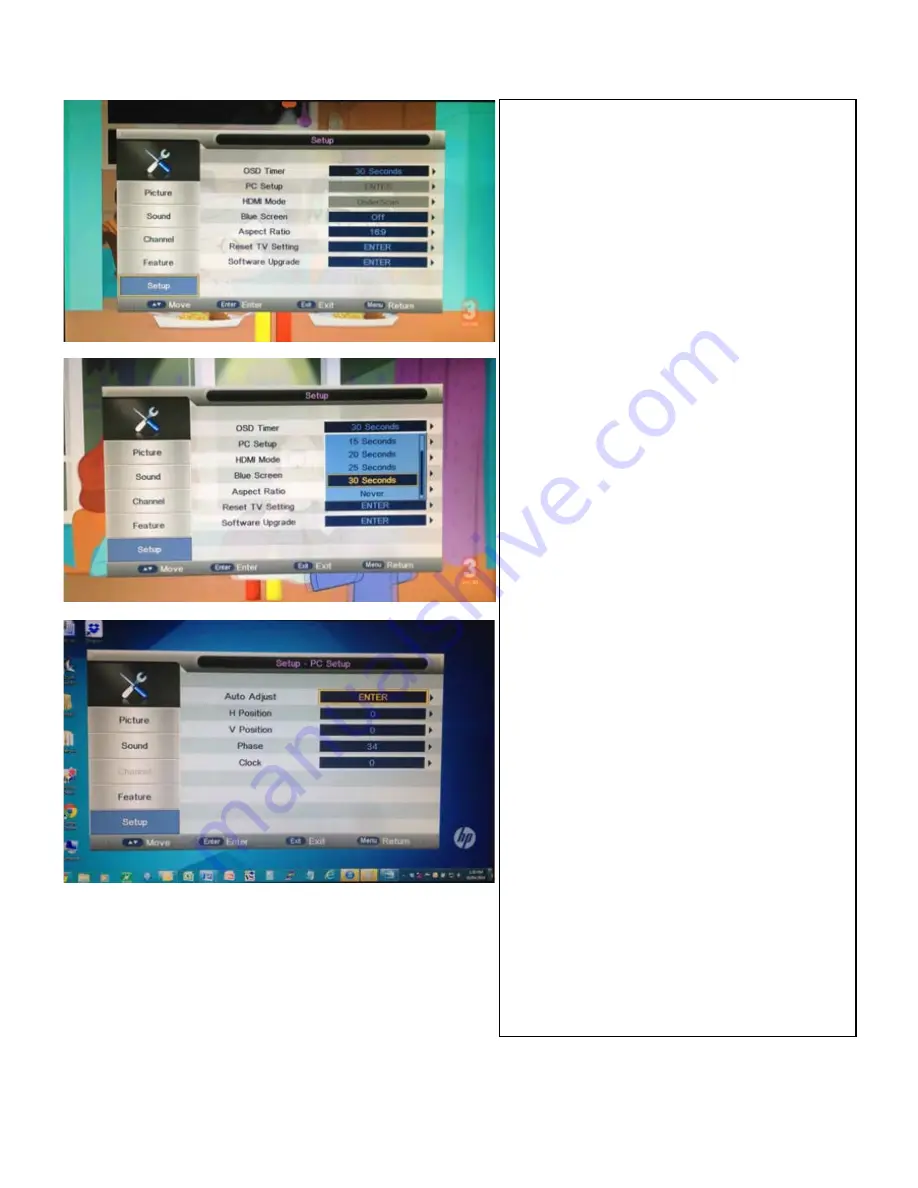
SETUP MENU

SETUP MENU 

Press the 

 / 

to select Setup then Press 

OK

 or 

to enter. 

Press 

 / 

set in the Setup Menu (OSD Timer→ PC Setup→ 

HDMI Mode→ Blue Screen→ Aspect Ratio → Reset 

TV Setting→ Software Upgrade) then Press 

OK

 or 


to enter. 

OSD (On Screen Display) TIMER 

Press the 

 / 

 to select OSD then press 

OK


or  

► 

to enter. 

Press 

 / 

10 sec→ 15 sec→ 20 sec → 25 sec → 30 sec → 

Never) then Press 

OK

 or 

 to confirm selection.


Info:

 OSD Timer is the time you set for the On Screen 

Display before it times out. 

PC SETUP 

Press the 

 / 

OK

 or 

 to enter. Select the following options 

available: 

Auto Adjust: Press 

OK

 or 

 to auto adjust 

H Position/V Position: Press 

OK

 or 

 to enter and 

use 

◄►

to adjust the level (-16 to +16) 

 and press 

OK

 to confirm selection. 

Phase: Press 

OK

 or 

 to enter and use 

◄►

to adjust 

the level (0 to +63) and press 

OK

 to confirm 

selection. 

Clock: Press 

OK

 or 

 to enter and use 

◄►

to adjust 

the level (-50 to +50) and press 

OK

 to confirm 

selection. 

HDMI Mode 

Press the 

 / 

to select HDMI then press 

OK

 or

to enter. Select Under Scan or Over Scan then press 

OK

 or 

 to confirm selection. 

NOTE:

 PC Setup/HDMI Mode menu is only available 

if a VGA/HDMI inputs are connected to the TV. 

BLUE SCREEN 

Press the 

 / 


to select Blue Screen then press 

OK

or 

 to enter. Select ON or OFF then press 

OK

 or 


to confirm selection 

to select PC Setup/HDMI then press

to select the options available (5sec->

to select the option that you want to 

For assistance:

[email protected]

www.uec.com.au

Altech UEC, 2014

33

Summary of Contents for AL-32TVCM421PVR

Page 1: ...ea a o e uc o e o e u a ee uc o ma ua a a e ace o u u e e e e ce Altech UEC 2014...

Page 2: ...enu 21 Feature Menu 25 Set up Menu 33 PC Set up Menu 33 Media Menu Movie Menu 38 Music Menu 37 Photo Menu 36 PVR and e Book Menu 39 VAST Menu VAST Decoder Features and Menu 45 Troubleshooting 58 Produ...

Page 3: ...your LED TV If any items are missing contact your dealer Remote Control Batteries 2 x AAA Stand Neck Screws AL 32TVCM421PVR For assistance support uec com au www uec com au Altech UEC 2014 3 User Manu...

Page 4: ...from high temperature heating objects or direct sunlight It requires good ventilation Allow 10cm between the LED TV and other appliances or built in cabinet walls You may clean the display panel with...

Page 5: ...n Do not overload the power cord or power socket Do not disassemble the back cover as it contains high voltages inside and will cause electric shock Internal adjustments and checks should only be cond...

Page 6: ...ng If you choose to mount the LED TV to the wall please follow the instructions below Unplug all the cables and cords from your LED TV Place the LED TV face down on a soft and flat surface blanket foa...

Page 7: ...ay Due to the large variation of file sizes compression formats and codec available playback of all files cannot be guaranteed I cannot record onto my USB flash drive for DTV FAT 32 formatted flash dr...

Page 8: ...SIDE CONNECTION PANEL FOR DTV SIDE CONNECTION PANEL FOR VAST BOTTOM CONNECTION PANEL BUTTON FUNCTIONS FRONT PANEL LED INDICATOR For assistance support uec com au www uec com au Altech UEC 2014 8...

Page 9: ...b Pr In Component input terminal Select COMPONENT input source using the SOURCE button on the remote COAXIAL Digital TV sound output RF IN Connect the antenna to the RF IN port Please refer to the Ant...

Page 10: ...he coaxial cable under the TV 3 To obtain quality picture and sound a roof aerial antenna with the correct coaxial cable 75 and with the correct terminating plug must be used in the installation Notes...

Page 11: ...libration shortcuts Short press Switches between TV and Radio channels Press and Hold launches TV and Radio bouquets in VAST mode Increase decrease the volume level Turns the Teletext ON or OFF HOLD O...

Page 12: ...l always boot up in VAST mode everytime it is powered ON as shown in the images below ou o e ec a ea e e e o e ec o o a e o mo e e a o co ac ou a e e a a o ec c a o ec ca a a ce Once it finishes with...

Page 13: ...ss buttons on the remote or on the bottom of the TV to increase decrease the volume level Press button on the remote to enable Press again to disable TV a Record In DTV mode press the RECORDER button...

Page 14: ...channel program title and time slot Press again to launch the program information Channel frequency Bandwidth Signal Strength and Quality Press the arrow key to show the next program and information...

Page 15: ...auto tune reminder Press ee w ce to cancel the auto tune reminder and set recording Press ee ce to cancel recording Press to resume TV viewing eco co ca e a o am e o eco em e co ca e a a u o u e em e...

Page 16: ...oft User Shortcut Key While watching TV Press PMODE on the remote to toggle on the different settings and select Leave the pop up message to timeout after a selection is made Note Brightness 50 to 50...

Page 17: ...NOISE REDUCTION Press the toselectNoise Reduction then Press OK or to enter Press settings Off Low Middle High and Press OK to select RESET Press the Press OK or to enter Press OK to reset all Picture...

Page 18: ...EQ 100Hz 300Hz 1KHz 3KHz 8KHz 50 to 50 can only be manually set if the Sound Mode is set to USER Press OK or to enter the Setting Use the arrow keys to adjust settings according to your preference Pre...

Page 19: ...oncert hall Automatic Volume Levelling AVL Press the to select AVL then Press OK or to enter Press the among the given settings Off On and Press OK to select Info Automatic Volume Levelling AVL mainta...

Page 20: ...Bitstreams and PCM audio signals Select Bitstream to get Dolby Digital DTS stereo 5 1 etc sound content in a program if supported Select PCM to get CD like audio sound Select OFF if you are not using...

Page 21: ...nel is channel 24 if you press CH Skip some channels so the remote will skip these channels Delete channels If you delete a channel this channel will no longer be in the Channel Manager List and will...

Page 22: ...n again to cancel skip DELETING A CHANNEL Press press Green button to Delete a channel Key in password default 0000 A appears on the X column indicating that the channel is marked for deletion The cha...

Page 23: ...ress OK or to enter Use the OK to select the appropriate country i e Australia Press MENU to return to previous menu or press EXIT to resume TV viewing TV CONNECTION Press and press OK or to enter Use...

Page 24: ...ignals are available hence Analogue Manual Search is unavailable Press to return to previous menu or press to resume TV viewing Press Search and press or to enter Key in password default 0000 Use the...

Page 25: ...hen Press OK or to enter Key in Password default 0000 to access menu Press OK or to enter and use ON or OFF then Press OK to confirm Press MENU to return to previous menu or press EXIT to resume TV vi...

Page 26: ...New Password Confirm New Password Press MENU to return to previous menu or press EXIT to resume TV viewing LANGUAGE Press the to select Language then Press OK or to enter Use the to select on the ava...

Page 27: ...g on the time of the year whether DST is currently on or not and Press OK or to confirm selection Press MENU to return to previous menu or press EXIT to resume TV viewing SLEEP TIMER Press the to sele...

Page 28: ...m selection Press MENU to return to previous menu or press EXIT to resume TV viewing HEARING IMPAIRED Press the Impaired then Press OK or to enter Use the and Press OK or to confirm selection Press ME...

Page 29: ...PAUSE II button while watching live broadcast and resume watching later by pressing the PLAY PAUSE II button again This recording is lost if you switch to a new channel IMPORTANT PVR function of the D...

Page 30: ...to confirm selection Info A Program Stream PS is just a container format for multiplexed audio video and metadata Data meant to be stored and copy pasted is encoded in a Program Stream DVD as an examp...

Page 31: ...if you want an auto tune reminder Press OK or to enter Type Press the Set to DTV or RADIO if you want to record DTV programs or RADIO programs respectively Press OK or to enter Channel Press the chan...

Page 32: ...on the screen Stop timeshift for channel change when changing a channel from a currently viewed timeshifted program Select and Press to confirm channel change to select Timeshift Start to select Recor...

Page 33: ...or to enter and use to adjust the level 16 to 16 and press OK to confirm selection Phase Press OK or to enter and use to adjust the level 0 to 63 and press OK to confirm selection Clock Press OK or t...

Page 34: ...and press OK to confirm selection The TV will reset and will prompt you again to the installation process ASPECT RATIO Press the OK or to enter Press to select the options available 4 3 16 9 Full Zoom...

Page 35: ...e IMPORTANT Software upgrade shall be performed by a qualified service technician authorised by Altech UEC Any unauthorised software upgrade done on the product is not covered by the manufacturer s wa...

Page 36: ...ss to select PHOTO Press OK to enter and you will see the root directory of the USB highlighted Press OK to enter into the contents of the USB Select the appropriate folders with photo files Press OK...

Page 37: ...s OK or to playback the file Press I I to playback the previous next music file to rewind fast forward the music file II to play pause the music file to toggle between random play play all repeat all...

Page 38: ...launch available functions and progress bar on the screen to toggle between the Repeat modes Repeat One Repeat All Repeat Off to launch Movie Setup and select on the options available Program Subtitl...

Page 39: ...le Program Subtitle Audio Repeat to set time for playback at the specified point in time Press 0 9 to enter a value and use the to move to the next previous number place Press OK to jump playback at t...

Page 40: ...on the remote Dish Alignment If this screen is being displayed on startup then the unit is not receiving signal This is either because the dish is not aligned properly and the signal is weak or the LN...

Page 41: ...co ordinates to align to NOTE Compass bearing is aligned to true north Press OK on the remote once more to change the LNB setting and this screen will appear Now Press the number on the remote which...

Page 42: ...u will need to fine tune your alignment This screen will then appear Signal Found is displayed at the top of the screen then the unit will begin to scan in services and channel 800 will appear The sma...

Page 43: ...item and use and to scroll Press OK to confirm selection Enter in the correct LNB value by pressing OK on the LNB Frequency option and then enter the new LNB value Press OK to confirm selection Press...

Page 44: ...vailable on the website when this feature is available ma a The smart card is paired to this VAST decoder which means that the smart card provided with your VAST decoder cannot be used in any other VA...

Page 45: ...e other channels without changing the channel you are presently viewing You can set the timeout value for the information plate i Plate from the Information Display Timeouts menu The i Plate will only...

Page 46: ...reminder from a banner to an autotune press the OK button again changes the icon to an A confirming that an autotune banner is set How to Delete Reminder Highlight the programme which the reminder was...

Page 47: ...may cancel the reminder by pressing the EXIT button or tune immediately to the selected programme by pressing the OK button If you do nothing the decoder will automatically tune to the selected channe...

Page 48: ...decoder The PG pin code pop up will appear when changing channels to a parental blocked program or when a parental blocked program begins After the third incorrect pin entry the pin code is locked you...

Page 49: ...ON a blue bar is visible showing the level your volume is set When the volume is OFF the blue bar is extinguished However when the button is pressed again the volume level will be unchanged For assis...

Page 50: ...ettings Select the Accept these settings andpress OK button to save the settings If the HD Output Format option has been changed it will temporarily switch the resolution and launch a popup on the scr...

Page 51: ...correct region and the local time will be adjusted automatically Software upgrades can be done over the air When an upgrade is available for your VAST decoder the menu option will be accessible If th...

Page 52: ...NG There are a number of ways to schedule a recording Instant Record If you want to record the program you are currently watching press the record on the remote control A record start icon will appear...

Page 53: ...launch the Scheduled List screen that recording is scheduled remote r recording change the a e the recording Scheduled List recording user manual Scroll to the Scheduled List icon and For assistance s...

Page 54: ...The timeshift buffer is reset when changing channel or when entering the TV Guide The timeshift buffer contents can be displayed by pressing the green button when the iplate is visible if a timeshift...

Page 55: ...nue playing back the remaining programs in the timeshift buffer Once the timeshift buffer has been exhausted the PVR will switch to live TV on the channel on which the recording occurred P A AC The pl...

Page 56: ...oll to the PVR Setup icon and press OK to launch the PVR Setup menu screen The screen on the left will be shown eco e Programs tend to run past the times listed in the TV Guide due to inaccuracies in...

Page 57: ...drive format option to correctly configure the hard drive for use the first time it is connected to the PVR Format hard drive can also be used to erase all recorded programs on the hard drive If the h...

Page 58: ...perly Hard Drive has Incorrect Format Hard Drive is Full Hard Drive Space only says 1TB when I have Connected a 2TB Drive d Z s Press PVR to launch the PVR menu scroll right to the PVR Setup icon and...

Page 59: ...of acceptable quality and the failure does not amount to a major failure Proof of Purchase This warranty is valid for the original purchase and is not transferable to another unit Please keep your pur...

Page 60: ...______________________ How to Make a Claim This warranty against defects is provided by Altech UEC Level 2 27 Sirius Road Lane Cove West NSW 2066 phone 02 9425 5777 If a defect in the product is detec...

Page 61: ...ces ope or se DIY Installations Disclaimer rie of it is not to co r e potent in this e or the r ROVI his product incorpo es cop ht protection t is p en int c ropert hts se of this cop ht protection t...

Page 62: ...licenses please visit http www uec com au The source code for these components can be obtained by written request to The Technical Support Team Altech UEC PTY LTD 27 Sirius Road Lane Cove West NSW 20...

Page 63: ...st AL 32TVCM421PVR VAST User Manual go to website www uec com au The smartcard is unique to each VAST decoder and cannot be replaced or changed with another VAST decoder without rst contacting the cal...

Page 64: ...For assistance support uec com au www uec com au Altech UEC 2014 64...

Page 65: ...For assistance support uec com au www uec com au Altech UEC 2014 65...

Page 66: ...For assistance support uec com au www uec com au Altech UEC 2014 66...

Page 67: ...For assistance support uec com au www uec com au Altech UEC 2014 67...

Page 68: ...www uec com au Altech UEC 2014...

Reviews: