


3
Setup
Do not plug the AC power plug into the wall outlet until all connections are made.
The ADA890 can be setup in two configurations. For ENHANCED SURROUND SOUND a 5-piece setup is used. For near field STEREO/SURROUND SOUND a
3-piece setup is used. The two modes of operation are described below. The speakers are packaged and shipped in the 5-piece arrangement. Follow the instructions
and pictorial in Figure 1 to make the 5-piece connections.
The ADA890 can be used with Gaming Systems such as the Sony PlayStation and with Sega Dreamcast with the analog input as shown in Figure 2. Playback with
this method will result in simulated Dolby
®
ProLogic surround sound, when in ProLogic mode, for a great gaming experience. ADA890 also can be used with any
other sound system with dual right and left RCA outputs.
For Dolby
®
Digital sound with the ADA890 and the Sony PlayStation2, there is an optional optical to S/PDIF converter, called OC1, available for sale on the Altec web
site at
www.altecmm.com.
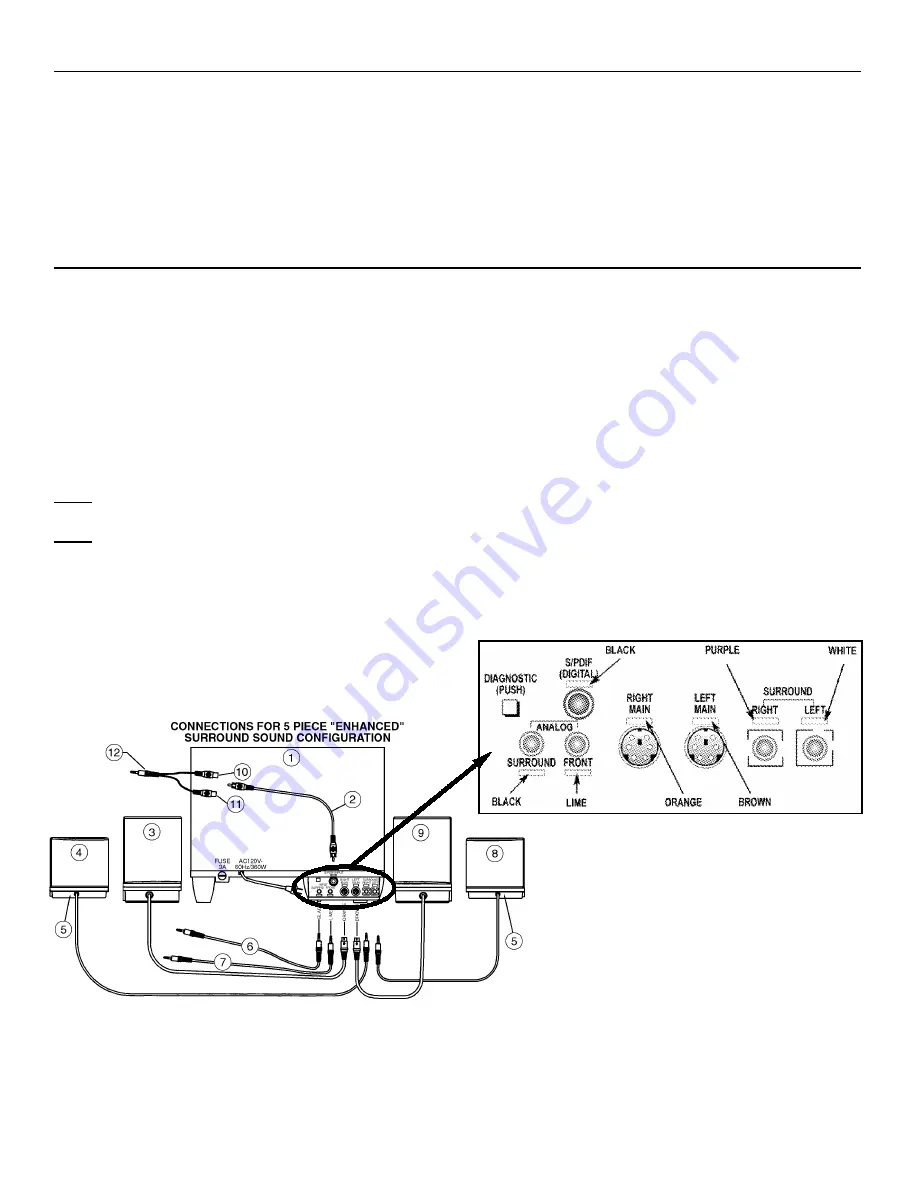
Enhanced Surround Sound Operation (See Figure 1)
1) Connect the left and right satellite speakers.
Notice that the DIN connectors from the left and right satellite speakers are color-coded and plug into the matching color indicators on the back of the subwoofer.
Also note that the connectors have arrows. These arrows should face up as shown in figure 1.
2) Connect the left and right surround speakers.
The left (WHITE) and right (PURPLE) surround speaker connectors are plugged into the corresponding colored inputs on the back of the subwoofer.
3) Connect the subwoofer to the computer. (See Note 1)
The lime color-coded wire connects the FRONT INPUT on the subwoofer to the corresponding output on the computer.
The black color-coded wire connects the SURROUND (SURRD) INPUT on the subwoofer to the corresponding output on the computer.
The black RCA type plug is used to connect the S/PDIF INPUT on the subwoofer to a DVD player or to the corresponding output on the computer. (See Note 2).
Plug the AC power plug into the wall outlet. Your ADA890 system is now ready for use.
Note 1: Your computer may have one of several different sound cards. The computer system documentation will provide information on the sound card outputs used
in your model.
Note 2: The supplied S/PDIF connection cable is terminated with RCA type plugs. In some instances this type of plug may not match the corresponding sound card.
A connector cable (Dongle) is provided that will match the computer output and the S/PDIF cable. Some sound cards may not have a rear analog or S/PDIF output.
Refer to your computer system documentation for information on the sound card used in your model.
1) Subwoofer
8) Left Surround
2) To S/PDIF Output (Black)
9) Left Speaker
3) Right Speaker
10) For PCM Data
4) Right Surround
11) For AC3 Data
5) Speaker Stand
12) To Sound Card
6) To Computer Rear Audio Output (Black)
7) To Computer Front Audio Output (Lime)
Figure 1


