19
Alpine TR42 Direct Vent Gas Fireplace
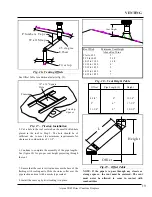
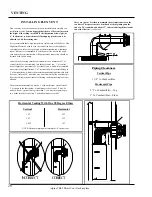
4 5 d e g r e e
E lb o w
W a ll S tr a p
P lu m b e r s T a p e
F i r e s to p
Fig. 16– Venting Offsets
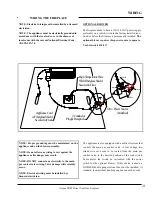
Firestop
Spacer
Framing
10" x 10" Square
Hole
Fig. 17 – Firestop Installation
5. Cut a hole in the roof centered on the small drilled hole
placed in the roof in Step 2. The hole should be of
sufficient size to meet the minimum requirements for
clearance to combustibles of 1 1/2”.
6. Continue to complete the assembly of the pipe lengths.
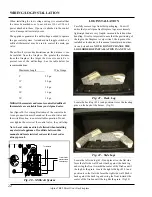
See (figure 18) for proper vent height projecting through
the roof.
7. Ensure that the vent is vertical and secure the base of the
flashing with roofing nails. Slide the storm collar over the
pipe section and seal with a mastic type sealant.
8. Install the vent cap by twist locking it in place.
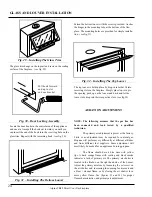
See Offset Table for additional details (fig. 19).
Fig. 18 – Vent Height Table
Roof Pitch
Minimum Vent Height
Above Roof Line
Flat to 9/12
2’
9/12 to 10/12
2-1/2’
10/12 to 11/12
3-1/4’
11/12 to 12/12
4’
12/12 to 14/12
5’
14/12 to 16/12
6’
16/12 to 18/12
7’
Vent Height
Fig.19 – Offset Table
Offset Pipe Length (L)
Height
4-3/4”
0”
13-1/4”
9”
6”
17-1/2”
11-1/4”
9”
19-1/2”
L
H eight
O ffset
NOTE: If the pipe is to pass through any closets or
storage spaces, the vent must be enclosed. The vent
must never be allowed to come in contact with
combustibles
VENTING


