Alpine iXA-W407BT Owner'S Manual Download Page 28

26

-EN


A compatible, external audio processor is operable from this unit when 
connected. Some audio processors may require a wired controller. The 
explanations below use the PXA-H700/PXA-H701 as an example. 
Refer to the operating instructions of the audio processor for more 
details.

The adjustments or settings performed on the connected audio 
processor cannot be operated properly from this unit.

The setting “Setting the Speakers”, “Setting Bass Sound Control”, 
and “Graphic Equalizer Adjustments” are not available if the 


MRA-D550 is connected. Additionally, if the MRA-F350 or 


MRA-F355 is connected, the following setting “Setting the MX Mode 
of External Audio Processor” is not available. Also, the setting 
content differs between the PXA-H700 and PXA-H701.

This unit cannot be connected to the PXA-H510 and PXA-H900.

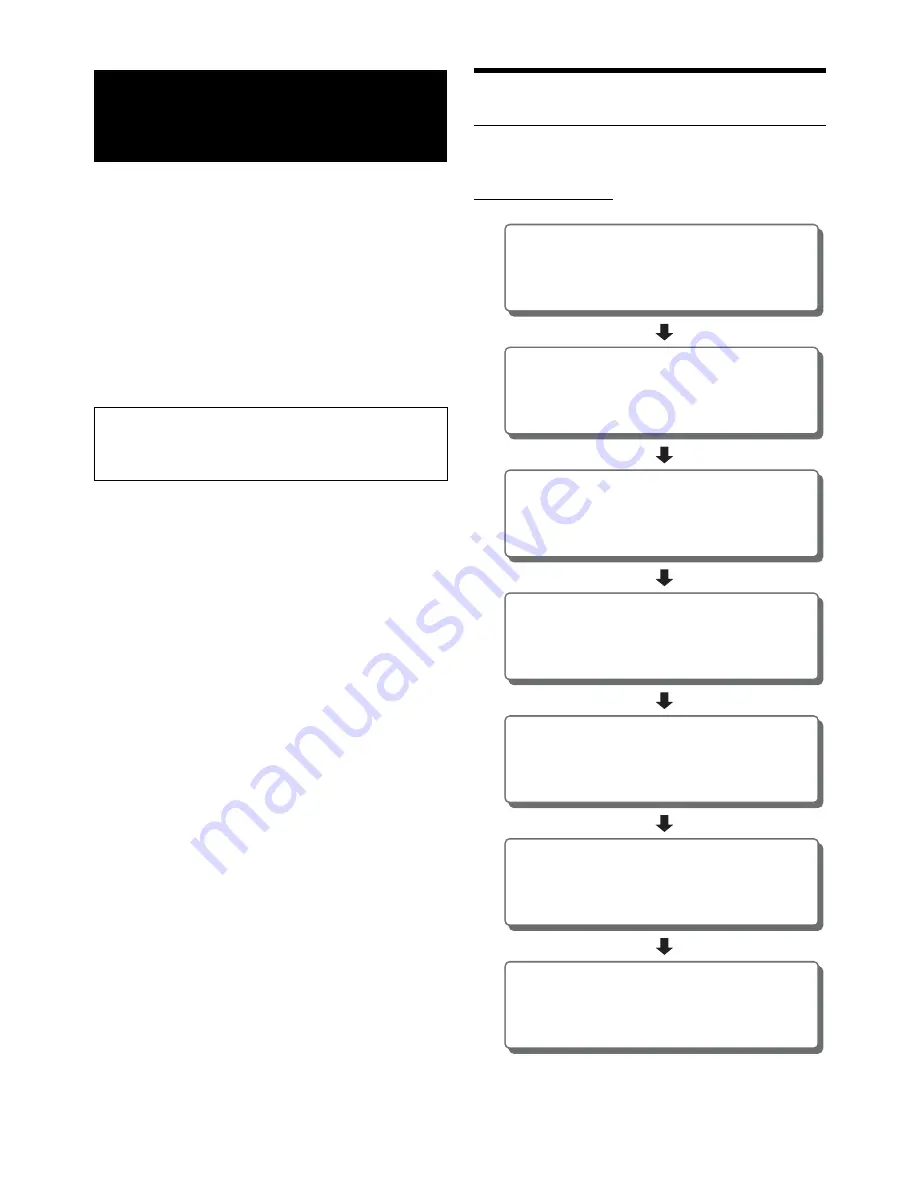
Adjustment Procedure for Dolby 
Surround

Make the adjustments described below in order to reproduce Dolby 
Digital and DTS sound with greater accuracy.

Adjustment procedure

In case of combining the Automatic adjustments etc.

We recommend to make the Automatic adjustments before the Dolby 
Surround adjustments.

External Audio 
Processor (Optional)

The Parking Brake must be engaged to access the Audio 
Processor mode screen. Attempting to access this screen while 
driving will display the warning-CAN’T OPERATE WHILE 
DRIVING.

1

2

3

4

5

6

7

Speaker Setup (page 31)

(Turning the speakers to be used on and off and 
setting their response)

Adjusting the speaker levels (Output Level) 
(page 31)

(Adjusting the signal output level to the various 
speakers)

Mixing bass sound to the rear channel (Rear 
MIX) (page 31)

(Achieving smooth sound in the rear seat by mixing 
the front audio signals with the rear speaker signals)

Adjusting the acoustic image (BI-Phantom) 
(page 30)

(Adjusting the acoustic image to achieve a sound as 
if the centre speaker were directly in front of the 
listener)

Achieving powerful high volume sound 
(Listening Mode) (page 31)

(Achieving energetic sound with even greater power, 
like the sound in a movie theater)

Adjusting the DVD Level (page 32)

(Adjust the volume (signal level) in the Dolby Digital, 
Pro Logic II, DTS and PCM modes)

Storing Settings in the Memory (page 32)

(Storing all the settings and adjustments made on the 
iXA-W407BT (not only the above settings/adjusts) in 
the memory)

Summary of Contents for iXA-W407BT

Page 1: ...257 4631 ALPINE ELECTRONICS OF CANADA INC 777 Supertest Road Toronto Ontario M3J 2M9 Canada Phone 1 800 ALPINE 1 1 800 257 4631 ALPINE ELECTRONICS OF AUSTRALIA PTY LTD 161 165 Princes Highway Hallam V...

Page 2: ......

Page 3: ...etup 16 RDS Time Display 16 Adjusting Source Signal Levels 16 PI Seek Setting 16 Receiving RDS Regional Local Stations 16 Switching the Display Language of PTY Programme Type 16 Setting PTY31 Emergenc...

Page 4: ...g the Speakers 30 Setting of Dolby Digital 30 Speaker Setup 31 Adjusting the DVD Level 32 Linear PCM Setting 32 Storing Settings in the Memory 32 Calling up the Preset Memory 32 IMPRINT Operation Opti...

Page 5: ...n MP3 Changer mode 48 Repeat Play 48 M I X Random Play 49 File Folder Name Search MP3 Changer mode 49 USB Memory Portable audio player Optional BANK Function USB memory only 49 Playback 50 Repeat Play...

Page 6: ...CREWS OUT OF THE REACH OF CHILDREN Swallowing them may result in serious injury If swallowed consult a physician immediately USE THE CORRECT AMPERE RATING WHEN REPLACING FUSES Failure to do so may res...

Page 7: ...using other USB products cannot be guaranteed If the USB connector is used be sure to use only the supplied connector cable with the unit A USB hub is not supported Depending on the connected USB mem...

Page 8: ...product incorporates copyright protection technology that is protected by U S patents and other intellectual property rights Use of this copyright protection technology must be authorized by Macrovis...

Page 9: ...n Setting Navigation Mode page 21 If NAV IN is set to ON the Navigation screen will be recalled Press and hold for at least 2 seconds to recall the setting which is set in Setting the OPTION Button on...

Page 10: ...e Each time you slide the display the mode switches circularly in the following order Audio Visual Navigation 1 Camera 2 Telephone 3 Multi Info Audio Visual 1 Displayed only when NAV IN is set to ON R...

Page 11: ...de 2 Displayed only when the current station is the preset one Listening to the Radio 1 Press SOURCE to activate mode switching screen 2 Slide the display horizontally with your finger to select Audio...

Page 12: ...display the list screen of preset stations 2 Touch any one of the preset stations 1 through 6 that has your desired radio station in memory The preset station is received Touch to cancel the list scr...

Page 13: ...the programme type to start searching for a station of the selected programme type If no station is found NO PTY will be displayed Receiving Traffic Information While Playing iPhone iPod or Radio 1 T...

Page 14: ...ch a desired setting range and will move to that location Touch L or R of Balance and F or R of Fader for fine tuning Turning Defeat ON or OFF Touch to display the Defeat adjusting screen Touch or of...

Page 15: ...el settings will be individually memorized for each source FM MW LW CD etc until the setting is changed The Treble frequency settings adjusted for one source are effective for all other sources FM MW...

Page 16: ...alculations are performed in the order they are input Multiplication and division have no priority Information of the playing Audio Visual source will be displayed iPod mode Audio mode Artwork song na...

Page 17: ...tainment Function The rear entertainment function independently routes different sources to the front and the rear inside a car For example while listening to the radio or other audio source in the fr...

Page 18: ...ting Source Signal Levels If the difference in volume level between the iPhone iPod and FM radio is too great adjust the FM signal level as follows Setting item FM Level Setting contents LOW HIGH PI S...

Page 19: ...wnload 2 Screen Alignment Display 1 Refer to Visual EQ on page 24 2 Refer to Downloading the Background data on page 25 4 Touch to return to the previous screen Touch and hold for at least 2 seconds t...

Page 20: ...een Alignment The adjustment screen appears 2 Accurately touch the mark provided in the lower left corner of the screen The screen changes to the adjustment screen 3 Accurately touch the mark provided...

Page 21: ...the World Clock Display of Multi Information Function is used refer to page 13 Setting item T ZONE Select the time zone of your district For the time zone refer to List of World Clock page 58 Touchin...

Page 22: ...Option Key 1 Displayed only when Bluetooth IN is OFF 2 When ON is set in Setting the Picture Output page 22 the item is displayed 3 Not displayed when OFF is set in Setting the Rear Camera Input page...

Page 23: ...case select NTSC or PAL mode manually When you connect optional navigation equipment set to ON Setting item NAV IN Setting contents OFF ON With an Alpine navigation system connected to the iXA W407BT...

Page 24: ...ames e g DVD1 DVD2 Adjusting the AUX2 name After setting AUX2 IN to ON in Setting the AUX Mode this setting can be carried out Setting item Name Setting contents AUX DVD GAME TV DVB T EXT DVD NAV DVD...

Page 25: ...and is displayed in Multi Information main screen e g AV Controller will be replaced as Calendar 6 Touch to return to the previous screen Touch and hold for at least 2 seconds to return to the main so...

Page 26: ...ss picture tint etc set this function to OFF If your desired brightness picture tint etc are adjusted after selecting any one of the setting contents NIGHT M to CONTRAST CUSTOM is displayed Setting it...

Page 27: ...to a USB Memory optional data is written in the root folder and store the data to the iXA W407BT To start Background download access the URL below and follow the on screen instructions http www alpin...

Page 28: ...end to make the Automatic adjustments before the Dolby Surround adjustments External Audio Processor Optional The Parking Brake must be engaged to access the Audio Processor mode screen Attempting to...

Page 29: ...can have its own MX setting MX mode does not function when MX is ON for MW LW radio MX CMPM is applied for MP3 WMA AAC and iPhone iPod The MX setting can be performed only when a source is currently s...

Page 30: ...o your preference Selecting the Cut Off Frequency Touch or of Freq then select the cut off frequency crossover point The adjustable bandwidth differs depending on the speaker channel Adjusting the Lev...

Page 31: ...screen appears 4 Adjust the G EQ to your preference Adjusting the Level Touch or of the desired frequency to adjust the level When the speaker is set to the OFF mode the graphic equalizer for that spe...

Page 32: ...onnected speaker by touching the respective or button Set the speaker which is not connected to OFF Settings above can be carried out even when the speaker is set to OFF in Speaker Setup page 31 To us...

Page 33: ...es to the next channel 2 While the test tone is being produced from the speakers touch or of Output Level balance the output from all the speakers 3 Touch ON again to turn off If a speaker is set to o...

Page 34: ...that thoroughly eliminates in car acoustic problems that normally degrade sound quality This enables us to experience music the way the artist intended Refer to About IMPRINT page 39 When the IMPRINT...

Page 35: ...tem TW Setup Touch or of TW Setup to select Maker s or User s The TW Setup mode can only be selected if the FRONT REAR SUBW 4 2CH 3WAY 2 2CH switch on the IMPRINT audio processor PXA H100 is set to 3W...

Page 36: ...To adjust another band repeat step 3 and adjust all bands The frequencies of adjacent bands cannot be adjusted within 4 steps While adjusting the Parametric EQ you should consider the frequency respo...

Page 37: ...pending on the speaker channel 4 2ch FRONT REAR SUBW System Setting contents Low SUB W 20 Hz 200 Hz Mid REAR 20 Hz 200 Hz High FRONT 20 Hz 200 Hz Adjusting the Slope Touch or of Slope then adjust the...

Page 38: ...ached This operation cannot be performed when a typical equalizer setting e g POPS is selected in Equalizer Presets F EQ page 33 Calling up the Preset Memory 1 Check whether the Defeat mode is OFF 2 T...

Page 39: ...farthest speaker and the other speakers L distance to farthest speaker distance to other speakers These values are the time correction values for the different speakers Setting these values to make e...

Page 40: ...damage to the speaker due to the low frequency content You cannot adjust the crossover frequency higher than the HPF or lower than the LPF Adjustment should be made according to the recommended cross...

Page 41: ...ystem has been able to overcome them Until now with the introduction of IMPRINT Alpine provides a hardware software combination that not only solves these problems it actually improves the sound stage...

Page 42: ...ompatible device 4 If this unit is successfully connected to a BLUETOOTH compatible device CONNECTED Device name is displayed and then the unit returns to normal mode Set Setting the Search Mode page...

Page 43: ...sly connected BLUETOOTH compatible device Setting Item Clear Device 1 Touch the BLUETOOTH compatible device you want to delete from the Clear Device list A message is displayed 2 Touch YES if you want...

Page 44: ...ings may limit the feature s functionality Always contact your service provider about feature availability and functionality All features functionality and other product specifications as well as the...

Page 45: ...cted or receiving dialing a call At this time if you select any outgoing mode NOW UPDATING will be displayed It may take some time for the list to be displayed and also directly after connection the l...

Page 46: ...the voice dial mode The voice dial mode is activated and SPEAK is displayed Touch NO will return to the Telephone Menu screen 3 Say the telephone number name you want to call into the microphone The n...

Page 47: ...red Song Touch Returns the beginning of the song being played back Touch Forwards the next song Pausing Touch A playback stops Touching again will resume a playback When the optional rearview camera H...

Page 48: ...rly in the following order Audio Visual Navigation Camera Telephone Multi Info Audio Visual 3 Slide the display vertically with your finger or press SOURCE repeatedly to select AUX source The name giv...

Page 49: ...r Down Up The button displays the current changing mode CH or FAV Calling up Main Menu Screen Touch MENU to call up the main menu screen Calling up Menu Operation Mode 1 Touch P1 2 The function guide...

Page 50: ...k Selecting a Disc Changer Optional When a Disc CD Changer is connected Touch DISC or to select the desired DISC When an MP3 compatible CD changer is connected 1 Touch P1 2 to change the Function Guid...

Page 51: ...ING is displayed If another bank is selected when unit power is turned on the ACC position is set or USB connection is made banking will start It can take anywhere from a few seconds to up to 10 minut...

Page 52: ...compatible with this unit Before disconnecting USB memory be sure to change to another source or set to pause Repeat Play Only Repeat One is available for this mode Repeat One A single song is repeat...

Page 53: ...u can select your preferred skip style in Skip Style Setting page 17 For Skip Style function details refer to Page Skip Function Percent Skip Function Alphabet Skip Function on page 54 2 Titles are li...

Page 54: ...le track title artist name and album name ID3 tag WMA tag data If information contains characters other than ID3 tag information the audio file may not be played back The tag information may not be co...

Page 55: ...correct function and performance are not guaranteed Playback 1 Press SOURCE to activate mode switching screen 2 Slide the display horizontally with your finger to select Audio Visual mode Each time y...

Page 56: ...n artist 1 Touch the desired album s name in To search for the album of an artist in step 1 The Songs search screen of the selected album is displayed 2 Touch the desired song s name The selected song...

Page 57: ...he iPhone iPod is displayed as on this unit Shuffle ALL All songs in the iPhone iPod are played back in random sequence Any one song does not play back again until all songs have been played back Shuf...

Page 58: ...ascending order stations programmed into the radio s presets as shown below Changer mode DISC Select UP button Press this button to select a disc in ascending order MP3 WMA AAC mode Folder Playlist A...

Page 59: ...tery cover Slide out the battery cover while firmly pressing in the direction of the arrow 2 Replacing the battery Insert the batteries observing the polarities as illustrated 3 Closing the cover Slid...

Page 60: ...58 EN List of World Clock For details see page 13 Information...

Page 61: ...are in a weak signal area Make sure the tuner is in DX mode If the area you are in is a primary signal area the antenna may not be grounded and connected properly Check your antenna connections make...

Page 62: ...device Portable audio player that is not supported by the unit is connected Attempt to connect another USB memory Portable audio player A USB memory Portable audio player is not connected Make sure th...

Page 63: ...ower Consumption 500mA USB Class USB Play From Device USB Mass Storage Class File System FAT12 16 32 MP3 Decoding MPEG 1 2 AUDIO Layer 3 WMA Decoding Windows Media Audio AAC Decoding AAC LC format m4a...

Page 64: ...D INSTALL THEM SECURELY Be sure to use only the specified accessory parts Use of other than designated parts may damage this unit internally or may not securely install the unit in place This may caus...

Page 65: ...Mounting Sleeve Included Dashboard Rubber Cap Included Face Plate 2 Included This unit Hex Bolt Included Bracket key Pressure Plates 1 3 When your vehicle has the Bracket mount the long hex bolt onto...

Page 66: ...position and the battery may be discharged iXA W407BT Red Yellow SPST SW Optional FUSE 5A Optional FUSE 20A Optional Battery ACC BATTERY To prevent external noise from entering the audio system Locat...

Page 67: ...ier Amplifier To plus side of the back lamp signal lead of the car To Audio Input terminals R L To Audio Output terminals R L To Video Input terminal To Video Output terminal ISO Antenna Plug JASO Ant...

Page 68: ...tails about connections consult your nearest Alpine dealer Steering Remote Control Interface Connector To steering remote control interface box For details about connections consult your nearest Alpin...

Page 69: ...O Connector Speaker Output AV extension cable Included USB 30P cable Included USB extension cable Included Ai NET Cable Included with CD Changer System Switches When connecting an equalizer or divider...

Page 70: ...ul not to bend the Fiber Optic Cable at a sharp angle Navigation system Sold Separately NVE N099P PMD B200P Audio Processor Ai NET Fiber Optic Digital compatible Sold Separately Fiber optic digital In...

Page 71: ...his to the output or input connector of other product equipped with Ai NET Video Input Connector AUX INPUT Yellow Connect the video output lead of a DVD video player or DVD changer to this terminal RC...

Page 72: ...White Use only when a back up camera is connected Connect to the plus side of the car s reverse lamp This lamp illuminates when the transmission is shifted into reverse R With this lead properly wired...

Page 73: ......

Reviews: