Alpine IVA-W203 - 6.5

10

-EN

Accessory List

Head unit .............................................................................1

Power cable.........................................................................1

Remote cable ......................................................................1

Mounting sleeve ..................................................................1

Bracket key..........................................................................2

Flush Head Screw (M5x8) ...................................................6

Screw (M5×8) ......................................................................8

Remote control ....................................................................1

Battery (CR2025) .................................................................1

Face plate............................................................................1

Mounting Position Seal ........................................................2

Slot Securing Screw (M2 x 4)

*

............................................2

Owner’s Manual .............................................................1 set

* To customers who do not use an optional portable navigation: 

If necessary, secure the slot panel with this screw.

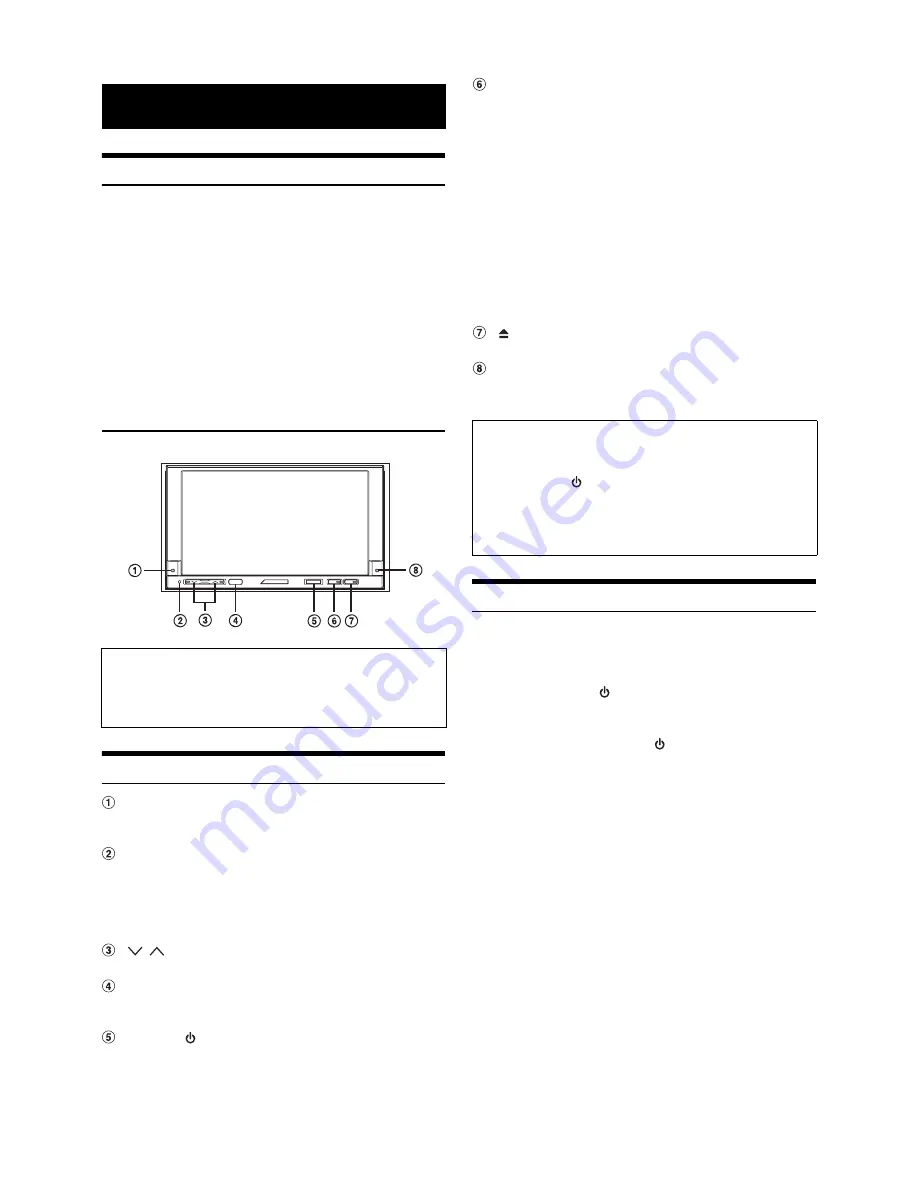
Location of Controls

DOCK indicator

Lights when a portable navigation device is inserted into the 
unit.

RESET switch

Be sure to press the RESET switch when using the unit for 
the first time, after installing the CD changer, after changing 
the car battery, etc.
Turn off the unit power, press RESET with a ballpoint pen or 
similar pointed object.

/


button

Press to adjust the volume.

Remote Sensor

Point the supplied remote control transmitter towards the 
remote sensor within a range of 2 meters.

SOURCE/

 button

Turns the power on. Press and hold for at least 2 seconds to 
turn the power off.
Recalls the SOURCE selection screen.

VISUAL / button

Press to recall the VISUAL selection screen.
If VISUAL is set in “Setting the VISUAL Soft Button” 
(page 36), momentarily press to recall the VISUAL selection 
screen, and if NAV. is set, momentarily press to recall the 
navigation screen.
Pressing and holding for at least 2 seconds will recall the 
setting which is set in “Setting the VISUAL Button on the 
Unit” (page 37).
If “AUDIO SETUP” is set, the AUDIO SETUP screen will be 
recalled.
If “SAT” is set, the weather channel or traffic channel will be 
recalled (when the XM or SIRIUS Receiver Box is 
connected).
If “TEL” is set, the TEL Bluetooth screen will be recalled 
(when the optional Bluetooth Box is connected).

button

Recalls the EJECT/TILT screen.

POWER indicator

Blinks when an operation is performed. However, turns off 
when Beep is set to OFF.

Turning Power On or Off

Some of this unit’s functions cannot be performed while the vehicle is in 
motion. Be sure to stop your vehicle in a safe location and apply the 
parking brake, before attempting these operations.

1

Press 

SOURCE

/

 to turn on the unit.

The unit can be turned on by pressing any button.

2

Press and hold 

SOURCE

/

 for at least 2 seconds to 

turn off the unit.

Some operation of the unit cannot be performed while the vehicle is 
in motion. In this case, be sure to first stop your vehicle and apply the 
parking brake, then perform the operation.

The IVA-W203 is a precision device. With gentle handling, its unique 
capabilities can be enjoyed for a long time.

In low ambient temperature conditions, the display may be dim for a 
short period of time immediately after the power is turned on. Once 
the LCD has warmed up, the display returns to normal.

Getting Started

Connectable to Remote Control Interface Box

You can operate this unit from the vehicle’s control unit when an 
Alpine Remote Control Interface Box (optional) is connected. For 
details, contact your Alpine dealer.

About the button descriptions used in this Owner’s 
Manual

The buttons found on the face of the unit are expressed in bold 
(e.g. 

SOURCE/

). The buttons found on the touch-screen 

display are shown in bold within brackets, [ ] (e.g. 

[SOURCE]

).

This Owner’s Manual explains mainly the function of soft 
buttons, when a soft button and a unit button have the same 
function.

*

Summary of Contents for IVA-W203 - 6.5" Touch Screen 2-DIN DVD In-Dash Receiver

Page 1: ...ntario M3J 2M9 Canada Phone 1 800 ALPINE 1 1 800 257 4631 ALPINE ELECTRONICS OF AUSTRALIA PTY LTD 161 165 Princes Highway Hallam Victoria 3803 Australia Phone 03 8787 1200 ALPINE ELECTRONICS GmbH Frankfurter Ring 117 80807 München Germany Phone 089 32 42 640 ALPINE ELECTRONICS OF U K LTD Alpine House Fletchamstead Highway Coventry CV4 9TW U K Phone 0870 33 33 763 ALPINE ELECTRONICS FRANCE S A R L ...

Page 2: ...18 If a menu screen appears 19 Displaying the Top Menu Screen 20 Displaying the Menu Screen 20 Displaying the Menu Operation Mode Screen 20 Searching by Program 20 Searching by Playlist 20 Stopping Playback PRE STOP 20 Stopping Playback 20 Fast forward Fast reverse 21 Finding the Beginnings of Chapters or Tracks 21 Playing Still Frames Pausing 21 Forward reverse frame by frame Playback 21 Slow Mot...

Page 3: ...the Navigation Interruption 36 Setting the AUX Mode 36 Adjusting the External Input Audio Level 36 Setting the Picture Output 36 Setting the Bluetooth Connection BLUETOOTH IN 36 Setting the USB Adapter to ON OFF 36 Setting the VISUAL Soft Button 36 Setting the VISUAL Button on the Unit 37 Setting the Digital Output 37 Subwoofer On and Off 37 DISPLAY Setup Display Setup Operation 37 Setting the Bri...

Page 4: ...ional Controlling USB Optional 51 SAT Radio Receiver Optional Receiving Channels with the SAT Receiver Optional 52 Tuning in to Categorized Programs 52 Changing the Display 52 Checking the SAT Radio ID Number 53 Storing Channel Presets 53 Receiving Stored Channels 53 Search Function XM mode 53 Search Function SIRIUS mode 54 Selecting the Channel directly 54 Receiving Weather or Traffic information...

Page 5: ...4 EN Installation and Connections Warning 70 Caution 70 Precautions 70 Installation 71 Connections 74 System Example 76 LIMITED WARRANTY ...

Page 6: ...result in an accident fire or electric shock USE ONLY IN CARS WITH A 12 VOLT NEGATIVE GROUND Check with your dealer if you are not sure Failure to do so may result in fire etc KEEP SMALL OBJECTS SUCH AS BATTERIES OUT OF THE REACH OF CHILDREN Swallowing them may result in serious injury If swallowed consult a physician immediately USE THE CORRECT AMPERE RATING WHEN REPLACING FUSES Failure to do so ...

Page 7: ...allpoint pen Playing a disc while driving on a very bumpy road may result in skips but this will not scratch the disc or damage the player Irregular Shaped Discs Be sure to use round shaped discs only for this unit and never use any special shaped discs Use of special shaped discs may cause damage to the mechanism New Discs To prevent the CD from jamming DISC ERROR is displayed if discs with irreg...

Page 8: ...y of the driver and passengers Audio Processor Adjustments cannot be made if the car is moving The car must be parked and the parking brake must be engaged for the procedure described in the Owner s Manual to be valid The warning CAN T OPERATE WHILE DRIVING will be displayed if any attempts are made to perform these operations while driving The IVA W203 draws minimal current even when its power sw...

Page 9: ...R CD RW if necessary and attempt playback again Tips for making your own CDs The IVA W203 plays DVD Video DVD Audio Video CD Audio CD and has a built in MP3 WMA decoder The following information is designed to help you create your own music CDs either Audio CD or MP3 WMA encoded CD R RW files What is the difference between an Audio and MP3 WMA CD An Audio CD is the same format as the commercial CD...

Page 10: ...duct incorporates copyright protection technology that is protected by U S patents and other intellectual property rights Use of this copyright protection technology must be authorized by Macrovision and is intended for home and other limited viewing uses only unless otherwise authorized by Macrovision Reverse engineering or disassembly is prohibited Manufactured under license from Dolby Laborator...

Page 11: ... XM or SIRIUS Receiver Box is connected If TEL is set the TEL Bluetooth screen will be recalled when the optional Bluetooth Box is connected button Recalls the EJECT TILT screen POWER indicator Blinks when an operation is performed However turns off when Beep is set to OFF Turning Power On or Off Some of this unit s functions cannot be performed while the vehicle is in motion Be sure to stop your ...

Page 12: ... Adjusting the Volume Adjust the volume by pressing or Volume decreases increases continuously by pressing and holding or Volume 0 35 The MUTE function is available on the supplied remote control Refer to Controls on Remote Control on pages 58 59 How to view the Display Be sure to touch the button lightly with the pad of your finger on the display to protect the display If you touch a button and t...

Page 13: ...n can be changed to the SETUP selection screen by touching SETUP After 5 seconds of each operation in the visual mode the screen changes to the visual screen only To display the main source screen touch the display panel then touch CONTROL on the screen The SOURCE selection screen appears by touching SOURCE on the changed main source screen The numeric keypad input screen is displayed when the DVD...

Page 14: ...l mode touch and hold to change the frequency continuously DIGITAL is displayed when a digital radio station is received Refer to Digital SEEK Setting HD Radio mode only on page 33 Presetting Stations Manually 1 Tune in a desired radio station you wish to store in the preset memory by manual or automatic seek tuning 2 Touch P1 2 to change the function guide P 1 3 is displayed in the HD Radio mode ...

Page 15: ...hown below 1 Displays Short Station Name Long Station Name in the Station Information Service Data 2 Displays Song title Artist Album in the main program Service Data Receiving a Multicast HD Radio mode only Multicasting which is the ability to broadcast multiple program streams over a single FM frequency thereby increasing the amount and diversity of content choices When the channel for the multi...

Page 16: ...track file Returning to the beginning of the current track file Touch Fast reverse Touch and hold Advancing to the beginning of the next track file Touch Fast forward Touch and hold To pause playback Touch Touching again will resume playback Inserting Ejecting a Disc Refer to Inserting Ejecting a Disc page 11 The IVA W203 model includes a built in MP3 WMA unit You can play CD ROMs CD Rs and CD RWs...

Page 17: ...a at extremely high ratios reducing the size of music files to as much as one tenth their original size This is achieved while still maintaining near CD quality The MP3 format realizes such high compression ratios by eliminating the sounds that are either inaudible to the human ear or masked by other sounds What is WMA WMA or Windows Media Audio is compressed audio data WMA is similar to MP3 audio...

Page 18: ... device cannot correctly play back discs recorded with Track At Once or packet writing Order of files Files are played back in the order that the writing software writes them to the disc Therefore the playback order may not be what s expected Verity the writing order in the software s documentation The playback order of the folders and files is as follows The following numbers may differ from actu...

Page 19: ...een turned off It is not necessary to repeat the above procedure 1 through 3 of To display the DVD mode screen Each time the ignition is turned OFF perform the procedure of To display the DVD mode screen If you try to activate the auxiliary device while driving the display will show the warning PICTURE OFF FOR YOUR SAFETY DVD Video CD DVD Commercial Video discs used for the distribution of movies ...

Page 20: ...ion may vary depending on the disc CAN T DOWNMIX is displayed when a Downmix multi channel signals are mixed into 2ch prohibited section of a DVD Audio disc is played In this case only the Lch Rch recorded on the disc is output as sound The sound of Center speaker L surround speaker R surround speaker and Subwoofer is not output On DVDs and Video CDs with playback control PBC menu screens may appe...

Page 21: ...disc set VCAP in Setting of the DVD Audio Playback Mode page 32 Searching by Program 1 Touch TOP MENU on the DVD mode main screen while playing a DVD VR disc The program search list screen is displayed 2 Touch of the program you want to play The selected program is played back and then returns to the DVD mode main screen Searching by Playlist 1 Touch MENU on the DVD mode main screen while playing ...

Page 22: ...cture advances or reverses by one frame each time the button is touched 2 Touch to return to normal mode No sound is output during forward reverse frame by frame playback Reverse frame by frame cannot be carried out on the DVD VR and Video CD Slow Motion Playback 1 When or is touched and held while in the pause mode the 1 8th speed slow motion playback mode is set When held in for 5 more seconds t...

Page 23: ...VD Audio 1 Touch on the main unit The repeat mode switches every time the button is touched VCAP mode 1 VOFF mode 1 1 When VCAP or VOFF is set in Setting of the DVD Audio Playback Mode page 32 DVD VR 1 Touch on the main unit The repeat mode switches every time the button is touched The Program mode 2 The Playlist mode 2 2 To switch the Program mode display to the Playlist mode display on the DVD m...

Page 24: ... CD disc a track number can be selected even in the stop mode Switching the Angle On DVDs in which scenes have been filmed from multiple angles the angle can be switched during playback 1 During playback touch P1 2 The function guide changes Touch P1 3 while playing a DVD Audio 2 Touch ANGLE The angle switches between the angles recorded on the disc every time the button is touched Some time may b...

Page 25: ...nu The subtitle language selected becomes the default setting every time the power is turned on or the disc is replaced If the disc does not include that language the disc s default language is selected instead However the subtitle language may differ depending on the disc For some discs the subtitles will be displayed even when this is set to OFF However the subtitle language may differ depending...

Page 26: ... Setting range OFF 80Hz 120Hz 160Hz Select OFF when no adjustment is required The H P F item is not displayed when an External Audio Processor is connected Adjusting Bass Treble You can change the bass treble frequency emphasis to create your own tonal preference Touch to display the Bass Treble adjusting screen Touch or on the scroll bar to scroll the setup items line by line Adjustment cannot be...

Page 27: ...anger If TOP MENU or MENU is touched in the DVD VR mode the unit changes to the search function Refer to Searching by Program and Searching by Playlist page 20 A folder list is displayed only during MP3 WMA playback when the DVD player DVA 5210 or changer compatible with MP3 is connected Internal CD player mode 1 The track list screen appears 2 Touch of a desired track text The selected track will...

Page 28: ...ouch VISUAL within 5 seconds The VISUAL selection screen appears 4 Touch NORMAL The simultaneous function is canceled To make the setting set to VISUAL of Setting the VISUAL Soft Button page 36 If a DVD player is connected you can receive the DVD picture sound DVD changer DHA S680 is connected Press and hold V OUT on the remote control supplied with the DVD player or DVD changer for more than 2 se...

Page 29: ... play back in a language other than that displayed or to input your parental lock password etc Setup DVD Setup To display the DVD mode screen To watch a video source your vehicle must be parked with the ignition key in the ACC or ON position To do this follow the procedure below 1 Bring your vehicle to a complete stop at a safe location Engage the parking brake 2 Keep pushing the foot brake and re...

Page 30: ...the audio language produced from the speakers Setting item AUDIO LANGUAGE Setting contents AUTO ENGLISH JAPANESE GERMAN SPANISH FRENCH ITALIAN SWEDISH RUSSIAN CHINESE When AUTO is selected the primary audio language among the recorded ones is played Set the language of the subtitles displayed on the screen Setting item SUBT LANGUAGE Setting contents AUTO ENGLISH JAPANESE GERMAN SPANISH FRENCH ITAL...

Page 31: ...he higher the rating level 6 Touch RETURN to return to the previous screen Changing the password 4 Touch INPUT of PASSWORD CHANGE The numeric keypad screen is displayed 5 Touch the input screen to enter a new 4 digit password Keep a note of the number somewhere safe in case you should forget it 6 Touch ENT to memorize the number 7 Touch RETURN to return to the previous screen Use the following pro...

Page 32: ...ded 2ch 2chDownmix OK AUTO Auto Max 7 1ch OK DTS ES CD DA DVD V DVD A 44 1kHz 16 20 24bit LPCM 44 1kHz 16bit Decoded 2ch 2chDownmix OK AUTO Auto Max 6 1ch OK 48 96kHz 16 20 24bit LPCM 48kHz 16bit Decoded 2ch 2chDownmix OK AUTO Auto Max 6 1ch OK MPEG1Layer II VCD DVD V DVD A DVD VR 44 1kHz 16bit LPCM 44 1kHz 16bit Decoded 2ch OK AUTO Auto OK 48kHz 16bit LPCM 48kHz 16bit Decoded 2ch 2chDownmix OK AU...

Page 33: ...y input screen is displayed 2 Input the 4 digit code number given on the jacket of the disc etc 3 Touch ENT to memorize the number If the code number of the bonus group differs from the code number you set in this section the 10 key input screen automatically appears in the display If a new code number is input this code number will be replaced To playback the DVD Audio Disc you have a choice of 3...

Page 34: ...therwise the settings may not be changed RADIO Setup ON SEEK UP DOWN is used only for the digital radio station OFF SEEK UP DOWN is used for DIGITAL and ANALOG radio stations However the strong signals have priority during SEEK GENERAL Setup To display the General mode screen To watch a video source your vehicle must be parked with the ignition key in the ACC or ON position To do this follow the p...

Page 35: ...hort Long Station name Song Artist and album name scrolling are displayed in HD Radio mode You can adjust the brightness of the button lighting at night with the dimmer Setting item LED DIMMER LEVEL Setting level 2 to 2 The adjustment is available when ON is set in Setting the Brightness of the Backlighting page 38 Displaying the Time Setting the Time HOUR Adjust the hour MINUTE Adjust the minute ...

Page 36: ...itor sensor has priority over the remote control sensor If the rear monitor connected to the Alpine rear monitor output via the Monitor control lead is touched the command is executed regardless of the remote control sensor switch setting Note however that the remote control sensor that has been set takes priority if it has been 5 seconds since last touching the panel When an optional DVD changer ...

Page 37: ...tting cannot be made when Setting the External Device Interrupt Mode page 35 is set to ON For details on Bluetooth operation refer to the Owner s Manual of the Bluetooth Box If a USB Adapter is to be used set to ON Setting item USB ADAPTER Setting contents OFF ON If ON is set even when a CD changer is connected the source name on the SOURCE selection screen will change from CD CHG to USB Setting i...

Page 38: ...IO SETUP screen SAT If you press and hold VISUAL for at least 2 seconds when either the XM or SIRIUS Receiver Box is connected the Weather or Traffic channels will be recalled TEL If you press and hold VISUAL for at least 2 seconds when the Bluetooth Box is connected the Bluetooth TEL screen will be recalled Setting the Digital Output Subwoofer On and Off OFF Subwoofer output is off ON Subwoofer o...

Page 39: ...D Setting contents OFF ON Wallpapers downloaded from Downloading the BACKGROUND data page 40 are recalled You can choose from 5 different display colors for the font back source title shortcut display etc Setting item BASE COLOR Setting contents MODE 1 to MODE 5 Adjustment becomes necessary when the display position on the LCD and the touch position on the touch panel do not match Setting item SCR...

Page 40: ...selected the brightness is automatically adjusted according to the car s interior lighting as long as AUTO is set in Setting the Brightness of the Backlighting page 38 Setting item COLOR Setting content 15 15 You can adjust the color between MIN 15 and MAX 15 When it reaches the minimum or maximum point the display shows MIN or MAX respectively Color adjustment can be made only in the navigation D...

Page 41: ...CKGROUND download access the URL below and follow the on screen instructions http www alpine com or http www alpine europe com or http www alpine com au 1 Insert the CD R CD RW disc containing the data you need 2 Touch or of DATA DOWNLOAD then select USER1 or USER2 The selected wallpaper can be changed 3 Touch of DATA DOWNLOAD Data search of the disc starts After completing the data search the fil...

Page 42: ... The display changes to the team list of the selected league 4 Touch of the favorite team changes to orange highlight and the selection key is displayed 5 Touch or of the desired announcement type Select NONE on the list if you do not want to store in memory ALERT interruption does not occur Setting the Sports Team Display Set the game status and result information display of a stored team Setting...

Page 43: ... this follow the procedure below 1 Bring your vehicle to a complete stop at a safe location Engage the parking brake 2 Keep pushing the foot brake and release the parking brake once then engage it again 3 When the parking brake is engaged for the second time release the foot brake For automatic transmission vehicles place the transmission lever in the Park position Now the locking system for the A...

Page 44: ...hat was omitted at the time of compression This reproduces a well balanced sound close to the original MX FM OFF FM MX 1 to 3 The medium to high frequencies become more clear and produces well balanced sound in all the bands MX DVD OFF MOVIE MX 1 to 2 The dialog portion of the video is reproduced more clearly MX AUX OFF CMPM MX MOVIE MX MUSIC MX Choose the MX mode CMPM MUSIC or MOVIE that correspo...

Page 45: ...t speaker on the diagram below In other words setting the time correction value for the front left speaker to 5 1 ms sets a virtual distance matching the distance to the farthest speaker 5 Touch SETUP on the main source screen The SETUP selection screen appears 6 Touch AUDIO The AUDIO SETUP screen appears 7 Touch of A PROC The A PROCESSOR list screen is displayed 8 Touch or of T CORR Select L R or...

Page 46: ...aker s playable frequency range is 55 Hz to 30 kHz for example adjusting the 40 Hz or 20 Hz band has no effect Additionally you may overload and damage the speakers When graphic EQ is adjusted the adjustment for parametric EQ becomes ineffective Parametric Equalizer Adjustments The frequency bands of the graphic equalizer are fixed This makes it very difficult to correct for undesired peaks and di...

Page 47: ...return to the previous screen Speaker Setup The PXA H700 or PXA H701 can be set according to the playable frequency range of your speakers Check the playable frequency range of the speakers not including the subwoofer before performing this operation to verify whether the speakers can play low frequencies of about 80 Hz or less Avoid stopping pausing switching the disc cueing fast forwarding or sw...

Page 48: ...rear speaker regardless of the REAR FILL and REAR MIX setting With Dolby Digital the dynamic range is compressed so that powerful sound can be achieved at regular volume levels This compression can be canceled to achieve an energetic sound with even greater power like the sound in a movie theater This function works only in the Dolby Digital mode Touch or of LISTENING MODE to select STD or MAX Kee...

Page 49: ...adjusted between 0 to 7 When the level increases the center channel position moves from the center speaker position to both sides Touch OFF of CENTER WIDTH CONT to turn off the center width control This adjustment is effective when the setting of the center speaker is SMALL or LARGE in the speaker setup settings REAR FILL function Depending on the input signals the sound may only be output from th...

Page 50: ...inserting touch CLOSE on the EJECT TILT screen The movable monitor will close 5 Press SOURCE The SOURCE selection screen is displayed 6 When the source name of NAV on the SOURCE selection screen is displayed touch the desired source name For details on operation refer to the Owner s Manual of the Portable Navigation device Removing the Portable Navigation Device 1 Press on the unit The display cha...

Page 51: ...D Changer is connected You can select the disc numbers 1 to 6 in the same manner as for 6 disc Changer Touch P1 3 twice to select disc numbers 7 to 12 The function guide display changes so that DISC 7 through DISC 12 represent disc numbers 7 to 12 After selecting the desired disc you can operate in the same way as for the CD player For details see the CD MP3 WMA section When an MP3 compatible CD c...

Page 52: ...the selected changer see CD MP3 WMA section To operate the selected changer see CD MP3 WMA pages 15 17 Controlling USB Optional If the optional USB Adapter for the MP3 KCA 620M is connected it is controllable from the unit 1 Touch SOURCE on the main screen 2 Touch USB The display changes to the USB mode screen After selecting the USB mode you can operate in the same way as for the changer For deta...

Page 53: ...ning mode is changed channel number tuning channel name tuning 5 Touch NO NO or NAME NAME to select the desired channel Touching and holding either button will change channels continuously To customers when connecting the SIRIUS Tuner Box For detailed functions refer to the SIRIUS Tuner Box installation manual For SIRIUS Setup Operation refer to page 41 Tuning in to Categorized Programs You can li...

Page 54: ...he desired band and repeat the procedure A total of 18 channels can be stored in the preset memory 6 channels for each band XM1 XM2 and XM3 or SIRIUS 1 SIRIUS 2 and SIRIUS 3 If you store a channel in a preset already being used the current channel will be replaced with the new one Receiving Stored Channels 1 Touch P1 3 after selecting a desired band The Function Guide is switched 2 Touch any one o...

Page 55: ...led by pressing and holding VISUAL for at least 2 seconds even in modes other than XM or SIRIUS mode Channels other than Weather or Traffic information can also be stored and recalled Storing the desired Song Artist SIRIUS mode only A maximum of 30 desired songs and artists including sports teams can be stored on the unit When stored a message is displayed to announce when stored songs are being b...

Page 56: ...yed 4 If is touched offset playback stops and the display returns to the main screen To fast reverse touch and hold and to fast forward touch and hold Touching or will move a track up down An iPod can be connected to the IVA W203 by using the proprietary ALPINE FULL SPEED Connection Cable KCE 422i sold separately When the IVA W203 is connected by using the cable the controls on the iPod are not fu...

Page 57: ...r details refer to Direct Search Function page 56 Direct Search Function The unit s direct search function can be used to search for an album song etc more efficiently In PLAYLIST ARTIST ALBUM SONG GENRE COMPOSER PODCAST mode you can quickly target any song Direct search bar Active point The present selection position is displayed Touching or will move the active point by 1 6 each Touching and hol...

Page 58: ...aylist Artist or Album all songs of the Playlist Artist or Album are performed in random order 1 Touch ALL The songs will be played back in random sequence M I X SONGS off Shuffle Songs Touch after touching P1 2 2 To cancel M I X play touch ALL or For details of the search mode refer to Searching for a desired Song page 56 If a song is selected in the album search mode before selecting Shuffle M I...

Page 59: ...sition on the disc During playback press and hold for more than 1 second to reverse the disc at double speed Hold for more than 5 seconds to reverse the disc at 8 times the normal speed Hold for more than 10 seconds to reverse the disc at 21 times the normal speed DVD mode When pressed and held in while in the pause mode the disc is played in reverse slow motion at 1 8th the normal speed When held...

Page 60: ...anger mode DISC Select UP Button selects a disc in ascending order iPod mode Selects a playlist artist album genre composer podcast in ascending order DVD Video DVD Audio VCAP mode Selects an item displayed in the screen Radio mode SEEK UP button SAT mode Channel UP button CD Changer mode Press the button to advance to the beginning of the next track Press and hold to fast forward MP3 WMA iPod mod...

Page 61: ...hannel Surround In addition DVDs offer a variety of functions Multiple audio page 23 Movies can be recorded in up to eight languages The desired language can be selected from the unit Subtitles function page 24 Movies can include subtitles in up to 32 languages The desired subtitle language can be selected from the unit Multi angle function page 23 When the DVD contains a movie shot from multiple ...

Page 62: ... processor PXA H701 etc The DVD video software must also have a DTS sound track The IVA W203 has a built in DTS 2 channel audio decoder Analog audio outputs are available Dolby Pro Logic II Dolby Pro Logic II plays 2 channel sources in 5 channels over the entire frequency range This is done with an advance high sound quality matrix surround decoder which draws out the spatial properties of the ori...

Page 63: ...979 6983 6984 6985 7065 7073 7074 7079 7082 7089 7165 7168 7176 7178 7185 7265 7273 7282 7285 7289 7365 Abbreviation IE IK IN IS IT IW JA JI JW KA KK KL KM KN KO KS KU KY LA LN LO LT LV MG MI MK ML MN MO MR MS MT MY NA NE NL NO OC OM OR PA PL PS PT QU RM Code 7369 7375 7378 7383 7384 7387 7465 7473 7487 7565 7575 7576 7577 7578 7579 7583 7585 7589 7665 7678 7679 7684 7686 7771 7773 7775 7776 7778 ...

Page 64: ... IS IT JM JO JP KE KG KH 6877 6879 6890 6967 6969 6971 6972 6982 6983 6984 7073 7074 7075 7077 7079 7082 7165 7166 7168 7169 7170 7172 7173 7176 7177 7178 7180 7181 7182 7183 7184 7185 7187 7189 7275 7277 7278 7282 7284 7285 7368 7369 7376 7378 7379 7381 7382 7383 7384 7477 7479 7480 7569 7571 7572 Dominica Dominican Republic Algeria Ecuador Estonia Egypt Western Sahara Eritrea Spain Ethiopia Finl...

Page 65: ... 8371 8372 8373 8374 8375 8376 8377 8378 8379 8382 8384 8386 8389 8390 8467 8468 8470 8471 8472 8474 8475 8477 8478 8479 8480 8482 8484 8486 8487 8490 8565 8571 8577 8583 8589 8590 8665 8667 8669 8671 8673 8678 8685 8770 8783 8969 8984 8985 9065 9077 9087 PE PF PG PH PK PL PM PN PR PT PW PY QA RE RO RU RW SA SB SC SD SE SG SH SI SJ SK SL SM SN SO SR ST SV SY SZ TC TD TF TG TH TJ TK TM TN TO TP TR ...

Page 66: ...e area you are in is a primary signal area the antenna may not be grounded and connected properly Check your antenna connections make sure the antenna is properly grounded at its mounting location The antenna may not be the proper length Make sure the antenna is fully extended if broken replace the antenna with a new one Broadcast is noisy The antenna is not the proper length Extend the antenna fu...

Page 67: ...may malfunction if the battery power is under 11 volts with a load applied Monitor s fluorescent tube is worn Replace the monitor s fluorescent tube Image stops sometimes Disc is scratched Replaced with a non scratched disc Indication for CD MP3 WMA Protective circuit is activated due to high temperature The indicator will disappear when the temperature returns to within operation range Leave the ...

Page 68: ...t turn off after touching of DISC on the EJECT TILT screen for a few times consult your Alpine dealer Scratched disc contaminated disc poor recording disc incompatible with this unit Touch of DISC on the EJECT TILT screen Change the disc The DVD setup operation was attempted when a disc is inserted in the unit Eject the disc before the DVD setup operation Indication for CD changer Protective circu...

Page 69: ...annel The user has selected a channel number that does not exist or is not subscribed to The unit will revert back to the previously selected channel There is no artist name feature song program title or additional information associated with the channel at that time No action needed Indication for iPod Mode The iPod is not connected Make sure the iPod is correctly connected Make sure the cable is...

Page 70: ...30 1 710 kHz Usable Sensitivity 22 5 μV 27 dBf Frequency Response 5 20 000 Hz Wow Flutter WRMS Below measurable limits Total Harmonic Distortion 0 008 at 1 kHz Dynamic Range 95 dB at 1 kHz Channel Separation 85 dB at 1 kHz Signal system NTSC Horizontal resolution 500 lines or greater Video output level 1Vp p 75 ohms Video S N ratio DVD 60 dB Audio S N ratio More than 105 dB Wave length DVD 666 nm ...

Page 71: ...AND INSTALL THEM SECURELY Be sure to use only the specified accessory parts Use of other than designated parts may damage this unit internally or may not securely install the unit in place This may cause parts to become loose resulting in hazards or product failure ARRANGE THE WIRING SO IT IS NOT CRIMPED OR PINCHED BY A SHARP METAL EDGE Route the cables and wiring away from moving parts like the s...

Page 72: ...en affix the supplied seal refer to How to use a Seal page 72 Slide the unit into the mounting sleeve and secure it If B or C is used make sure that there is a enough space depthwise before installing the unit If the unit is forcibly pushed into the mounting sleeve damage may occur 1 If the installed mounting sleeve is loose in the dashboard the pressure plates may be bent slightly to remedy the p...

Page 73: ...to a clean metal spot using a screw already attached to the car s chassis Attach the Original Mounting Bracket to each side of the IVA W203 using the screws supplied with IVA W203 4 Hex Nut M5 Screw Bolt Stud This unit Chassis Ground Lead Metal Mounting Strap 2 1 Reinforce the head unit with the metal mounting strap not supplied Secure the ground lead of the unit to a clean metal spot using a scre...

Page 74: ...ot brake switch Battery Chassis Foot brake lead Parking brake lamp Parking brake lead Pinch Connector sold separately Pinch Connector sold separately Yellow Blue PARKING BRAKE FOOT BRAKE IVA W203 Red Yellow SPST SW Optional FUSE 5A Optional FUSE 20A Optional Battery IGNITION BATTERY To prevent external noise from entering the audio system Locate the unit and route the leads at least 10 cm away fro...

Page 75: ...y To amplifier or equalizer Front left Rear left Rear right Front right REMOTE OUT REMOTE IN REVERSE M CONT REMOTE TURN ON POWER ANT AUDIO INTERRUPT IN PARKING BRAKE BATTERY GND Antenna White Green Black Violet Gray Black FOOT BRAKE Yellow Black IGNITION Red To remote input lead To power antenna To vehicle phone To the parking brake signal lead To the foot brake cord or brake lamp cord Battery Spe...

Page 76: ...device CD Changer Equalizer HD Radio TUNER MODULE etc equipped with Ai NET You can input TV video sound by connecting an optional Ai NET RCA Interface cable KCA 121B to this component Rear Output RCA Connectors RED is right and WHITE is left Front Output RCA Connectors RED is right and WHITE is left Subwoofer RCA Connectors RED is right and WHITE is left System Switch When connecting an equalizer ...

Page 77: ...ng on top of the Fiber Optic Cable Be careful not to bend the Fiber Optic Cable at a sharp angle NORM Ai NET EQ DIV Fiber optic cable Fiber optic digital Input terminal for head unit Audio Processor Ai NET Fiber Optic Digital compatible Sold Separately Fiber optic digital Input terminal for DVD Player Ai NET cable Fiber optic digital Input terminal for Changer Fiber optic cable Ai NET cable CD Cha...

Page 78: ...it before changing the switch position Fiber Optic Cable Sold Separately Ai NET Cable Included with DVD video player Video Input Connector AUX INPUT Yellow Connect the video output lead of a DVD video player or DVD changer to this terminal RCA Extension Cable Included with DVD video player Remote Control Output Lead White Brown Connect this lead to the remote control input lead This lead outputs t...

Page 79: ...utput Lead White Brown Connect this lead to the remote control input lead This lead outputs the controlling signals from the remote control Remote Control Input Lead White Brown Reverse Lead Orange White Connect to the plus side of the car s reverse lamp which lights when the transmission is shifted into reverse R Switches the video picture to the back up camera This is linked to putting the car i...

Page 80: ... révisé le tout sans frais pour vous Si les réparations sont couvertes par la garantie et si le produit a été envoyé à un centre de service Alpine ou à Alpine le paiement des frais de réexpédition du produit incombe Alpine B Vous devez donner une description détaillée des problèmes qui sont à l origine de votre demande de réparation C Vous devez joindre la preuve de votre achat du produit D Vous d...

Page 81: ...ct was shipped to an Authorized Alpine Service Center or Alpine Alpine will pay the return shipping charges B You should provide a detailed description of the problem s for which service is required C You must supply proof of your purchase of the product D You must package the product securely to avoid damage during shipment To prevent lost packages it is recommended to use a carrier that provides...

Page 82: ......

Page 83: ......

Reviews: