background image

33

SET UP

SET UP

Note: Press “RTN” to return to the previous

screen.

Press “SET” for at least
2 seconds.

The set up are stored and
the set up mode is canceled.

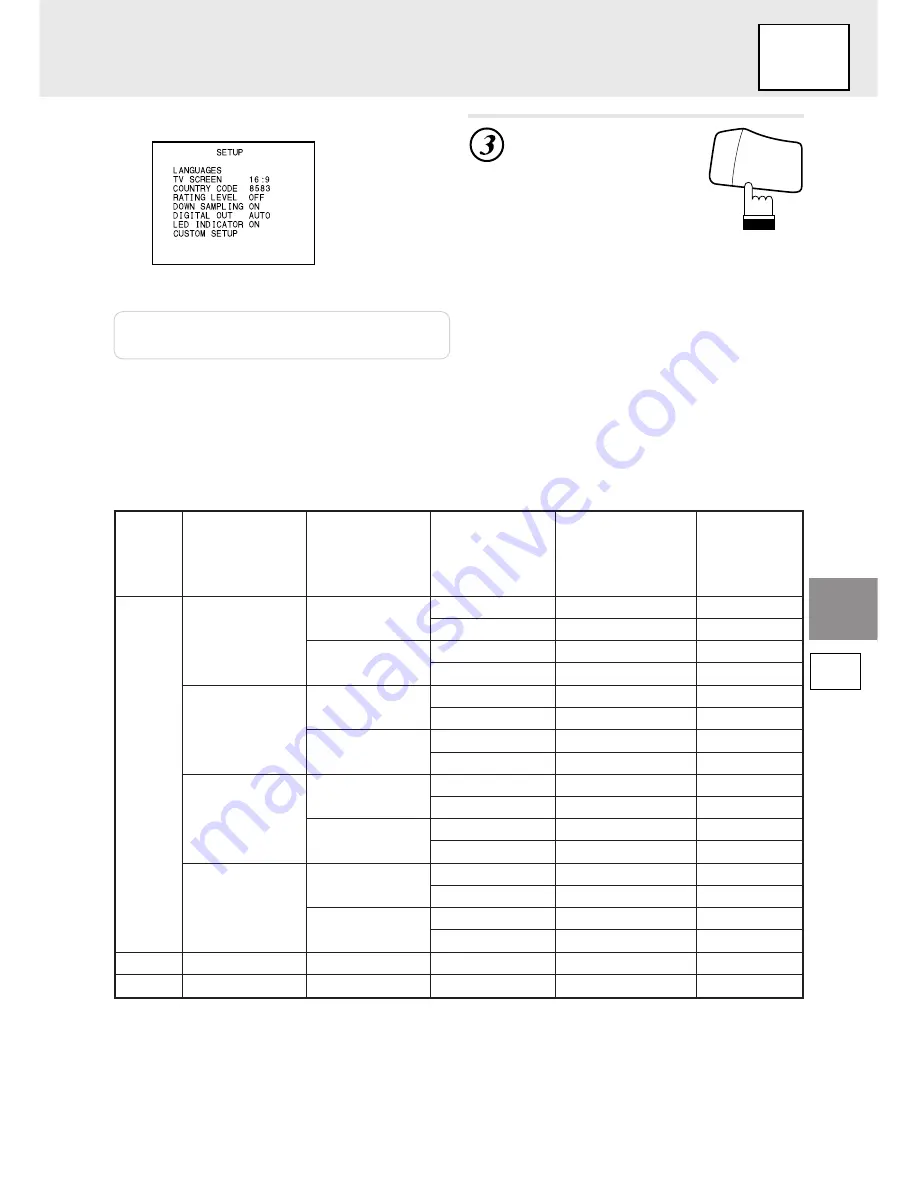
Changing the digital output setting

DISP

MENU

SET

Displays the setting contents.

• Audio output/Optical digital audio output

Disc

DVD

Video CD

CD

Audio recording

format

DTS

Dolby Digital

Linear PCM

 (48 kHz)

Linear PCM

(96 kHz)

MPEG

Linear PCM

Digital output

setting

AUTO

LPCM

AUTO

LPCM

AUTO

LPCM

AUTO

LPCM

AUTO or LPCM

AUTO or LPCM

Optical digital audio

output (when a

digital audio

processor is

connected)

DTS

DTS

X

X

Dolby Digital

Dolby Digital

LPCM (48kHz/16 bit)

x

LPCM (48kHz/16 bit)

x

LPCM (48kHz/16 bit)

x

LPCM (48kHz/16 bit)

x

LPCM (48kHz/16 bit)

x

LPCM (44.1kHz)

LPCM (44.1kHz)

Analog audio

output (Ai-NET,

RCA output)

X

X

X

X

O

O

O

O

O

O

O

O

O

O

O

O

O

O

Down sampling

setting

ON

OFF

ON

OFF

ON

OFF

ON

OFF

ON

OFF

ON

OFF

ON

OFF

ON

OFF

ON or OFF

ON or OFF

Summary of Contents for DVA-5205

Page 1: ...re reference MODE D EMPLOI Page 72 137 Veuillez lire ce mode d emploi pour tirer pleinement profit des excellentes performances et fonctions de cet appareil et conservez le pour toute référence future MANUAL DE OPERACION Página 138 Lea este manual por favor para disfrutar al máximo de las excepcionales prestaciones y posibilidades funcionales que ofrece el equipo luego guarde el manual para usarlo...

Page 2: ...GYOUR VEHICLE Any function that requires your prolonged attention should only be performed after coming to a complete stop Always stop the vehicle in a safe location before performing these functions Failure to do so may result in an accident DO NOT WATCH VIDEO WHILE DRIVING Watching the video may distract the driver from looking ahead of the vehicle and cause an accident KEEP THE VOLUME AT A LEVE...

Page 3: ... NEW BATTERIES WITH OLD BATTERIES INSERT WITH THE CORRECT BATTERY POLARITY When inserting the batteries be sure to observe proper polarity and as instructed Rupture or chemical leakage from the battery may cause fire or personal injury HALT USE IMMEDIATELY IF A PROBLEM APPEARS Failure to do so may cause personal injury or damage to the product Return it to your authorized Alpine dealer or the near...

Page 4: ...hen you insert the disc Your player will auto matically eject any disc that is inserted incorrectly Playing a disc while driving on a very bumpy road may result in skips but this will not scratch the disc or damage the player Irregular Shaped Discs Make sure the discs you use in this unit do not have any irregularities The outer and inner edges should be round and smooth Use of irregularly shaped ...

Page 5: ...ock 28 Changing the downsampling setting 30 Changing the digital output setting 32 Changing the LED indicator setting 34 CONTENTS Custom setting Changing the Closed Caption setting 35 Custom setting Changing the Ai NET settings 36 Custom setting Changing the H U Control settings 38 Digital Audio Processor Optional Operating the digital audio processor optional 40 Adjusting the parametric equalizer...

Page 6: ...µm 0 6 mm 0 6 mm Track pitch 0 74 µm CD ROMs DVDs Moreover DVDs offer a variety of functions Multiple audio page 19 Movies can be recorded in up to eight languages The desired language can be selected from the remote control unit Subtitles function page 20 Movies can include subtitles in up to 32 languages The desired subtitle language can be selected from the remote control unit Multi angle funct...

Page 7: ...nu screens recorded on the disc to find the scene you want to watch and view various types of information in dialog style Disc terminology Title If titles are programmed for the DVD these are the largest unit of division of the informa tion recorded on the disc Chapter Each Title may also be divided into smaller divisions called Chapters These can be specific scenes or musical selections This prod...

Page 8: ...thin about 2 meter It may not be possible to operate the remote control unit if the remote control sensor is exposed to direct sunlight The remote control is a small light weight precision equipment To avoid damage early battery wearing opera tions error and deterioration of opera tion feeling take care of the followings Do not apply any shock Do not put in a trouser pocket Keep free from splashin...

Page 9: ...ver and reload it to play the other side Refer to the indications on the disc Side 1 Side 2 Never insert map discs for navigation purposes as they could damage the equipment If wrong disc upside down discs or dirty discs have been inserted DISC ERROR is displayed Open the door and remove the disc Close the door Be sure to close the door to prevent dust from getting inside Unloading discs Press the...

Page 10: ...ing other than the CVA 1005 IVA C800 the default DVD setting must be changed See page 36 Custom setting Changing the Ai NET settings to change the SETUP to CD mode before using it To turn the power off press POWER again Notes With this unit connected to an Ai NET compatible head unit there will be about a 3 second delay during power up from the remote control This is caused by the systems communic...

Page 11: ...crease the volume Turn to the left to decrease the volume Adjusting the volume Adjust the volume for connecting only with the Digital Audio Processor PXA H510 Note If an Ai NET product head unit has been connected in addition to the Digital Audio Processor PXA H510 or if this equipment is connected singly to a TV monitor adjust the volume on the connected equipment Switching between NTSC and PAL c...

Page 12: ...functions described in this manual are not supported by all DVDs See the individual DVDs instructions for details on the features supported Fingerprints on a disc may adversely affect playback If a problem occurs remove the disc and check for fingerprints on the playback side Clean the disc if necessary When using the remote control be careful to press one button at time Pressing multiple buttons ...

Page 13: ...P function is used the position at which playback is stopped is stored in the memory and playback resumes from that position Press L once during playback PRE STOP is displayed Press in the PRE STOP mode Playback starts from the position at which it was stopped Canceling the PRE STOP function Either press L again in the PRE STOP mode or eject the disc and turn the power or the ignition key off to c...

Page 14: ...the current chapter or track Fast forwarding fast reversing DEFEAT MUTE A PROC SOURCE SLOW Fast forwarding fast reversing Finding the beginnings of chapters or tracks During playback press c fast reverse or f fast forward for at least 2 seconds A PROC Press to return to normal playback DEFEAT RPT or Notes No sound or subtitles are played during fast forwarding fast reversing For DVDs and video CDs...

Page 15: ...y still pause a picture or sound may stop for an instant period but this is not a failure Frame by frame playback DVD Video CD In the pause mode press The picture advances by one frame each time the button is pressed Press to resume normal playback Note No sound is played during frame by frame playback Slow motion playback During playback press SLOW for at least 2 seconds Press to resume normal pl...

Page 16: ...nput the number of the title you want to play using the number keys 0 to 9 and 10 Notes This function cannot be used on discs on which no title numbers are recorded Press CLR to delete the last digit in the title number Press CLR for at least 2 seconds to clear all title numbers Press RTN to cancel the title search mode and resume normal playback DN CLR BAND LIST GO TO TITLE RTN V OUT ENT UP 10 0 ...

Page 17: ...s function cannot be used on discs on which no chapter numbers are recorded Press CLR to delete the last digit in the chapter track number Press CLR for at least 2 seconds to clear Chapter and Track numbers Press RTN to cancel the chapter track search mode and resume normal playback With video discs containing playback control PBC function of searching directly by track number is not available und...

Page 18: ...lapsed time Notes Input the hours first followed by the minutes then the seconds Press CLR to delete the last digit in the elapsed time Press CLR for at least 2 seconds to erase all the set times Press RTN to cancel the elapsed time search mode and resume normal playback With DVDs the precision of the elapsed time search function differs from disc to disc With video discs containing playback contr...

Page 19: ...y setting at factory shipping Track Disc Repeat off Switching the audio language On DVDs including multiple audio modes or multiple audio languages the audio language can be switched during playback During playback press AUDIO for at least 2 seconds The sound switches between the different audio modes recorded on the disc each time the button is pressed DVD Video CD Notes The language selected wit...

Page 20: ...a still picture is displayed first after which the angle switches During playback press SUB T for at least 2 seconds The subtitle language switches between the languages recorded on the disc each time the button is pressed DVD Notes Some time may be required for the subtitle language to change The language selected with the default settings is set when the power is turned on or the disc is replace...

Page 21: ...lect the item then press ENT Use the Joystick or the number keys 0 to 9 and 10 to select the language or angle then press ENT or or SUB T ON OFF AUDIO ANGLE OP CL 1 2 3 4 5 6 7 8 9 0 UP 10 or or Tips DVD ON OFF 2 DISP MENU SET LIST GO TO TITLE ENT ENT ENT SOURCE SLOW Displaying the disc status Use the procedure described below to display the status title number chapter number etc of the currently ...

Page 22: ...een During playback press DISP The playback status is displayed Note For music CDs the playing status is displayed even when DISP is not pressed Press DISP once more to turn the display off Playback disc CD Music CD VCD Video CD Track playback time TV system NTSC or PAL Operating mode Current track number Playback control PBC ON OFF For video CDs only Repeat setting Default setting disc repeat CD ...

Page 23: ...the RCA connectors at the rear of the DVA 5205 to feed audio to your Rear monitor Set AUX OUT of Selecting Rear Monitor on the CVA 1005 IVA C800 side to AUX 1 Note This output is at a fixed level and requires a preamp with a volume control to adjust listening levels BAND RTN V OUT Change the source on the CVA 1005 IVA C800 side to MD CD radio etc Use the Playing 2 Sources Simultaneously function o...

Page 24: ...UNTRY CODE RATING LEVEL DOWN SAMPLING DIGITAL OUT LED INDICATOR CUSTOM SETUP Set the audio language subtitle language and menu language Set the screen size according to the type of TV monitor being used Set the country code when setting the rating level Set the rating level parental lock Takes DVD digital sound and converts it into 48K 16BIT sampling digital sound Set the digital output Set whethe...

Page 25: ... the priority language for the disc SUBTITLE only Set this to play the disc with a language other than one of the languages dis played Use the keys 0 to 9 to input the 4 digit country code then press ENT For the country codes refer to List of language codes page 61 Use the Joystick to select the desired language then press ENT Notes If the disc does not include the selected language the disc s def...

Page 26: ...connected to a conventional 4 3 size monitor The picture will fill the entire TV screen However due to the mismatch in aspect ratio parts of the movie at the extreme left and right sides will not be visible Select this when connected to a conventional 4 3 size normal TV aspect ratio monitor There may be black stripes visible at the top and bottom of the screen The width of these stripes will depen...

Page 27: ...et the country code when setting the rating level Parental lock Select COUNTRY CODE under Changing the default settings SET UP on page 24 Use keys 0 to 9 to input the 4 digit country code then press ENT SUB T ON OFF AUDIO ANGLE OP CL 1 2 3 4 5 6 7 8 9 0 US 8583 Notes Can be erased one digit at a time each time CLR is pressed Press RTN to return to the previous screen Press SET for at least 2 secon...

Page 28: ...ing level parental lock Use this function to restrict the viewing of movies to children of appropriate age levels only Setting the rating level parental lock Select RATING LEVEL under Changing the default settings SET UP on page 24 Press ENT The password input mode is set ENT DISP MENU SET 0 9 Press ENT ENT SUB T ON OFF AUDIO ANGLE OP CL 1 2 3 4 5 6 7 8 9 0 ENT ...

Page 29: ... is set Once set this rating level remains in memory until changed To enable the play of discs of higher rating levels or to cancel the parental lock the setting must be changed Not all DVDs provide a Parental Lock feature If you are unsure about a DVD play it first to confirm Do not leave DVDs accessible to young children for whom you deem them inappropriate Changing the rating level temporarily ...

Page 30: ...ot converted into digital signals with 48K 16bits sampling They are not output from the optical cable Set to ON at time of shipment from factory Select DOWN SAMPLING under Changing the default settings SET UP on page 24 Move the Joystick up and down to choose ON or OFF and then press ENT Changing the down sampling setting Converts linear PCM LPCM voice signals recorded on the DVD disc to downsampl...

Page 31: ...P DISP MENU SET Press SET for at least 2 seconds The settings are stored and the set up mode is canceled Displays the setting contents Note Press RTN to return to the previous screen Changing the down sampling setting ...

Page 32: ...e selection then press ENT AUTO LPCM The digital output is switched automatically according to the type of audio signals being played Be sure to select AUTO when you want to connect a digital audio processor and play Dolby Digital audio AUTO is selected upon shipment from the factory The audio signals recorded on the disc are converted into 48 kHz 16 bit for DVDs or 44 1 kHz for video CDs and CDs ...

Page 33: ...PCM 48 kHz Linear PCM 96 kHz MPEG Linear PCM Digital output setting AUTO LPCM AUTO LPCM AUTO LPCM AUTO LPCM AUTO or LPCM AUTO or LPCM Optical digital audio output when a digital audio processor is connected DTS DTS X X Dolby Digital Dolby Digital LPCM 48kHz 16 bit x LPCM 48kHz 16 bit x LPCM 48kHz 16 bit x LPCM 48kHz 16 bit x LPCM 48kHz 16 bit x LPCM 44 1kHz LPCM 44 1kHz Analog audio output Ai NET ...

Page 34: ...INDICATOR under Changing the default settings SET UP on page 24 Use the Joystick to select the ON or OFF then press ENT ON OFF The LED indicators are lit indicating the product s operating status ON is selected upon shipment from the factory The LED indicators are turned off When OFF is set the indicators do not light even when the power is on DISP MENU SET ENT BAND RTN V OUT ENT ENT ...

Page 35: ...Move the Joystick up and down to select ON or OFF then press ENT Displays the closed captions Does not display the closed captions Set to OFF at time of shipment from factory Notes Please be aware that closed captions are different from titles Press RTN to return to the previous screen Press SET for at least 2 seconds The settings are stored and the set up mode is canceled Note Press RTN to return...

Page 36: ...he sound of connected Ai NET products Custom setting Changing the Ai NET settings Select CUSTOM SETUP under Changing the default settings SET UP on page 24 Use the Joystick to select Ai NET SETUP then press ENT Use the Joystick to select DVD or CD then press ENT ENT ENT ENT DISP MENU SET ENT ENT ...

Page 37: ...creen Operations cannot be performed using the main menu screen if the Ai NET setting is set to CD when connected to the CVA 1005 IVA C800 If the Ai NET setting is set to DVD when connected to an Ai NET compatible head unit other than the CVA 1005 IVA C800 the only operation possible from the head unit is the volume adjustment operation When the Ai NET setting is set to CD the operable functions a...

Page 38: ... an Ai NET compatible AV head unit CVA 1005 IVA C800 set the equipment so that it is possible to control from the head unit Select CUSTOM SETUP under Changing the default settings SET UP on page 24 Move the Joystick up and down to select H U CONTROL then press ENT Custom setting Changing the H U CONTROL settings Move the Joystick up and down to select ON or OFF then press ENT ...

Page 39: ...unit CVA 1005 IVA C800 Not possible to operate from an Ai NET compatible head unit or an Ai NET compatible AV head unit CVA 1005 IVA C800 Set to OFF at time of shipment from factory Displays the setting contents Note Press RTN to return to the previous screen Press SET for at least 2 seconds The settings are stored and the set up mode is canceled DISP MENU SET ...

Page 40: ...IME CORRECTION DOLBY SURROUND MODE ADJUST MODE Adjust the parametric equalizer s band frequency band width and level Select one of six surround modes according to the music source using DSP digital signal processing Store and recall up to six parametric equalizer adjustments and settings Eliminate time delays resulting from the distance between the listening position and the speakers Switch betwee...

Page 41: ...or at least 2 seconds to switch between pages 1 and 2 Use the Joystick to select the band width Q FACT then press ENT Use the Joystick to adjust the band width then press ENT Use the Joystick to select the level LV then press ENT Use the Joystick to adjust the level then press ENT Note Press RTN to return to the previous screen Press A PROC to close the digital audio processor screen and return to...

Page 42: ...djusting the surround settings Select SURROUND under Operating the digital audio processor optional on page 40 Use the Joystick to select the surround mode then press ENT There are six surround modes Press ENT The level LV value turns yellow Use the Joystick to adjust the level LV then press ENT ENT BAND RTN V OUT A PROC BAND ENT ENT ENT ENT ENT ...

Page 43: ...essor optional on page 40 Use the Joystick to select WRITE then press ENT Use the Joystick to select the number at which you want to store the settings PRIVATE MEMORY 1 to PRIVATE MEMORY 6 then press ENT Note Press RTN to return to the previous screen Storing the surround settings Use the Joystick to select the time echo time then press ENT Press A PROC to close the digital audio processor screen ...

Page 44: ... number of the settings you wish to recall PRIVATE MEMORY 1 to PRIVATE MEMORY 6 then press ENT Note Press RTN to return to the previous screen Press A PROC to close the digital audio processor screen and return to the play back screen Select PRIVATE MEMORY under Operating the digital audio processor optional on page 40 ENT ENT A PROC BAND V SEL ...

Page 45: ... is set automatically when the disc is Dolby Digital compatible and the DVD video player s audio output setting is set to AUTO DOLBY PRO LOGIC or OFF can be selected when the disc is Dolby Pro Logic compatible and the DVD video player s audio output setting is set to LPCM When OFF is selected the surround settings cannot be adjusted DOLBY DIGITAL DOLBY PRO LOGIC Note Press RTN to return to the pre...

Page 46: ...ect ADJUST under Operat ing the digital audio processor optional on page 40 Use the Joystick to switch the mode Note Press RTN to return to the previous screen FRONT CENTER REAR LARGE SMALL OFF LARGE SMALL OFF LARGE SMALL Use the Joystick to select the speaker to be set FRONT CENTER or REAR then press ENT ENT BAND RTN V OUT A PROC BAND ENT ENT ENT ENT ...

Page 47: ...de ON or OFF then press ENT Note The BI PHANTOM setting is automatically set to OFF when the center speaker is set to OFF Use the Joystick to select the level item then press ENT Use the Joystick to adjust the level then press ENT Note Press RTN to return to the previous screen Press A PROC to close the digital audio processor screen and return to the play back screen ADJUST Adjusting the acoustic...

Page 48: ...Mixing the rear audio channels Select ADJUST under Operat ing the digital audio processor optional on page 40 Use the Joystick to select the mode ON or OFF then press ENT Note The REAR MIX setting is automatically set to OFF when the rear speaker is set to OFF Use the Joystick to select the level item then press ENT Use the Joystick to select REAR MIX then press ENT ENT ENT ENT ENT ENT ENT ...

Page 49: ...r time compensation Compensation is not possible when the center speaker is set to OFF Select ADJUST under Operat ing the digital audio processor optional on page 40 Use the Joystick to adjust the level then press ENT Note Press RTN to return to the previous screen Press A PROC to close the digital audio processor screen and return to the play back screen Use the Joystick to select CENTER DELAY th...

Page 50: ... Operat ing the digital audio processor optional on page 40 Use the Joystick to adjust the level then press ENT Note Press RTN to return to the previous screen Press A PROC to close the digital audio processor screen and return to the play back screen Use the Joystick to select REAR DELAY then press ENT ADJUST Rear speaker time compensation ENT ENT ENT ENT A PROC BAND V SEL ...

Page 51: ...Use the Joystick to select the mode For powerful sound at low volumes to compensate for high levels of background noise such as road noise For more powerful sound at regular volumes For the regular sound L NIGHT STANDARD MAXIMUM Note Press RTN to return to the previous screen Press A PROC to close the digital audio processor screen and return to the play back screen Use the Joystick to select LIST...

Page 52: ...sor optional on page 40 Use the Joystick to select TEST TONE then press ENT Use the Joystick to select ON then press ENT Test tones are produced for two seconds from each speaker Note Test tones are not produced from the center and rear speakers when these speakers are set to OFF Press BAND for at least 2 seconds to switch the ADJUST screen ENT ENT ENT ENT A PROC BAND V SEL ...

Page 53: ...urn to the playback screen MODE Adjusting the volume fader and balance When a head unit is connected using Ai NET connections adjust the volume fader and balance from the head unit Select MODE under Operating the digital audio processor optional on page 40 Use the Joystick to adjust Note Press RTN to return to the previous screen Press A PROC to close the digital audio processor screen and return ...

Page 54: ...t MODE under Operating the digital audio processor optional on page 40 Use the Joystick to select the mode ON or OFF then press ENT Note The subwoofer cannot be adjusted when set to OFF Use the Joystick to select the level item then press ENT Use the Joystick to select SUB W then press ENT ENT ENT ENT ENT ENT ENT ...

Page 55: ... Operating the digital audio processor optional on page 40 Use the Joystick to select the mode ON or OFF then press ENT ON The response is flat OFF Off Notes When DEFEAT is set to ON the PARAMET RIC EQ SURROUND PRIVATE MEMORY and TIME CORRECTION settings cannot be adjusted Press RTN to return to the previous screen Press A PROC to close the digital audio processor screen and return to the play bac...

Page 56: ... DVA 5205 player Playing DVDs video CDs and CDs Press SOURCE and select the CD DVA 5205 mode The mode switches each time the button is pressed The DVA 5205 s power is on when the CD mode is selected off when other modes are selected To set the pause mode press Press again to resume playback TUNER CHANGER CD Built in CD DVA 5205 only when a changer is connected Note Playback starts at the beginning...

Page 57: ...er track When pressed and held in fast reverses the disc Switches between play and pause Adjust the volume Switch Operation Functions operable from the CDA 7965 Notes The functions and operations may differ when using with a head unit other than the CDA 7965 For video CDs with playback control PBC turn PBC off Titles can be input for video CDs and CDs For details refer to the operating instruction...

Page 58: ... remote control unit Remote control operations P10 P14 P15 P14 Power on off Fast forward fast reverse Still picture pause Chapter track search O O O O Operation Remote Control unit RUE 4185 RUE 4160 There may be restrictions to some of the functions and displays depending on the Ai NET compatible product head unit remote control unit being used RUE 4165 O O O O O O O O ...

Page 59: ...ideo CDs with playback control PBC turn PBC off Warning Press and hold c or f continuously to make FF or RW operation RUE 4185 RUE 4160 Tilt and hold the joystick in left or right direction to make FF or RW opera tion RUE 4165 Press c or f to make a track or chapter skip RUE 4185 RUE 4160 Tilt the joystick in left or right direction to make a track or chapter skip RUE 4165 3 4 Do not operate or vi...

Page 60: ... in theaters and other settings DTS is the abbreviation for Digital Theater System To enjoy DTS surround sound you need the separately sold DTS digital audio processor The DVD video software should be compatible with DTS Dolby Pro Logic Dolby Pro Logic is a Dolby Surround format which restores four channels of signals recorded onto two channels back to four channels front left right center and rea...

Page 61: ... 6789 6865 6869 6890 6976 6978 6979 6983 6984 6985 7065 7073 7074 7079 7082 7089 7165 7168 7176 7178 7185 7265 7273 7282 7285 Abbreviation HY IA IE IK IN IS IT IW JA JI JW KA KK KL KM KN KO KS KU KY LA LN LO LT LY MG MI MK ML MN MO MR MS MT MY NA NE NL NO OC OM OR PA PL Code 7289 7365 7369 7375 7378 7383 7384 7387 7465 7473 7487 7565 7575 7576 7577 7578 7579 7583 7585 7589 7665 7678 7679 7684 7686...

Page 62: ...n Serbian Siswati Sesotho Sundanese Swedish Code 8083 8084 8185 8277 8278 8279 8285 8287 8365 8368 8371 8372 8373 8375 8376 8377 8378 8379 8381 8382 8383 8384 8385 8386 Abbreviation SW TA TE TG TH TI TK TL TN TO TR TS TT TW UK UR UZ VI VO WO XH YO ZH ZU Code 8387 8465 8469 8471 8472 8473 8475 8476 8478 8479 8482 8483 8484 8487 8575 8582 8590 8673 8679 8779 8872 8979 9072 9085 Language Swahili Tami...

Page 63: ... 6668 6669 6670 6671 6672 6673 6674 6677 6678 6679 6682 6683 6684 6686 6687 6689 6690 6765 6767 6768 6770 6771 6772 6773 6775 Abbreviation CL CM CN CO CR CU CV CX CY CZ DE DJ DK DM DO DZ EC EE EG EH ER ES ET FI FJ FK FM FO FR GA GB GD GE GF GH GI GL GM GN GP GQ GR Code 6776 6777 6778 6779 6782 6785 6786 6788 6789 6790 6869 6874 6875 6877 6879 6890 6967 6969 6971 6972 6982 6983 6984 7073 7074 7075 ...

Page 64: ...7480 7569 7571 7572 7573 7577 7578 7580 7582 7587 7589 7590 7665 7666 7667 7673 7675 7682 Abbreviation LS LT LU LV LY MA MC MD MG MH MK ML MM MN MO MP MQ MR MS MT MU MV MW MX MY MZ NA NC NE NF NG NI NL NO NP NR NU NZ OM PA PE PF PG Code 7683 7684 7685 7686 7689 7765 7767 7768 7771 7772 7775 7776 7777 7778 7779 7780 7781 7782 7783 7784 7785 7786 7787 7788 7789 7790 7865 7867 7869 7870 7871 7873 787...

Page 65: ...67 8368 8369 8371 8372 8373 8374 8375 8376 8377 8378 8379 8382 8384 8386 8389 8390 8467 8468 8470 8471 8472 Abbreviation TJ TK TM TN TO TP TR TT TV TW TZ UA UG UM US UY UZ VA VC VE VG VI VN VU WF WS YE YT YU ZA ZM ZW Code 8474 8475 8477 8478 8479 8480 8482 8484 8486 8487 8490 8565 8571 8577 8583 8589 8590 8665 8667 8669 8671 8673 8678 8685 8770 8783 8969 8984 8985 9065 9077 9087 List of country co...

Page 66: ...d to high temperature Symptom Unit does not operate Operation is unstable No picture is produced Playback does not start Picture is unclear or noisy Image stops sometimes NO DISC NOT VALID REGIONAL CODE VIOLATION VIDEO SIGNAL SYSTEM IS NOT CORRECT HI TEMP Remedy Replace with a fuse of the specified capacity See installation instructions Turn on the monitor s power Wait a while about 1 hour for the...

Page 67: ...e DVD 90 dB or greater CD 93 dB or greater Wow flutter Below measurable limit Channel separation 80 dB Harmonic distortion 0 03 Audio output 800 mV Power supply DC 14 4V operating range 11 to 16V Operating temperature range 10 to 60 C Weight 1 6 kg 3 lbs 8 oz External dimensions W x H x D 178 x 50 x 185 mm 7 x 2 x 7 1 4 For improvement purposes specifications and design are subject to change witho...

Page 68: ...ems displayed on the screen 2 ENT button Determines the selected item 3 Rotary Encoder Adjusts the volume when only the Digital Audio Processor is connected 4 MENU button Displays the DVD menu SET button Press for at least 2 seconds to summon the SET UP initial setting screen 5 Button Playback SLOW Button Press at least 2 seconds for slow motion playback 6 Button Seeks the start for video and audi...

Page 69: ...sed to summon the processor control screen when connected with the Digital Audio Processor BAND Button Press for at least 2 seconds to switch the menu screen when controlling the Digital Audio Processor u SUB T Button Press for at least 2 seconds to change the subtitles i ON OFF Button Press for at least 2 seconds to turn the subtitles ON and OFF o ANGLE Button Press for at least 2 seconds to chan...

Page 70: ...n Source switching 6 A PROC Button Audio Processor Switch 7 DEFEAT Button Defeat Mode ON OFF 8 TUNER Button Switches to Radio Mode 9 DISC Button Slave CD MD mode switching p Power Button Power ON OFF switching q DVD AUDIO Switch Switching between DVD and Audio operation w LIST Button Changes the title list display Press for at least 2 seconds to switch to title input screen e BAND Button Radio Ban...

Page 71: ...71 Memo ...

Page 72: ...0878 Ratingen Germany Tel 02102 45 50 Alpine Italia S p A Via C Colombo 8 20090 Trezzano Sul Naviglio MI Italy Tel 02 48 47 81 Alpine Electronics France S A R L RCS PONTOISE B 338 101 280 98 Rue De La Belle Etoile Z I Paris Nord II B P 50016 F 95945 Roissy Charles de Gaulle Cedex France Tel 01 48 63 89 89 Alpine Electronics of U K Ltd 13 Tanners Drive Blakelands Milton Keynes MK14 5BU U K Tel 0190...

Page 73: ...Remote control sensor unit Unité de réception de la télécommande Unidad de sensor del mando a distancia Remarques N assemblez pas l appareil dans un endroit où se produisent de fortes variations de température telles qu à proximité d une soufflerie d air conditionné ou de chauffage Des erreurs de lectures des disques ou d autres problèmes pourraient se produire S il est installé dans de tels endro...

Page 74: ...nitor de TV procesador audio digital que soporta Ai NET IGNITION 1 NORM EQ DIV Red CD Shuttle Ai NET Sold Separately Vendu s par ment Vendido separadamente Ignition Key Cl de contact Llave de encendido Battery Batterie Bater a Yellow Black GND BATTERY REMOTE IN White Brown 3 4 6 7 8 9 15 19 5 2 10 11 12 13 14 DVA 5205 CVA 1005 IVA C800 Tuner CVA 1005 IVA C800 Monitor PXA H510 Digital Audio Process...

Page 75: ...h fan m m Attention lors du montage sur la plage arribre Dans ce cas le support obstruera a moitie les trous de ventilation d air Ceci ne pose pas de probleme ni aux trous de ventilation d air restants ni au refroidissement avec le ventilateur m s Atencibn cuando monte en la repisa trasera En este case el soporte cubrira mas de la mitad de 10sagujeros de la ventilation de aire Esto no representa u...

Page 76: ...r radiation when open DO NOT STARE INTO BEAM I ATTENTION Rayonnement laser quand I appareil est ouvert NE PAS FIXER LE FAISCEAU PRECAUCldN Radiaci6n lkser al abrirse NO MIRE FIJAMENTE EL HAZ SpecificationdSpkificationdEspecificaciones PlCKUPlCAPTAGElRECOGlDA Wave length Longueur d ondellongitud de onda Laser PowerlPuissnnce du laser Potencia de kise 65 5nm CLASS II 68P41262Y79 0 Y ...

Page 77: ...OF THE PRODUCT BUS FARES CAR RENTALS OR OTHERS COSTS RELATING TO THE CARE AND CUSTODY OF THE PRODUCT THE TERM CONSEQUENTIAL DAMAGES REFERS TO THE COST OF REPAIRING OR REPLACING OTHER PROPERTY WHICH IS DAMAGED WHEN THIS PRODUCT DOES NOT WORK PROPERLY THE REMEDIES PROVIDED UNDER THIS WARRANTY ARE EXCLUSIVE AND IN LIEU OF ALL OTHERS OHOW STATE PROVINCIAL LAW RELATES TO THE WARRANTY Tills Warranty giv...

Page 78: ...nit Remote control operations are not possible unless the remote control sensor unit is connected 2 Press the V OUT button on the remote control unit for at least 2 seconds to turn the power on 3 Press the SET button on the remote control unit for at least 2 seconds to display the initial setup SETUP menu screen If the disc has started playing set the stop mode first 4 From the menu select CUSTOM ...

Page 79: ...UNITED STATES BUSINESS REPLY MAIL FIRST CLASS MAIL PERMIT N 320 TORRANCE CA 90509 POSTAGE WILL BE PAID BY ADDRESSEE ALPINE ELECTRONICS OF AMERICA INC Attention MARKETING SERVICES P O Box 2859 Torrance CA 90509 9939 III II I I II II II II III1 I II ...

Page 80: ...Canada Postagewillbepaidby ALPINE ELECTRONICS OF CANADA INC Suite 203 7300 Warden Ave Markham Ontario L3R 9Z6 T FORUSEINCANADA PLEASEFOLDHEREANDENSURETHAT CANADIANADDRESSFACESUP dfl S33VJ sswaavNVXl3VUV ltlHl3tlfISN3 aNV 3t13HCllOzl3SV 3ld KX I NI35X ltlOzl j ...

Page 81: ...tronics Appliance Store 4 0 Other WType of vehicle in which this unit is installed Make Model PurchasedYear 1 1 ModelYear j 1 SHOWwas this vehicle purchased 1 0Buy 2 Cl Lease n Purpose of buying this unit 1 0 Addition 0 Replacement Previous brand replaced 1 CIFactoryinstalled 2 0 Alpine 3 0 Other f BrandName n Haveyou purchased Alpine products before 1 ii Firsttime 2 J Twoor Moretimes WWhen you pu...

Page 82: ...gineeringfiechnrcal 7 0 Farming Fishing 8 0 Retired 9 0 Student 10 0 Other 4 cl 70 000 90 000 5 0 90 000 110 000 6 0 Over 110 000 n AGE 1 yearsold n MARITALSTATUS 1 0 Single 2 U Marrred mYour highest levelof education completed 1 I HighSchoolStudent 4 t Completed4Yr College 2 2 HighSchoolGraduate 5 2 CompletedGraduateSchool 3 I 2Yr Degree Some College HWhich ethnicity best describes yourself 1 3 C...

Reviews: