background image

Presetting Stations Automatically

Tuning to Preset Stations

1

1

2

2

Press 

BAND

 repeatedly until the desired radio band is 

displayed.

Press 

BAND

 repeatedly until the desired band is displayed.

Press and hold 

TUNE/A.ME

 for at least 2 seconds.

The frequency on the display continues to change while the 

automatic memory is in progress. The tuner will automatically 

seek and store 6 strong stations in the selected band. They will be 

stored into preset buttons 1 to 6 in order of signal strength. When 

the automatic memory has been completed, the tuner goes to the 

station stored in preset location No.1.


Press any one of the station 

preset buttons (1 through 6)


that has your desired radio station in memory.

The display shows the band, preset number and frequency of the 

station selected.

Note

Note

A total of 18 stations can be stored in the preset memory (6 stations for 

each band; FM1, FM2 and AM).

If no stations are stored, the tuner will return to the original station you 

were listening to before the auto memory procedure began.

If you store a station in a preset memory which already has a station, the 

current station will be cleared and replaced with the new station.

Frequency Search Function

1

2

3

Press 

s

/ENTER

 in Radio mode to activate Frequency 

search mode. 

The “

s

” indicator lights up.


You can search for a radio station by its frequency.

Turn the 

Rotary encoder

 to select the desired frequency.

Press 

s

/ENTER

 to receive the selected frequency. 

Note

Press 

c

 in the search mode to cancel. Or, the search mode will be 

cancelled if no operation is performed for 10 seconds.

Playback

1

2

3

4

5

Insert a disc with the label side facing up.

The disc will be pulled into the unit automatically.

While playing back MP3/WMA, press 

a

 or 

s

 to select the 

desired folder.

Pressing and holding 

a

 or 

s

 will change folders continuously.

Press 

w

 or 

e

 to select the desired track (file).

Pressing and holding 

w

 or 

e

 will fast backward/fast 

forward track continuously.

To pause playback, press 

q

.

Pressing 

q

 again will resume playback.

To eject the disc, press 

v

.

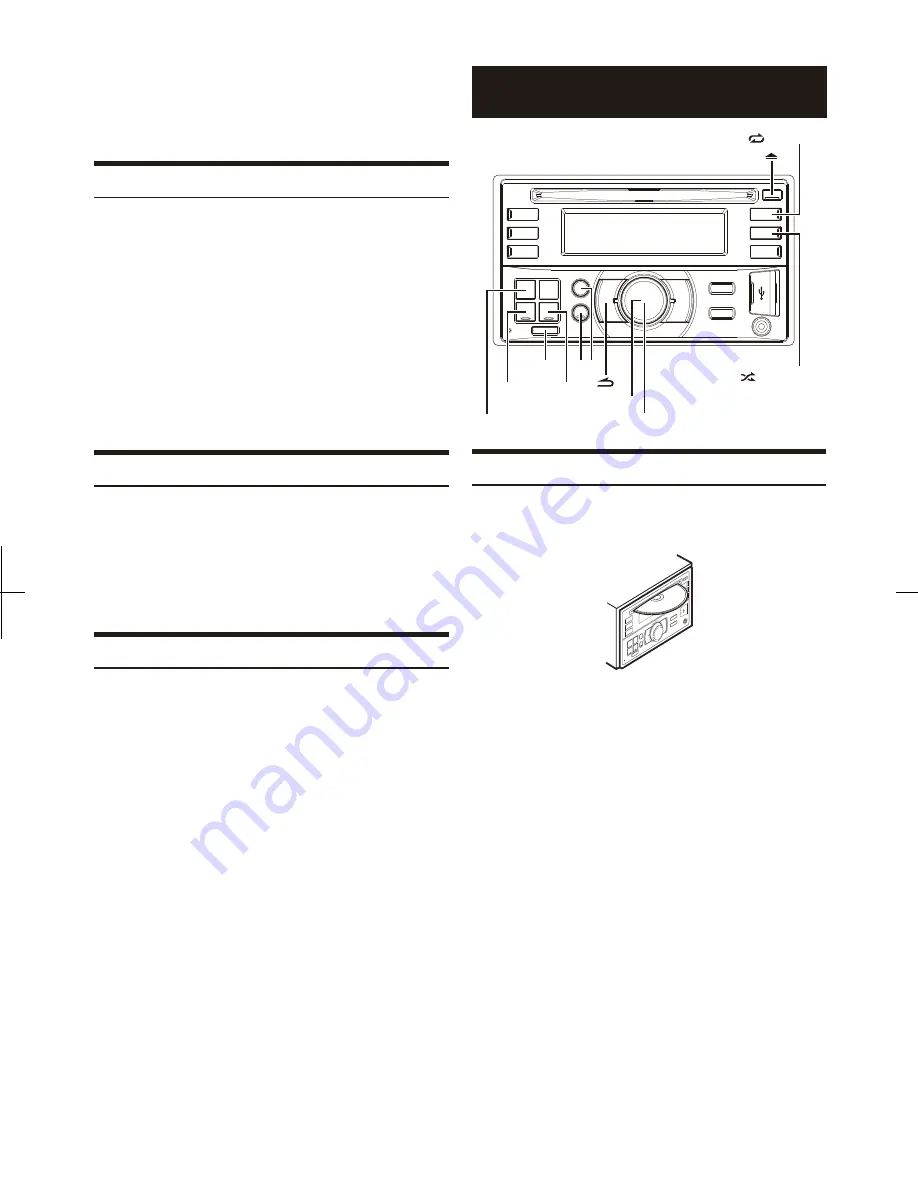
SOURCE/

/REPEAT 4

/SHUFFLE 5

/ENTER

Rotary encoder

Note

Note

Do not remove a CD during its eject cycle. Do not load more than one 

disc at a time. A malfunction may result from doing either.

When a disc is already inserted, press 

SOURCE/

a

 to switch to the 

DISC mode.

The “

e

” indicator lights up when a disc is inserted.

CD/MP3/WMA

Three-inch (8 cm) CDs can not be used.

Any file protected by DRM (Digital Rights Management) copy protection, 

cannot be played back on this unit.

The track display for MP3/WMA data playback is the file numbers 

recorded on the disc.

8

-EN

Summary of Contents for CDE-W233E

Page 1: ...807 München Germany Phone 089 32 42 640 ALPINE ELECTRONICS DE ESPAÑA S A Portal de Gamarra 36 Pabellón 32 01013 Vitoria Alava APDO 133 Spain Phone 945 283588 ALPINE ELECTRONICS OF CANADA INC 777 Supertest Road Toronto Ontario M3J 2M9 Canada Phone 1 800 ALPINE 1 1 800 257 4631 ALPINE ELECTRONICS OF U K LTD Alpine House Fletchamstead Highway Coventry CV4 9TW U K Phone 0870 33 33 763 ALPINE ELECTRONI...

Page 2: ......

Page 3: ...235EBT only Displaying the Text 14 Setting 16 Setup Before Using 18 Using the Front AUX Input Terminal 14 Option Menu Setting 15 About the indication display 14 General Setting 16 About BLUETOOTH 18 Before Using BLUETOOTH Function 18 Display Setting 17 iPod iPhone Setting 17 About Text 14 Setting the Bass Control 12 Setting the Mid Control 12 Setting the Treble Control 12 Display the time 16 Dimme...

Page 4: ...aiting function 23 Dialing the preset number 23 Call Switching Operation 24 Preset a number Shortcut dial 23 Phone Book Auto Update ON OFF 20 Changing the Phone book List Order 20 Setting the Visible Mode 19 Sound Auto setting AUTO SET 20 Voice Dial Operation 22 Redialing a Number In Outgoing History 22 Dialing a Number In Incoming History 22 Dialing a Number In The Phone Book 22 Phone book alphab...

Page 5: ... disc at a time for playback Do not attempt to load more than one disc Make sure the label side is facing up when you insert the disc ERROR will be displayed on your player if you insert a disc incorrectly If ERROR continues to be displayed even though the disc has been inserted correctly push the RESET button with a pointed object such as a ballpoint pen HALT USE IMMEDIATELY IF A PROBLEM APPEARS ...

Page 6: ...er unstable conditions CDs on which a recording failed or a re recording was attempted copy protected CDs which do not conform to the audio CD industry standard Use discs with MP3 WMA files written in a format compatible with this unit For details refer to About MP3 WMA on page 10 ROM data other than audio files contained in a disc will not produce sound when played back Irregular Shaped Discs Be ...

Page 7: ...se this product in any commercial i e revenue generation real time broadcasting terrestrial satellite cable and or any other media broadcasting streaming via internet intranets and or other networks or in other electronic content distribution systems such as pay audio or audio on demand applications An independent licence for such use is required For details please visit http www mp3licensing com ...

Page 8: ... turned on the volume will start from level 12 Only for CDE W235EBT Only when BT AUDIO is set to ON Refer to Setting the BLUETOOTH Connection BT IN on page 19 Only when AUX SETUP is set to ON For details refer to Setting the AUX SETUP Mode on page 17 1 2 Turn off the unit power Press RESET with a ballpoint pen or similar pointed object SettingTime 1 2 3 Press and hold AUDIO SETUP CDE W235EBT only ...

Page 9: ...elect the tuning mode DX SEEK Distance mode d SEEK Local mode d off Manual mode d DX SEEK Note The initial mode is Distance mode Distance mode Both strong and weak stations will be automatically tuned in Automatic Seek Tuning Local mode Only strong stations will be automatically tuned in Automatic Seek Tuning Manual mode The frequency is manually tuned in steps Manual tuning Remote control sensor ...

Page 10: ...n 1 2 3 Press s ENTER in Radio mode to activate Frequency search mode The s indicator lights up You can search for a radio station by its frequency Turn the Rotary encoder to select the desired frequency Press s ENTER to receive the selected frequency Note Press c in the search mode to cancel Or the search mode will be cancelled if no operation is performed for 10 seconds Playback 1 2 3 4 5 Insert...

Page 11: ...In the USB mode all files stored in the USB Memory are played back in random sequence Folder File Name Search concerning MP3 WMA Note Note Press and hold c for at least 2 seconds in the search mode to cancel Or the search mode is cancelled if no operation is performed for 10 seconds Press and hold c for at least 2 seconds in the search mode to cancel Or the search mode is cancelled if no operation...

Page 12: ...file this device can display the title track title artist name and album name ID3 tag WMA tag data This device can only display single byte alphanumeric characters up to 30 for ID3 tags and up to 15 for WMA tags and the underscore For non supported characters NO SUPPORT is displayed If information contains characters other than ID3 tag information the audio file may not be played back The tag info...

Page 13: ...setting value are linkage If no operation is performed for 5 seconds the unit automatically returns to normal mode Subwoofer 0 15 Bass level 7 7 Middle level 7 7 Treble level 7 7 Balance L15 R15 Fader R15 F15 Loudness ON OFF Defeat ON OFF Volume 0 35 Note Sound Setting The illustration is for CDE W233E The illustration is for CDE W235EBT Audio Setup 1 5 2 3 Press and hold AUDIO SETUP CDE W235EBT o...

Page 14: ...n Off Adjusting the Parametric Equalizer Curve 3BAND EQ Setting the Bass Control Setting the Mid Control Setting the Treble Control 1 1 1 2 2 2 3 3 3 After selecting BASS from the 3BAND EQ adjustment mode turn the Rotary encoder to select the desired Bass setting item and then press s ENTER WIDTH Q s CENTER FRQ s LEVEL After selecting MID from the 3BAND EQ adjustment mode turn the Rotary encoder t...

Page 15: ... BT AUDIO AUX PHONE TALK RING TONE MIC GAIN Setting contents 5 dB 5 dB Setting contents HPF OFF Initial setting HPF 60 Hz HPF 80 Hz HPF 120 Hz HPF 160 Hz All frequencies above the selected cutoff are output Setting contents LPF OFF Initial setting LPF 60 Hz LPF 80 Hz LPF 120 Hz LPF 160 Hz All frequencies lower than the selected cutoff are output Setting contents NORMAL Initial setting REVERSE Sett...

Page 16: ...ossible to display the folder name the file name and the tag etc while playing MP3 WMA files Connect a portable music player etc by simply connecting it to the input on the front panel An optional adapter cable is required standard RCA to 3 5ø mini phono plug or 3 5ø to 3 5ø mini phono plug Text compatible CDs contain text information such as the disc name and track name Such text information is r...

Page 17: ...ion mode and in SETUP mode are linkage Refer to Setting the Source Volume Level on page 13 PLAY MODE can be selected in this mode For details refer to Playing MP3 WMA Data PLAY MODE on page 17 Refer to Setting the iPod Control on page 26 The setting items are the same as iPod setting in SETUP mode For details refer to iPod iPhone Setting on page 17 AUX NAME can be selected in this mode For details...

Page 18: ... for details about the selected SETUP item SOURCE ENTER Rotary encoder AUDIO SETUP SOURCE ENTER Rotary encoder SETUP GENERAL CLOCK ADJ 3 s CLOCK s CLOCK MODE s AUX SETUP s AUX NAME 4 s INT MUTE 5 s PLAY MODE s DEMO DISPLAY DIMMER s SCROLLTYPE iPod IPOD LIST 1 3 2 4 5 Refer to Audio Setup on page 11 Refer to Setting Time on page 6 CDE W235EBT only Refer to BLUETOOTH SETUP on page 18 Displayed only ...

Page 19: ...sc is loaded or when a track is changed etc SCR AUTO The current text information of CD folder tag etc is scrolled automatically Setting contents AUXILIARY Initial setting TV DVD PORTABLE GAME Setting contents DEMO OFF Initial setting DEMO ON Setting the AUX SETUP Mode Turning Mute Mode On Off INT MUTE CDE W233E only Setting the AUX NAME Mode Demonstration Playing MP3 WMA Data PLAY MODE Note Note ...

Page 20: ... this unit For details refer to Pairing a BLUETOOTH Device from the unit on page 19 Proper function of this unit with all BLUETOOTH compatible devices is not guaranteed For handling of the BT compatible device consult your ALPINE dealer or ALPINE website Depending on the surroundings BLUETOOTH wireless connection may be unstable When you place a call or perform setup operations be sure to stop you...

Page 21: ...ing on the connected mobile phone the battery quantity signal strength and message indicators may not be displayed If all the 3 positions have been registered you cannot register the 4th device To register another device you need to delete one of the devices from position 1 to 3 first With BLUETOOTH technology you can place a hands free call by a BLUETOOTH equipped mobile phone Audio information o...

Page 22: ... GAIN 5 5 dB Setting contents OFF ON Initial setting Adjusting the volume VOL LV ADJ Setting text message indicator ON OFF MSG ALERT Setting the caller information display ON OFF CALLER ID Sound Auto setting AUTO SET Note Note Note Note These setting items are the same as PHONE TALK RING TONE and MIC GAIN settings in AUDIO step mode refer to Setting the Source Volume Level on page 13 Depending on ...

Page 23: ...Initial setting UPDATE YES Hands Free Phone Control Hands free calls are possible when using a HSP Head Set Profile and HFP Hands Free Profile compatible mobile phone with this unit About the Hands Free Phone Note Note Note Avoid performing a hands free call in heavy traffic or on narrow or winding streets When AUTO ANS is set to AT ANS ON you can receive a call automatically Refer to Setting the ...

Page 24: ...name and number cannot be displayed ID UNSENT will be displayed If you place a call directly from the paired mobile phone the phone number is not displayed you cannot redial from the unit in this case The telephone label of a number depends on the number information stored in Phone book of the mobile phone which includes 5 types GENERAL MOBILE HOME OFFICE and OTHER Call History is recorded for the...

Page 25: ...hange the display between waiting number 1 or 2 and caller name If a second call is received during a current call you can have the first caller wait momentarily while you take the second call When you are finished with one call you can switch to the other one Call waiting function If a second call is received during the current call call1 the information of second caller call2 is displayed instea...

Page 26: ...ansfer of the audio between the mobile phone and the speakers in the car Audio information of a BLUETOOTH compatible mobile phone a portable player etc is controllable playable wirelessly from this unit Call Switching Operation While calling press BAND to switch the call sound between the unit and mobile phone BLUETOOTH Audio Operation To play back audio a mobile phone or a portable player conform...

Page 27: ... if a USB Memory Device exceeds the limitations described above Do not make a file s playback time more than 1 hour Media supported This device can play back USB Memory media Corresponding File Systems This device supports FAT 12 16 32 for USB Memory device iPod iPhone optional The illustration is for CDE W235EBT Note An iPhone connected to this unit operates as an iPod The iPhone can be used as a...

Page 28: ...ion as shown below Each music category has its own individual hierarchy Use the Playlist Artist Album Song Podcast Genre Composer Audiobook search mode to narrow searches based on the table below Setting the iPod Control Searching for a desired Song Playback 1 3 4 5 2 1 1 2 2 Press and hold s ENTER OPTION for at least 2 seconds in the iPod mode The Option menu for iPod mode is activated Turn the R...

Page 29: ...e been played back The unit s direct search function can be used to search for an album song etc more efficiently In PLAYLIST ARTIST ALBUM SONG PODCAST GENRE COMPOSER AUDIOBOOK mode you can quickly target any song Alphabet search function Random Play Shuffle M I X Direct Search Function 1 2 3 In the search mode press ABC SKIP The letter selection list is displayed Turn the Rotary encoder to select...

Page 30: ...If the area you are in is a primary signal area the antenna may not be grounded and connected properly The antenna is not the proper length The antenna is poorly grounded Improper power lead Red and battery lead Yellow connections Blown fuse Internal micro computer malfunctioned due to interference noise etc If connected following instructions the unit will not operate with the vehicle s ignition ...

Page 31: ...an cause damage to the mechanism Clean the disc damaged disc should be replaced Perform finalisation and attempt playback again Press v After the error indication disappears insert the disc again If the above mentioned solution does not solve the problem consult your nearest Alpine dealer Securely re mount the unit Clean the disc Change the disc Do not use a commercially available lens cleaner dis...

Page 32: ...100 Hz Remote Control Profile 1 618 kg 3 lbs 9 oz 0 008 at 1 kHz 95 dB at 1 kHz 105 dB 85 dB at 1 kHz 80 dB 65 dB 35 dB 2 0 dB Communication error Caused by the iPod iPhone Software Version not being compatible with this unit The iPod iPhone is not verified Turn the ignition key off and then set to ON again Turn the ignition key off and then set to ON again Reset the iPod Reset the iPod Check the ...

Page 33: ...o use only the specified accessory parts Use of other than designated parts may damage this unit internally or may not securely install the unit in place This may cause parts to become loose resulting in hazards or product failure Route the cables and wiring away from moving parts like the seat rails or sharp or pointed edges This will prevent crimping and damage to the wiring If wiring passes thr...

Page 34: ...ink Less than 30 Mounting the Microphone CDE W235EBT only For the sake of safety mount the microphone in the following location Choose a location for the microphone that can easily pick up the driver s voice Requiring the driver to move towards the microphone for audibility causes a distraction that could be dangerous In a stable and secure location In a location that does not inhibit safely drivi...

Page 35: ...enna To amplifier Not used To the instrument cluster illumination lead Ignition Key Battery Speakers SPEAKER RIGHT FRONT SPEAKER RIGHT REAR SPEAKER LEFT REAR SPEAKER LEFT FRONT Front Right Rear Right Rear Left Front Left Amplifier Speakers Front or Subwoofer POWER ANT Blue Blue White Pink Black Orange Red Yellow Black Grey Grey Black Violet Black Violet Green Green Black White Black White REMOTE T...

Page 36: ...e RCA Extension Cable sold separately Steering Remote Control Interface Connector To steering remote control interface box You can operate this unit from the vehicle s control unit when an Alpine Steering Remote Control Interface Box optional is connected For details contact your Alpine dealer MIC Input Connector CDE W235EBT only To Microphone Front Subwoofer Output RCA Connectors RED is down and ...

Reviews: