background image

29

-EN

01GB05CDE-125EBT.fm

ALPINE CDE-125EBT 68-16909Z39-A (EN)

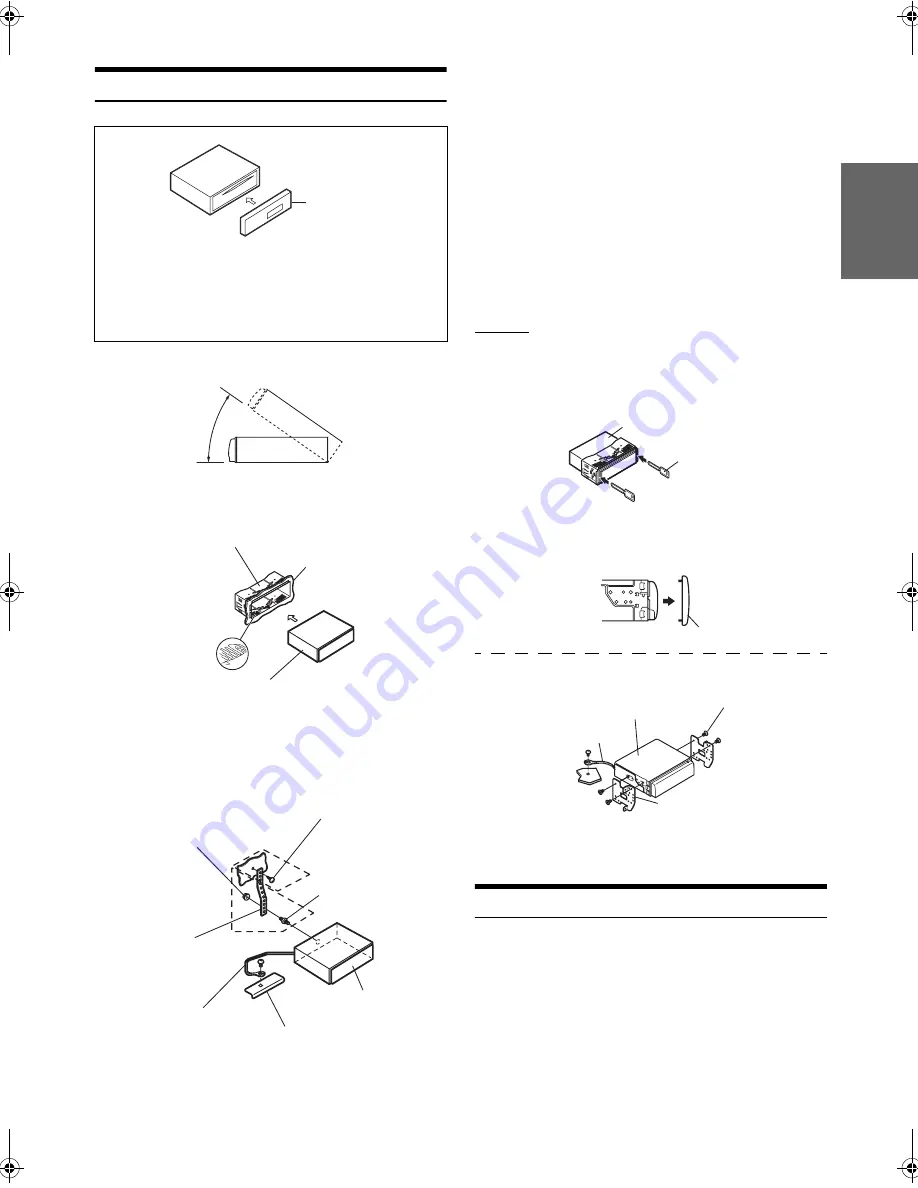
Installation

The main unit must be mounted within 35 degrees of the horizontal 
plane, back to front.

Removal

1. Remove the detachable front panel.

2. Insert the bracket keys into the unit, along the guides 

on either side. The unit can now be removed from the 
mounting sleeve.

3. Pull the unit out, keeping it unlocked as you do so.

<JAPANESE CAR>

Secure the ground lead of the unit to a clean metal spot using a screw 

(*

3

) already attached to the vehicle’s chassis.

Mounting the Microphone

For the sake of safety, mount the microphone in the following location.

• In a stable and secure location.
• In a location that does not inhibit safely driving the vehicle.
• Mount the microphone in a location where the driver’s voice can 

easily be picked up.

Choose a location for the microphone that can easily pick up the driver’s 
voice. Requiring the driver to move towards the microphone for 
audibility causes a distraction that could be dangerous.

Caution

When you install this unit in your car, do not remove the 
detachable front panel.
If the detachable front panel is removed during installation, you 
might press too hard and warp the metal plate that holds it in 
place.

1

* If the installed mounting sleeve is loose in the dashboard, the 

pressure plates may be bent slightly to remedy the problem.

Remove the mounting sleeve from the main unit (see  
“Removal” on page 29).

2

Detachable Front 
Panel

Less than 35°

Mounting Sleeve 
(Included)

Dashboard

This unit

Pressure Plates

*

Metal 
Mounting 
Strap

Chassis

Hex Nut (M5)

Bolt Stud

Ground Lead

Screw

This unit

*

2

*

1

Reinforce the head unit with the metal mounting 
strap (not supplied). Secure the ground lead of the 
unit to a clean metal spot using a screw (

*

1

) already 

attached to the vehicle’s chassis.

For the screw marked “*

2

”, use an appropriate screw for the chosen 

mounting location.

Connect each input lead coming from an amplifier to 
the corresponding output lead coming from the left 
rear of the CDE-125EBT. Connect all other leads of 
the CDE-125EBT according to details described in 
the CONNECTlONS section.

3

Slide the CDE-125EBT into the dashboard until it 
clicks. This ensures that the unit is properly locked 
and will not accidentally come out from the 
dashboard. Install the detachable front panel.

Bracket Keys 
(Included)

This unit

Front Frame

This unit

Screws (M5 × 8) 
(Included)

Mounting Bracket

Ground Lead

 *

3

01GB00CDE-125EBT.book  Page 29  Monday, September 27, 2010  10:08 AM

Summary of Contents for CDE-125EBT

Page 1: ...RONICS OF AUSTRALIA PTY LTD 161 165 Princes Highway Hallam Victoria 3803 Australia Phone 03 8787 1200 ALPINE ELECTRONICS GmbH Wilhelm Wagenfeld Str 1 3 80807 M nchen Germany Phone 089 32 42 640 ALPINE...

Page 2: ......

Page 3: ...10 Sound Setting Adjusting Subwoofer Level Bass Level Treble Level Balance Between Left and Right Fader Between Front and Rear Defeat 12 Setting the Bass Control 12 Setting the Treble Control 12 Adjus...

Page 4: ...Redial Function 19 Calling 19 Redialing a Number In Outgoing History 19 Dialing a Number In Incoming History 19 Dialing a Number In Incoming Missed Call History 19 Dialing a Number In The Phone Book 1...

Page 5: ...and may result in fire USE THIS PRODUCT FOR MOBILE 12V APPLICATIONS Use for other than its designed application may result in fire electric shock or other injury DO NOT PLACE HANDS FINGERS OR FOREIGN...

Page 6: ...her such instrument then insert the disc again Irregular Shaped Discs Be sure to use round shape discs only for this unit and never use any special shape discs Use of special shape discs may cause dam...

Page 7: ...r storage in the following locations Anywhere in the car exposed to direct sunlight or high temperatures Anywhere the possibility of high humidity or corrosive substances are present Fix the USB memor...

Page 8: ...ht side of the front panel into the main unit Align the groove on the front panel with the projections on the main unit 2 Push the left side of the front panel until it locks firmly into the main unit...

Page 9: ...Local mode OFF Manual mode DX SEEK The initial mode is Distance mode Distance mode Both strong and weak stations will be automatically tuned in Automatic Seek Tuning Local mode Only strong stations w...

Page 10: ...any one of the station preset buttons 1 through 6 that has your desired radio station in memory The display shows the band preset number and frequency of the station selected Playback 1 Insert a disc...

Page 11: ...corded file is played back MP3 Play Display The folder number and file number will be displayed as described below Press VIEW to switch the display See Displaying the Text page 13 for information abou...

Page 12: ...play back the selected file Press and hold ESC for at least 2 seconds in the search mode to cancel Or the search mode is cancelled if no operation is performed for 10 seconds Press MUTE in the search...

Page 13: ...t Once or packet writing Order of files Files are played back in the order that the writing software writes them to the disc Therefore the playback order may not be what is expected Verify the writing...

Page 14: ...SOURCE to select the desired bass bandwidth Changes the boosted bass bandwidth to wide or narrow A wider setting will boost a wide range of frequencies above and below the centre frequency A narrower...

Page 15: ...normal mode automatically The function is inoperable when DEFEAT is set to ON Turning Loudness On Off Loudness introduces a special low and high frequency emphasis at low listening levels This compen...

Page 16: ...rupt the time display momentarily The function selected will be displayed for about 5 seconds before the time returns to the display Using the Front AUX Input Terminal Connect a portable music player...

Page 17: ...ightness of the unit with the head lights of the vehicle ON This mode is useful if you feel the unit s backlighting is too bright at night Scroll Type Setting Choose from two scrolling methods Select...

Page 18: ...s set to ON Press ENT when AUX SETUP is set to ON and select AUX NAME by turning the Rotary encoder then press ENT After that turn the Rotary encoder to select the desired AUX name Setting the AUX NAM...

Page 19: ...ositions have been registered you cannot register the 6th device To register another device you need to delete one of the device from position 1 to 5 first If a BLUETOOTH compatible device is successf...

Page 20: ...ted speaker in car to output the sound signal of telephone Setting item SPEAKER SL The setting cannot be adjusted during a phone call Adjust the setting before placing a call Displaying the firmware v...

Page 21: ...d Depending on the connected mobile phone this function may not be performed If the name cannot be recognised default number will be displayed The names registered in the telephone book are displayed...

Page 22: ...s e g clipped on sun visor may also reduce feedback at high volume Call Switching Operation While making a call this function allows you to initiate the transfer of the audio between the mobile phone...

Page 23: ...ional Set AUX SETUP to OFF when an iPod iPhone is connected refer to Setting the AUX SETUP Mode on page 16 If you connect an iPhone to this unit it can be used as an iPod If you use iPhone as a hands...

Page 24: ...songs in the iPod iPhone or selected search mode While in the search mode if you press and hold ESC for 2 seconds or no operation is performed for 10 seconds the search mode is cancelled In the searc...

Page 25: ...ion is inactive If an album is selected during an artist search other albums by that artist are searchable This function is inactive during shuffle playback Random Play Shuffle M I X The Shuffle funct...

Page 26: ...herwise make sure the rest of your system is properly connected or consult your authorized Alpine dealer No function or display Vehicle s ignition is off If connected following instructions the unit w...

Page 27: ...has not been performed Perform finalisation and attempt playback again MP3 is not played back Writing error occurred The MP3 format is not compatible Make sure the MP3 has been written in a supported...

Page 28: ...connected refer to Connections Make sure the cable is not bent excessively There are no songs in the iPod iPhone Download songs to the iPod iPhone and connect to this unit Communication error Turn th...

Page 29: ...ation 85 dB at 1 kHz Wave length 795 nm Laser power CLASS I USB requirements USB 1 1 2 0 Max Power Consumption 500 mA USB Class Mass Storage File System FAT 16 32 MP3 Decoding MPEG 1 2 AUDIO Layer 3 N...

Page 30: ...dealer where you purchased this product to have the work done USE SPECIFIED ACCESSORY PARTS AND INSTALL THEM SECURELY Be sure to use only the specified accessory parts Use of other than designated par...

Page 31: ...ing installation you might press too hard and warp the metal plate that holds it in place 1 If the installed mounting sleeve is loose in the dashboard the pressure plates may be bent slightly to remed...

Page 32: ...Green Green Black White Black Grey Violet Black Violet To iPod iPhone To power antenna To amplifier To the instrument cluster illumination lead Ignition Key Battery Speakers Rear Left Front Right Rea...

Page 33: ...Speaker Output Lead Green Black Left Front Speaker Output Lead White Black Left Front Speaker Output Lead White Fuse Holder 10A Front Subwoofer Output RCA Connectors RED is right and WHITE is left MIC...

Page 34: ...gnetic Radiation Regulation Country Rules of Electromagnetic Radiation Regulation UAE Approved by TRA Thailand This telecommunication equipment conforms to technical standard NTC TS1010 2550 Australia...

Page 35: ......

Page 36: ......

Reviews: