


ALPACKA SERIES BASIC SETUP
5
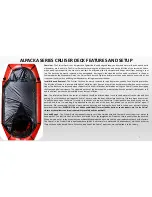
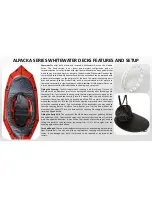
Seat Installation –
All Alpacka Series models other than self bailers include a
standard inflatable seat and back rest. Install the inflatable back rest by threading
the two webbing tabs on the seat back through the strap plates in the stern and
back through the tri-glides on the webbing tabs. Install the seat by lacing the seat
tabs on either side of the seat to the corresponding tabs installed in the packraft
using the included cord and with the inflation nozzle facing up. Excess cord can be
left as is or trimmed and (carefully) singed to prevent fraying.
(Optional) Backband Installation –
All 2017 Alpacka Series models include 1-inch
stainless D-Rings for installing an optional backband. The backband gives more
comfort and adjustability than the inflatable backrest. Install the backband by
looping the stabilizer straps through the strap plates and rethreading to the inner
ladder locks on the back of the backand. Then thread the main backband straps
through the two D-Rings from front to rear, then back through the aluminum
common loop and the outer ladder locks on the back of the backband. Adjust the
backband for fit and then tighten the stabilizer straps to hold in place.
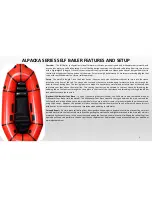
Inflating –
All 2017 Alpacka Series feature a lightweight single valve allows high
pressure oral inflation and quick deflation with a quick twist of the valve core.
Turning the valve core to the right will open the valve for deflation and turning the
core to the left will allow the one-way flap to engage for tempering. To inflate,
insert the valve adapter on the inflation bag into the valve and twist to the right to
lock in place. Use the inflation bag to capture air and compress it through the
valve (see the inflation bag video on our website for more details). As the boat fills
up, you may want to turn the valve core to the left (without disengaging the
adapter) to close the one way flap which will allow you to get more air in with the
inflation bag. When the boat is full, disconnect the valve adapter and proceed to
tempering.
Tempering –
Unlike a spring valve used in larger rafts, our valve is designed with a
very light action 1-way flap to allow the boat to be orally tempered.
Note that the
light action 1-way flap will not engage until you have orally added some pressure
to the raft.
The amount of air pressure that you choose to use is personal, but we
recommend approximately 1.2-2.0 psi which is the max that a normal person can
orally add into the boat. Be careful not to exceed 2.0psi if you are using a pump.
After tempering, screw on the valve cap to prevent any leakage while boating.
NOTE – LEAVING YOUR ALPACKA RAFT IN THE SUN UNATTENDED CAN CAUSE
THE AIR PRESSURE IN THE CHAMBER TO RAPIDLY RISE, WHICH CAN LEAD TO
FAILURE OR PERMANENT DAMAGE. ALWAYS LET SOME AIR OUT YOUR BOAT AND
SEATS BEFORE TAKING A BREAK FROM THE WATER IN THE SUN.
Deflating –
To deflate, remove the valve cap and twist the valve core to the right.
Roll the boat from the bow to remove additional air. During the valve break in
period, you may need to hold the valve open (turned to the right) during
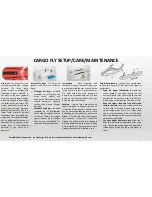
deflation. If you have a Cargo Fly, once the packraft has been de-tempered with
the valve you can open the Cargo Fly zipper to release the rest of the air.
Folding/Rolling –
There is no right or wrong way to roll or fold your boat for
transport. Do whatever fits best for your use and carrying method. We
recommend the following ways:
•
For a wide thinner roll, fold in half lengthwise and roll from the bow.;
•
For a narrower thicker roll, fold into thirds lengthwise and roll from the bow;
•
For a relatively square fold, try folding into quarters lengthwise and then
folding in 1-foot length sections from the bow and secure with a strap.
(Optional) Whitewater Foot Rest –
All 2017 Alpacka Series models have a red 1-
inch grab loop installed on the floor near the bow, which allows for the installation
of our WW Foot Brace (sold separately). The WW Foot Brace will reduce the
cockpit length and improve handling performance in whitwater and when using
thigh straps.