

Timer
To manage the power supply automatically, you may use:
•
Auto OFF:
After turning on, the power supply will automatically shutdown
after a predefined time (in seconds). A value of 0 will cancel the timer.
•
Auto ON:
After turning off, the power supply will be automatically turned
on after a predefined time (in seconds). A value of 0 will cancel the timer.
Weekly Schedule
This function requires an internet connection.
Shelly receives actual information about the time of sunrise and sunset in
your area. Shelly may turn on/off automatically at a predefined time, at sun
-
rise/sunset, or at a specified time before or after sunrise/ sunset.
Internet/Security
•
WiFi Mode - Client: Allows the device to connect to an available
•
WiFi network. After typing the details in the respective fields, press Con
-
nect.
•
WiFi Client Backup: Allows the device to connect to an alternative WiFi
network, if the primary is not available. After typing the details in the respec-
tive fields, press Set.
•
WiFi Mode - Access Point: Configure Shelly to create a Wi-Fi Access point.
After typing the details in the respective fields, press Create Access Point.
•
Restrict Login: Restrict the web interface of Shelly with a Username and
Password. After typing the details in the respective fields, press Restrict
Shelly.
•
SNTP Server: You can change the default SNTP server. Enter the address,
and click Save.
•
Advanced - Developer Settings: Here you can change the action execu-
tion:
- Via CoAP (CoIOT)
- Via MQTT
•
Cloud: Enable or Disable connection to the Cloud service.
Settings
•
Power On Default Mode
- This sets the default output state when Shelly
is powered.
-
ON: Configure Shelly to turn ON, when it has power.
-
OFF: Configure Shelly to turn OFF, when it has power.
•
Restore Last Mode
- Configure Shelly to return to last state it was in, when
it has power.
•
Firmware Update
- Update the firmware of Shelly, when a new version
is released.
•
Time Zone and Geo-location
- Enable or Disable the automatic detection
of Time Zone and Geo-location.
•
Set Date/Time
- You can manually set the Date and time for your Shelly
device.
•
Factory Reset
- Return Shelly to its factory default settings.
•
Device Reboot
- Reboots the Device.
•
Device Info
- Shows your device ID.
In Client Mode shows also your WiFi network name and WiFi signal strength.
Description of Shelly 3EM values:
1.
Power Consumption
- This is the power which is actually consumed or
utilized in an AC Circuit. It is also called True power, Active power or Real
power. It is measured in kilowatt (kW) or megawatt (MW). It is the actual
outcome of the electrical system which runs the electric circuits or loads.
This is the energy which you are paying. It is shown separately with individ-
ual colors for each phase, in the history graph. If you have solar panel and
sell energy, you will see this power with “negative” value. It is shown in green
color in the history graph.
2.
Reactive power
- This is the power that flows back and forth, it moves in
both the direction in the circuit or react upon itself. The Reactive power is
measured in Volt-Ampere reactive (VAR), Kilo Volt-Ampere reactive (VAR)
or Mega Volt-Ampere reactive (MVAR). You are not being charged for this
energy.
3.
Power Factor
- The power factor of an AC electrical circuit is defined
as the ratio of the real power absorbed by the load to the apparent power
flowing in the circuit, and is a dimensionless number in the closed interval
of −1 to 1. A power factor of less than 1 indicates the voltage and current
are not in phase, reducing the instantaneous product of the two. In a perfect
situation the Power Factor is close to 1.
4.
Voltage
- Voltage, also called electromotive force, is a quantitative ex-
pression of the potential difference in charge between two points in an
electrical field.
You can download your history by going to
https://my.shelly.cloud/
in a
browser on a PC.
Manufacturer:
Allterco Robotics EOOD
Address:
Sofia, 1407, 103 Cherni Vrah Blvd.
Tel.:
+359 2 988 7435
E-mail:
Web:
http://www.Shelly.cloud
The Declaration of Conformity is available at:
https://Shelly.cloud/declara
-
tion-of-conformity/
Changes in the contact data are published by the Manufacturer at the offi
-
cial website of the Device:
http://www.shelly.cloud
The User is obliged to stay informed for any amendments of these warranty
terms before exercising his/her rights against the Manufacturer.
All rights to trademarks of Shelly® , and other intellectual rights associated
with this Device belong to Allterco Robotics EOOD.
•
Step 5
- Enter Discovered Devices and choose the Device you want to
include in your account.
•
Step 6
- Enter a name for the Device (in the Device Name field). Choose a
Room, in which the Device has to be positioned. You can choose an icon or
add a picture to make it easier to recognize. Press “Save Device”.
•
Step 7
- To enable connection to the Shelly Cloud service for remote con-
trol and monitoring, press “YES” on the following pop-up.
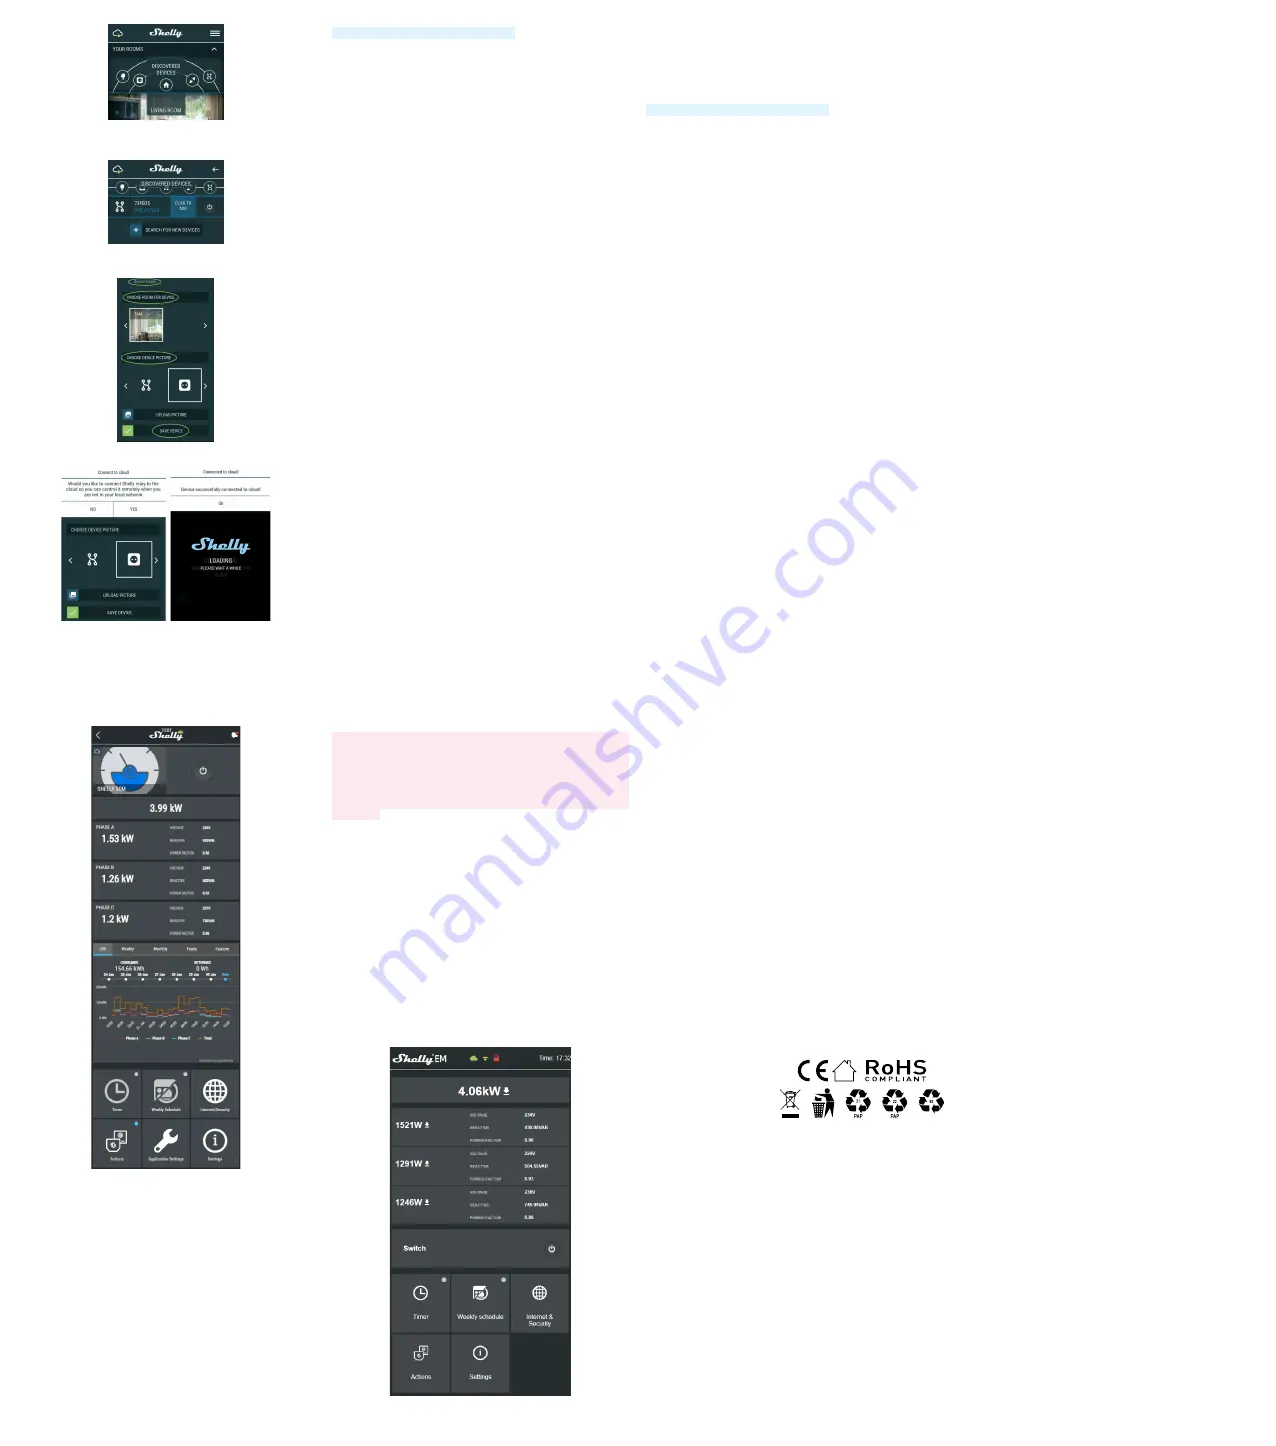
Shelly Devices Settings
After your Shelly device is included in the app, you can control it, change its
settings and automate the way it works. To switch the relay of the Device on
and off, use the respective Power button. To enter at the Details menu of the
respective Device, simply click on its name. From the details menu you may
control the Device, as well as edit its appearance and settings.
Details menu
Here you will see the momentary:
•
Consumption - in Watts
•
Voltage -in Volts
•
Reactive power – in Volt-Ampere Reactive (VAR)
•
Power Factor – in the range of -1 to 1 Below that you will see the history
graph for the last year for:
•
Consumption*
•
Voltage –with a lowest and highest measurement
*If you have connected your solar panel to Shelly 3EM, it will be shown in
green color.
Settings
Timer
Manage the power supply automatically
•
Auto OFF:
After turning on, the power supply will automatically shutdown
after a predefined time (in seconds). A value of 0 will cancel the timer.
•
Auto ON:
After turning off, the power supply will be automatically turned
on after a predefined time (in seconds). A value of 0 will cancel the timer.
Weekly Schedule
This function requires an internet connection.
Shelly receives actual information about the time of sunrise and sunset in
your area. Shelly may turn on/off automatically at a predefined time, at sun
-
rise/sunset, or at a specified time before or after sunrise/sunset.
Internet/Security
•
WiFi Mode - Client:
Allows the device to connect to an available WiFi net-
work. After typing the details in the respective fields, press Connect.
•
WiFi Client Backup:
Allows the device to connect to an alternative WiFi
network, if the primary is not available. After typing the details in the respec-
tive fields, press Set.
•
WiFi Mode - Access Point:
Configure Shelly to create a Wi-Fi Access point.
After typing the details in the respective fields, press Create Access Point.
•
Cloud:
Enable or Disable connection to the Cloud service.
•
Restrict Login:
Restrict the web interface of Shely with a Username and
Password. After typing the details in the respective fields, press Restrict
Shelly.
Settings
•
Power On Default Mode
- This sets the default output state when Shelly
is powered.
-
ON: Configure Shelly to turn ON, when it has power.
-
OFF: Configure Shelly to turn OFF, when it has power.
-
Restore Last Mode: Configure Shelly to return to last state it was in, when
it has power.
•
Firmware Update
- Update the firmware of Shelly, when a new version
is released.
•
Time Zone and Geo-location
- Enable or Disable the automatic detection
of Time Zone and Geo-location.
•
Factory Reset
- Return Shelly to its factory default settings.
•
Device Information
- Here you can see the:
- Device ID - Unique ID of Shelly
- Device IP - The IP of Shelly in your Wi-Fi network
- Device Type – The type of your Shelly device
- WiFi Name – the Name (SSID) of the WiFi network to which your Shelly
is connected
- WiFi Signal - the Signal strength of the WiFi network to which your Shelly
is connected
Edit Device
From here you can edit:
•
Device Name
•
Device Room
•
Device Picture
When you are done, press
Save Device
. Some of the features of the Shelly
Cloud mobile application are available at
https://my.shelly.cloud/
as well.
The Embedded Web Interface
Еven without the mobile app, Shelly can be set and controlled through a
browser and WiFi connection of a mobile phone, tablet or PC.
Abbreviations Used:
•
Shelly-ID
– the unique name of the Device. It consists of 6 or more char-
acters. It may include numbers and letters, for example 35FA58.
•
SSID
– the name of the WiFi network, created by the Device, for example
shellyem3-35FA58.
•
Access Point (AP)
– the mode in which the Device creates its own WiFi
connection point with the respective name (SSID).
•
Client Mode (CM)
– the mode in which the Device is connected to another
WiFi network.
Installation/Initial inclusion
•
Step 1
- Install Shelly to the power grid following the schemes described
above and place it into the console. After turning the power on Shelly will
create its own WiFi network (AP).
WARNING!
In case the Device has not created its own WiFi network with
SSID like shellyem3-35FA58 check if you have connected Shelly correctly
by the schemes described above. If you do not see an active WiFi network
with SSID like shellyem3-35FA58, reset the Device. In order to reset the de-
vice, you will need physical access to it. On the front of the device, you will
see a button. Press and hold it for 10 seconds. Shelly should return to AP
Mode. If not, please repeat or contact our customer support at:
support@
shelly.cloud
•
Step 2
- When Shelly has created an own WiFi network (own AP), with
name (SSID) such as shellyem3-35FA58. Connect to it with your phone,
tablet or PC.
•
Step 3
- Type 192.168.33.1 into the address field of your browser to load
the web interface of Shelly.
General - Home Page
This is the home page of the embedded web interface.
Here you will see information about:
•
Total electrical consumption of all channels
•
Current electrical consumption, Voltage, Reactive power and Power Fac-
tor of Channel A
•
Current electrical consumption, Voltage, Reactive power and Power Fac-
tor of Channel B
•
Current electrical consumption, Voltage, Reactive power and Power Fac-
tor of Channel C
•
Power Button
•
Connection to Cloud
•
Present time
•
Settings
Shelly 3EM can store in his internal memory history for 365 days. You can down-
load it in .xml format by clicking the download button next to the channel info.


