background image


1

2

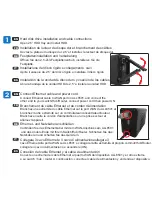
Installation du lecteur de disque dur et branchement des câbles

Ouvrez le plateau du disque dur 2,5” et installez le lecteur de disque dur.

FR

Instalación de la unidad de disco duro y coexión de los cables

Abra la bandeja de la unidad HDD de 2,5” e instale la unidad HDD.

ES

Installazione del disco rigido e collegamento  cavi

Aprire il vassoio da 2.5” del disco rigido e installare il disco rigido.

IT

Festplatteninstallation und Verkabelung

Öffnen Sie den 2,5-Zoll-Festplatteneichub, installieren Sie die 

Festplatte.

DE

Hard disk drive installation and cable connections

EN

Open 2.5” HDD tray and install HDD.

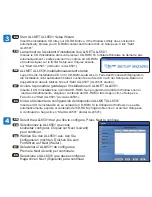
Branchement du câble Ethernet et du cordon d’alimentation

Branchez une extrémité du câble Ethernet sur le port WAN du ALL6501 et 

branchez l’autre extrémité sur un commutateur/concentrateur/routeur. 

Branchez ensuite le cordon d’alimentation sur une prise secteur et 

allumez l’appareil.

FR

Conexión del cable Ethernet y el cable de alimentación

Conecte un extremo del cable Ethernet al puerto WAN del dispositivo ALL6501 y el otro extremo 

a su switch / hub / router. A continuación, conecte el cable de alimentación y encienda el dispositivo.

ES

Collegare il cavo Ethernet e il cavo di alimentazioneollegare il 

cavo Ethernet alla porta WAN su ALL6501 e collegare l’altra estremità al proprio commut/Hub/Router, 

collegare il cavo di alimentazione e accendere (ON).

IT

Ethernet- und Netzkabel anschließen

Verbinden Sie das Ethernetkabel mit dem WAN-Anschluss am ALL6501

 und das andere Ende mit Ihrem Switch/Hub/Router. Schließen Sie das 

Netzkabel an und schalten Sie das Gerät ein.

DE

Connect Ethernet cable and power cord

Connect Ethernet cable to WAN port on ALL6501 and connect the 

other end to your switch/Hub/Router, connect power cord then power ON.

EN

Summary of Contents for ALL6501

Page 1: ...V1 0 Quick Installation Guide Guide d Installation Rapide Kurzanleitung Guida rapida all installazione Guía de instalación rápida ALL6501 ...

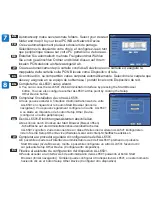
Page 2: ...mmutateur concentrateur routeur Branchez ensuite le cordon d alimentation sur une prise secteur et allumez l appareil FR Conexión del cable Ethernet y el cable de alimentación Conecte un extremo del cable Ethernet al puerto WAN del dispositivo ALL6501 y el otro extremo a su switch hub router A continuación conecte el cable de alimentación y encienda el dispositivo ES Collegare il cavo Ethernet e i...

Page 3: ...en el archivo Setup exe A continuación haga clic en Start ALL6501 Iniciar ALL6501 ALLNET ALL6501 Installationsassistent starten Legen Sie die Installations CD in Ihr CD ROM Laufwerk ein Falls das Windows Hilfsprogramm die Installation nicht automatisch startet suchen Sie auf der CD nach der Setup exe Datei und doppelklicken darauf Klicken Sie auf Satrt ALL6501 ALL6501 starten DE FR Sélectionnez le...

Page 4: ...Next suivant pour continuer ES Se detectarán todas las unidades HDD de su dispositivo ALL6501 Seleccione el nivel RAID que desee utilizar y pulse Next Siguiente para continuar IT Rilevare tutti i dischi rigidi nell ALL6501 selezionare il livello RAID desiderato Premere Next Avanti per continuare DE Erkennen Sie alle Festplatten auf Ihrem ALL6501 wählen Sie Ihren gewünschten RAID Level Drücken Sie ...

Page 5: ...urch Drücken der Start Browser Bwser öffnen Schaltfläche auf die Administrationsbenutzeroberfläche des ALL6501 zugreifen Zudem können Sie an dieser Stelle einen weiteren ALL6501 konfigurieren indem Sie die Setup Other Device Weiteres Gerät einrichten Schaltfläche anklicken IT Completare la procedura guidata di configurazione dell ALL6501 A È possibile accedere all Interfaccia amministratore web de...

Page 6: ...ramms auf Exit Verlassen Nun können Sie den ALL6501 auf Ihrem PC Notebook nutzen EN B Press Exit to exit the Windows Utility and start to use ALL6501 on your PC NB Weitere Einstellungen und Managementfunktion entnehmen Sie bitte dem Handbuch auf der beiliegenden CD Für weitere Informationen oder Online Ressourcen besuchen Sie bitte unsere Website http www allnet de Copyright 2009 Allnet Networks A...

Reviews: