

Easy Start Guide
ALL168211 Device Overview
Setup Diagram
How to add a new ALL168211 to an existing security-
enabled Powerline-Network?
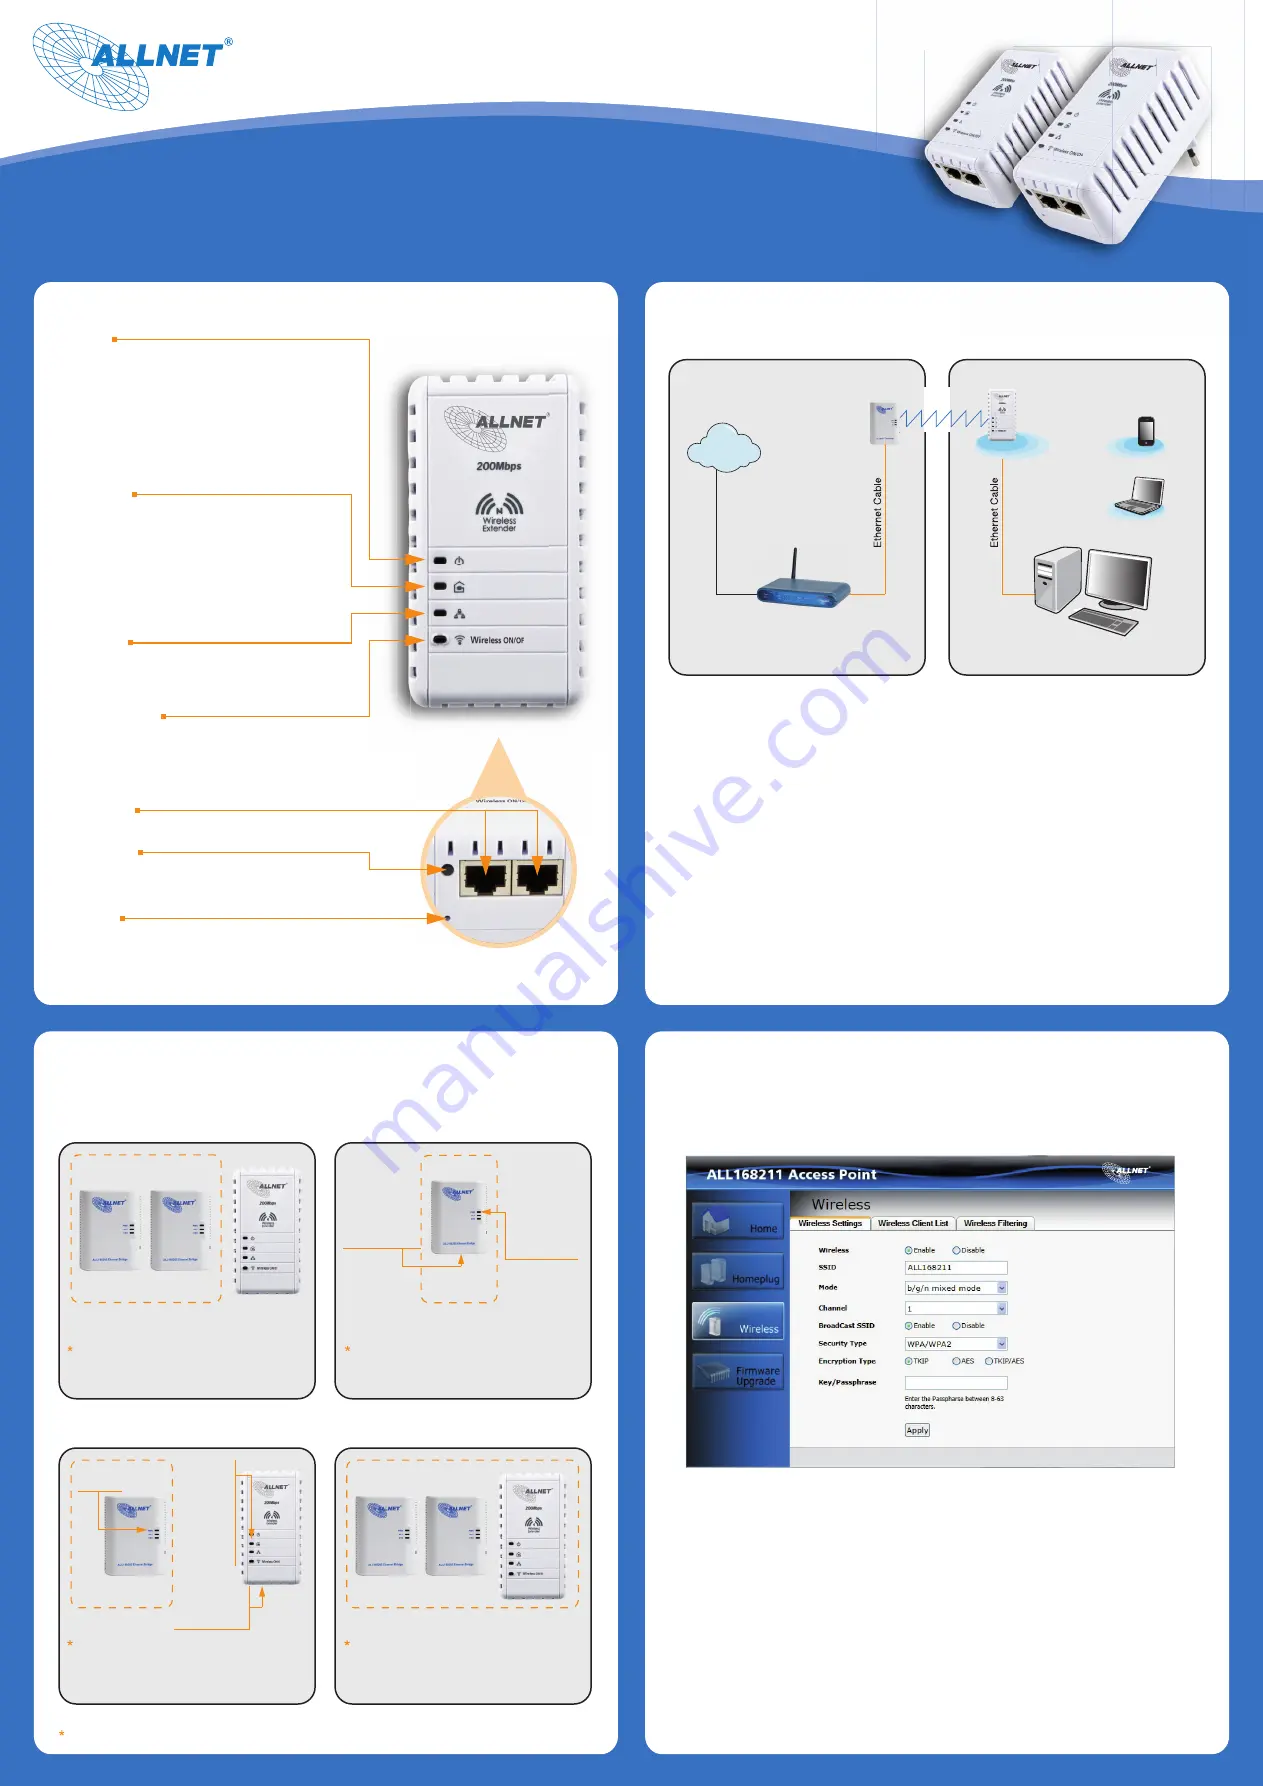
Configure ALL168211 as WLAN Access Point
Power LED
OFF
- No Power.
ON
- After Simple Connect is pressed for two seconds, this LED
will blink to confirm the button is pressed.
- When Simple Connect is pressed for at least 10 seconds,
this LED will blink to confirm the Private Network Name
is reset.
On Power Saving Mode
- Slowly blinking green.
1. Once you have completed the pairing, connect a Powerline Device to a wall
socket in Room 1.
2. Plug one end of the ethernet cable to your Modem/Router and then connect
the other end to the Powerline ethernet port.
3. In Room 2, connect the ALL168211 to a wall socket and check the Powerline
LED behavior. This LED should be ON to ensure that the device is paired with
the Powerline in Room 1.
4. Plug one end of the ethernet cable to your Ethernet device and then plug
the other end to any of the available ethernet port of your ALL168211.
Powerline LED
OFF
- Device is not connected to a HomePlug AV network.
ON
- This LED remains on when the device is part of a
HomePlug AV network.
- The LED colors represents the connection rate within the
HomePlug AV network whether it is bad (red), good
(amber), or excellent (green).
- The LED flashes to indicate network activity.
Ethernet LED
OFF
- An Ethernet device is not connected.
ON
- An Ethernet device is connected.
- The LED flashes to indicate Ethernet activity.
Wireless LED/Button
LED OFF
- Wireless is disabled.
LED ON
- Wireless is Enabled.
- The LED flashes to indicate wireless activity.
The LED is also a button, which can enable or disable wireless function.
Ethernet Ports
This is where you connect your Ethernet devices. (10/100 Mbit)
Connect-Button
- Press for 2 seconds to initiate pairing.
- Press for 10 seconds to randomize the private network name.
Reset-Button
Press for 3 seconds to restore factory defaults.
ALL168211 Wireless N Extender
ALLNET HomePlug devices are configured with a common Private Network Name, adding new HomePlug
devices to an existing network with the default factory configuration is as easy as plugging the device to thepower
outlet. The Simple Connect button makes it easy to activate both the security for the network and create multiple networks on the same
power line.
Schritt 1
Schritt 2
The ALL168211 is compatible with other HomePlugAV 200Mbps.
By default your wireless connection is 'Enabled'. Using your ALL168211 Utility allows
you to configure your wireless settings. Install the CD utility that comes with the
package and then follow the steps below.
1. Plug one end of the ethernet cable to your Computer and then connect the
other end to the ALL168211 ethernet port.
2. Open your ALL168211 Utility and select the Wireless Tab.
3. Select Wireless Settings, this page allows you to change your Wireless Settings.
4. Select Enable to enable your wireless connection.
5. By default your SSID is „ALL168211“. You may change this SSID to your desired
SSID on the SSID Box.
6. For Broadcast SSID select Enable to broadcast your device wireless
network name.
7. It is recommended to set your Wireless Security to avoid unauthorized
connection to your network. Set your desired Wireless Security then click
Save to save your settings. We recommend to use WPA2 as Security Type.
Existing Network
Existing
Powerline-Network
Plug the additional ALL168211 to a power outlet near
your existing HomePlug network so that you can
observe the LED behavior on the individual ALL168211.
Pressing the Simple Connect button for 2 secs, this will
trigger the unit to search for another Simple Connect
enabled Powerline Device, a time window of 2 mins is
programmed on the device.
Press the Simple
Connect button für 2
secs on either
Powerline Device.
Blinking
POWER LED
The POWER
LED will start
to blink.
NOTE: If the
POWER LED
did not blink,
repeat the
step until you
got the
POWER LED
blinking
Press the Simple
Connect button for 2
secs on the additional
ALL168211
1.
2.
Upon release, the
POWER LED will blink
continuously for 2
mins.
NOTE: If nothing
happened on the
POWER LED, try
further by pressing the
same button for 2 secs.
Additional
ALL168211
Schritt 3
Schritt 4
from the
existing network
Neues Powerline-Netzwerk
Make sure you do this action within 2 mins after
pressing the Simple Connect button on the first
Powerline. The LEDs on both devices will switch OFF
and ON twice to signify they are searching for the
other device to pair with.
All Powerline LED will be ON upon getting the
additional ALL168211 join the existing network.
NOTE: IF the Powerline LED on ALL168211 is not ON,
repeat steps 1-4.
3.
2.
1.
Room 1
Room 2
Computer
Modem/Router
Notebook
Wireless Smartphone
Broadband
Internet
Powerline


