


Chapter 4: Installing the GS970EMX/10 Switch on a Wall
66
5. Place the switch and brackets on a table.
6. For a wooden wall, use a stud-finder to determine if there are any live
electrical wires at the screw hole locations.
7. If required, pre-drill the screw holes on the wall. For a concrete wall,
observe the following:
Set the drill to hammer and rotation mode to break up the concrete
and clean out the hole.
Clean out the holes with a brush or compressed air.
8. If required, install wall anchors.
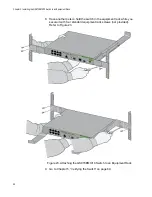
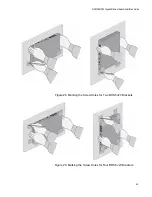
9. Attach the bottom BRKT-J23 brackets to the wall with appropriate
screws. Refer to Figure 30.
Figure 30. Attaching the Bottom BRKT-J23 Brackets to the Wall
Summary of Contents for GS970EMX/10
Page 1: ...613 003019 Rev A GS970EMX 10 Gigabit Layer 3 Ethernet Switch Installation Guide...
Page 6: ...6...
Page 10: ...Figures 10...
Page 12: ...Tables 12...
Page 16: ...Preface 16...
Page 36: ...Chapter 1 Overview 36...
Page 48: ...Chapter 2 Beginning the Installation 48...
Page 88: ...Chapter 7 Troubleshooting 88...