Allied Telesis AT003-HDR Manual Download Page 31


27 

Menu  Settings 


2. 

Low  Power  Consumption:  Here  you  may  Enable  /  Disable  the  low  power 

consumption mode. This mode provides power savings when the receiver 

is Stand-by mode. 

Press [Exit] button to leave this menu. 
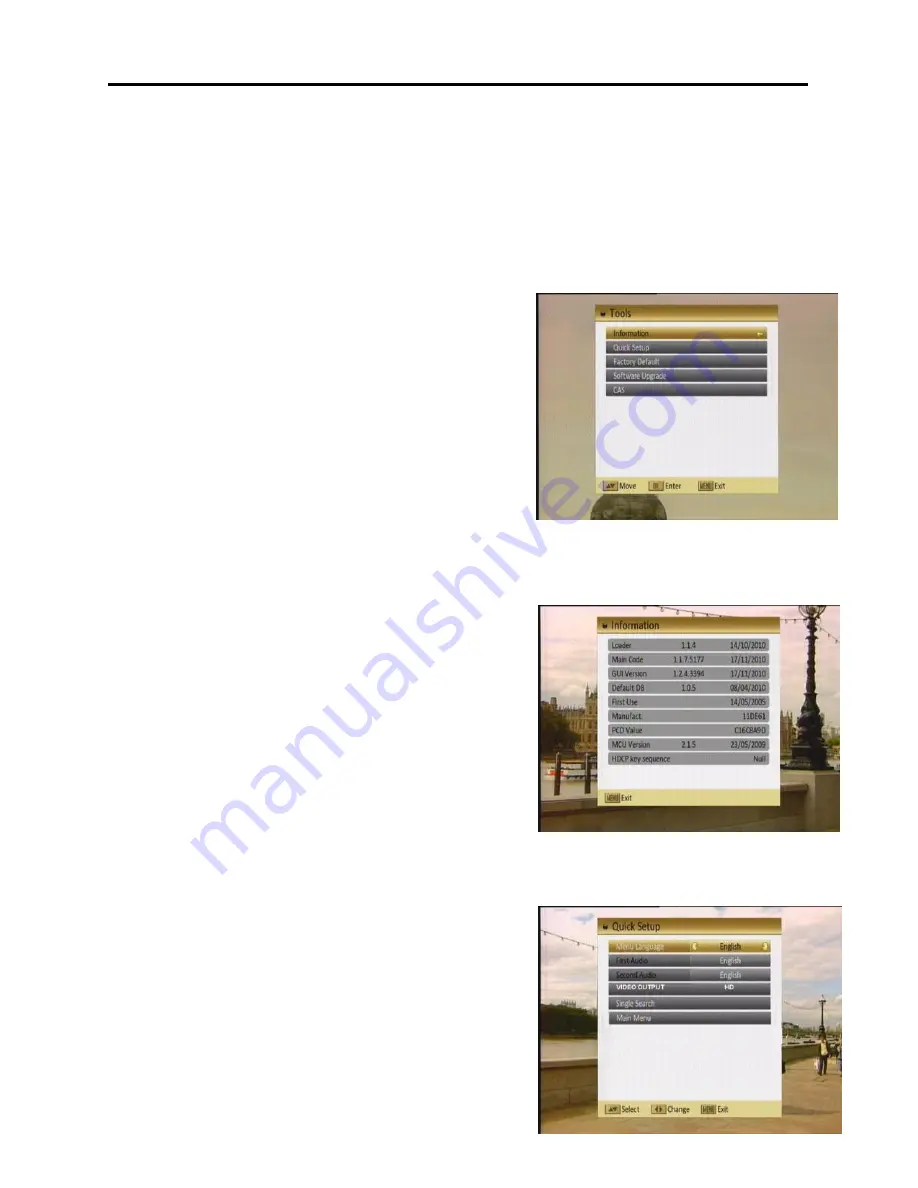


6.    Tools 

When you enter to “Tools” menu, you will see a 
screen as shown here: 
In “Tools” menu: 
1. 

Press [CH▲/▼] to select the wanted item 
among Information, Quick Setup, Factory 

Default, Software Upgrade, and CAS. 

2. 

Press [OK] to enter the selected item. 


6.1    Information   

1. 

When  you 

are  in  „Tools‟  menu,  you  may 

press the „INFO‟ button on remote to see 
the  “Information”  menu.  The  screen 
displays data about the current channel.   

2. 

Press 

[Exit] 

button 

to 

leave 

the 

information display. 


6.2    Quick  Setup 

When the Settop is first used, use this menu to 

quickly and easily set the: Menu Language, 

First Audio, Second Audio, Video Output, 

Cable Search and Main Menu. 


Summary of Contents for AT003-HDR

Page 1: ...AT003 HDR...

Page 2: ...er cord from being walked on or pinched particularly at plugs convenience receptacles and the point where they exit from the apparatus 11 Only use attachments accessories specified by the manufacturer...

Page 3: ...interference in a residential installation This equipment generates uses and can radiate radio frequency energy and if not installed and used in accordance with the instructions may cause harmful inte...

Page 4: ...e point where they exit from the unit Object and Liquid Entry Never put objects of any kind into this unit through openings as they may touch dangerous voltage points or short out parts that could res...

Page 5: ...K 10 2 12 MENU 10 2 13 EXIT 10 2 14 PAUSE 10 2 15 ZOOM 11 2 16 INFO 11 3 Channel 12 3 1 TV Channel List 12 3 1 1 Favorite 13 3 1 2 Move 13 3 1 3 Sort 14 3 1 4 Edit 14 3 1 5 Find 16 3 2 Radio Channel L...

Page 6: ...ade 29 6 5 CAS 29 7 Media Management 30 7 1 Media List 30 7 1 1 All 31 7 1 2 Music 34 7 1 3 Picture 34 7 1 4 Video 34 7 1 5 Music List 34 7 1 6 Picture List 35 7 1 7 Video list 35 7 1 8 Record list 35...

Page 7: ...All Settop settings can be easily configured via the user interface Settop Menu 1 2 Front Panel Description 1 POWER Button Used to switch the Settop between the ON mode and Standby mode Make sure the...

Page 8: ...5 MENU This button allows you to enter the Settop Menu making it possible to set the Settop features to your preference without using the remote control This button will also allow you to exit all Me...

Page 9: ...your TV Audio Input jacks 5 HDMI High Definition Multimedia Interface connection This connection enables secure distribution of uncompressed high definition video and audio in a single cable Because...

Page 10: ...6 Remote Control Panel Description 1 4 Remote Control Description...

Page 11: ...gnal display is shown A The channel you selected has no signal This can be caused by several reasons 1 The channel you selected currently has no programming from your cable provider Select another cha...

Page 12: ...L 2 5 LAST Press the LAST button to toggle between the current channel and the previously selected channel 2 6 Channel Numbers Enter the channel number directly with your remote control and confirm th...

Page 13: ...enter into the following screen 2 Use the VOL buttons to select the chosen icon then press the OK button to set that action Press the EXIT button to return to the original EPG screen 3 Press the GREE...

Page 14: ...normal TV viewing You may also use the OK button to direct tune a channel First enter the desired Channel number using the remote control number keys then press OK to tune that channel You also use t...

Page 15: ...ll enlarge to ZOOM x2 Press Zoom again and repeat until you reach the desired magnification Zoom has the following possible magnification settings x1 x2 x4 x6 x8 x12 x16 3 In x2 x16 Zoom mode use the...

Page 16: ...List menu allows you to modify the channel list to your preference Note When in this menu use the color buttons on your remote control to correspond to the color coded function for example the Green...

Page 17: ...ite groups are indicated with a favorite icon behind the name 3 1 2 Move Pressing the Red button in the TV channel list will open another window where you can choose between move the actual channel an...

Page 18: ...r entering the password will open The default password is 0000 You can delete skip lock and edit the channel Press MENU to leave the channel editing The system will ask you to confirm the saving of th...

Page 19: ...the changes when you leave this menu 3 1 4 4 Edit Pressing the Blue button in the TV channel list edit menu will open another window where you can choose between edit the actual channel and create a n...

Page 20: ...d press OK to exit the edit mode without saving the new channel 3 1 5 Find 1 Press Blue button to open the Find window like showed beside Press CH Vol to select the leading character of the channel na...

Page 21: ...l that was running when the box has been switched off On the Mode item you can select TV channel On Startup Channel item you can open the channel list by pressing OK Then you can select the channel of...

Page 22: ...xit on the RCU to exit the edit mode without saving the favorite group name 3 5 Delete All To delete all channels 1 Enter the password The default password is 0000 2 After entering the password correc...

Page 23: ...item 4 1 Auto Scan When you enter to Auto Scan menu there will display the screen like right 1 You have to set the parameters of First Frequency therefore use the number buttons of the RCU 2 You have...

Page 24: ...nction Yes or No 5 Moving the highlight to Search item and press OK key to start scanning 6 In the Auto Scan menu press Exit key to draw back from the scanning 5 System Setup When you open the System...

Page 25: ...anguage corresponds with the Second Audio then the default language of the current channel will be played instead 4 Closed Caption In OSD Setting menu use Vol to select On or Off If the current channe...

Page 26: ...imer is running Once Daily Weekly Monthly and Yearly or switch the timer to off Timer Service Select between TV Channel and Message When you select TV Channel timer setting for channel change and Wake...

Page 27: ...ry of the wakeup message from Birthday Anniversary and General Wakeup Date Use the Number buttons to input your wakeup date On Time Use the Number buttons to input your wakeup time If date and time ar...

Page 28: ...Usage is set to Off Press Vol to select one item and use number buttons to input time and date directly Time Display Press Vol to switch this function On or Off NOTE If the current channel provides t...

Page 29: ...ou can set the transparency of the menus Press Vol select the value between 10 20 30 40 and Off means no transparency function 5 Logo From USB Press Vol to select Off and On Set the image as backgroun...

Page 30: ...ssword is known by unauthorized persons To change the password enter the new password in the New Menu Password item and repeat the same one in the Confirm Password item If the passwords are not identi...

Page 31: ...the wanted item among Information Quick Setup Factory Default Software Upgrade and CAS 2 Press OK to enter the selected item 6 1 Information 1 When you are in Tools menu you may press the INFO button...

Page 32: ...0 3 If you select Yes then all changes you made will be reset to default values Make sure you really want to do this 4 Press Exit in both steps will close the window without resetting the receiver 6 4...

Page 33: ...der 1 Your cable provider may update your STB s w automatically Use this menu only if your cable operator requests you do so 6 5 CAS When you enter to CAS menu you will see a screen like shown here CA...

Page 34: ...button to open the Rename window like showed beside Press CH Vol to select the leading character of the channel name and press OK to confirm it If you enter the Media List menu a window like the one b...

Page 35: ...OK to confirm it After entering the character s highlight OK in the window and press OK on the Remote Press Exit button to close the find window This will bring you back to the Record list 2 Delete In...

Page 36: ...o open the New Folder window like showed here Press CH Vol to select the leading character of the folder name and press OK to confirm it After entering the character s highlight OK in the window and p...

Page 37: ...e the find window and this takes you back to the Media All list play The play option offers further functions to manage If you enter the play menu a window like the one shown here will open The color...

Page 38: ...as all 7 1 5 Music List The color buttons offer further functions to manage Delete In media list menu press Green button will open another window where you can choose between add one image and add all...

Page 39: ...ters Brush Slide Random and Fade Mp3 On and Off 7 1 7 Video list Basically the operation of Video List is same as Music List 7 1 8 Record list If you enter the Record list menu a window like the one b...

Page 40: ...Vol to switch select copy path Select OK to add all images Select Cancel to cancel the operation Delete In channel Record menu press Red button will open another window where you can choose between ad...

Page 41: ...p of I I operation 3 Record Type Press Vol to switch between TS and PS 4 Disk Press Vol to switch between C D 5 Format Disk If you want to delete the hard disk totally you can do it with the OK Button...

Page 42: ...32 44 1 48 DEMODULATOR Demodulation 16 256 QAM Annex B INPUT SIGNAL RF Input Type F 75 Ohms Frequency 54MHz 864MHz Input level 20dBmV 20dBmV OUTPUT Connections V L R Composite Video and analog L R aud...

Reviews: