background image

22

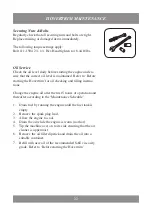
Securing Nuts & Bolts

Regularly check that all securing nuts and bolts are tight. 

Replace missing or damaged items immediately.

The following torque settings apply:

Bolt 111-1504 2 ¼ x ¼ Hex Head tighten to 18.44 ft/lbs.

Oil Service

Check the oil level daily before starting the engine and en-

sure that the correct oil level is maintained. Refer to ‘Before 

starting the Hovertrim’ for oil checking and filling instruc

-

tions.

Change the engine oil after the first 5 hours of operation and 

thereafter according to the ‘Maintenance Schedule’.

1.  Drain fuel by running the engine until the fuel tank is  


empty.

2.  Remove the spark plug lead.

3.  Allow the engine to cool.

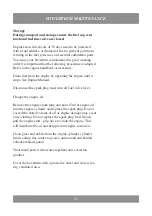
4.  Drain the oil while the engine is warm (not hot).

5.  Tip the machine over on to its side ensuring that the air  


cleaner is uppermost.

6.  Remove the oil filler dipstick and drain the oil into a  


suitable container.

7.  Refill with new oil of the recommended SAE viscosity  


grade. Refer to ‘Before starting the Hovertrim’.

HOVERTRIM MAINTENANCE

Summary of Contents for XR16 Hovertrim

Page 1: ...XR16 Hovertrim OWNER S HANDBOOK Original Version EN Issue 12 01 2011 From Serial No 311000001 Part No 111 2627 C MODELS 185 Hovertrim ...

Page 2: ......

Page 3: ...e 15 Operating the Hovertrim 16 19 Footstop Positions 16 Controls 17 Starting 17 18 Cutting Grass on Flat Ground 18 Cutting Grass on Slopes Banks 18 Stopping 18 Adjusting the Cutting Height Replacement of Nylon Cutting System 19 Before Trimming 19 Hovertrim Maintenance 20 23 Engine 20 Carburettor Adjustments 20 Air Cleaner Service 20 Spark Plug Service 21 Keeping the Engine Clean 21 Deck Housing 2...

Page 4: ......

Page 5: ...s Code 185 Model XR16 Hovertrim Engine Honda Engine Type GXV57 Engine Speed 4800 rpm Fuel Type Unleaded gasoline Fuel Capacity 0 07 gallons Engine Oil Type SAE 10W 30 Oil Sump Capacity 0 06 gallons Cutting Width 16 40cm Dry Weight 27 5 lbs MAIN FEATURES SPECIFICATIONS 7 8 14 3 15 9 11 10 17 13 2 4 16 1 HAY G00108 B 12 18 5 6 Sound Pressure level The sound pressure level at the Operator s position ...

Page 6: ...s handbook also constitute essential elements of the intended use This machine should be operated serviced and repaired only by persons who are familiar with its particular characteristics and who are acquainted with the relevant safety procedures The safety precautions listed in this handbook and all other generally recognised regulations on safety must be observed at all times Any arbitrary modi...

Page 7: ...rts This warranty does not apply to any unit that has been tampered with altered misused abused or used for hire and will become invalid if non genuine parts are fitted This war ranty does not cover for minor mechanical adjustments unless they are due to defective material or workmanship Consult the Owner s Handbook or an Authorised Service Dealer for assistance when making these adjustments To ma...

Page 8: ...tor controls and safety signs All operators and mechanics should be trained The owner is responsible for accidents or injuries occurring to themselves other people or property Never let children or untrained people operate or service the equipment Local regulations may restrict the age of the operator Preparation While using the machine always wear substantial footwear and long trousers Do not ope...

Page 9: ... Stale fuel can block the carburettor and cause leakage Check that the operator s presence controls safety switches and shields are attached and functioning properly Do not operate unless they are functioning properly Keep all parts in good working condition and all hardware tightened Replace all worn or damaged decals Never trim while people especially children or pets are nearby A damaged cuttin...

Page 10: ...ating the trimmer in wet grass Be sure of your footing whilst using this product especially when backing up Reduced footing could cause slipping Walk never run Operate across the face of slopes never up and down Slow down and use extra care when making turns or chang ing direction on slopes Be sure to travel in the recommend ed direction on slopes Turf conditions can affect the ma chine s stabilit...

Page 11: ...e Storage Disengage the drive stop the engine and disconnect the spark plug Wait for all movement to stop before adjusting cleaning or repairing Keep hands and feet away from moving parts Clean grass and debris away from the cutting device drive and engine to help prevent fires Clean up oil or fuel spill ages Never store the machine with gasoline in the tank within an enclosed area where fumes may...

Page 12: ... the engine and the sur rounding deck area free of grass leaves or excessive grease If the fuel tank has to be drained this should be done out doors and when the engine is cool Wear strong work gloves when removing and reassembling the cutting device Never replace the cutting mechanisms with metal parts and only use cutting mechanisms which are suitable for use at the operating speed of the machin...

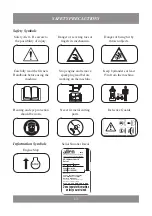
Page 13: ... Engine Stop STOP Hearing and eye protection should be worn Never fit metal cutting parts Keep bystanders at least 15m from the machine 15m Serial Number Decal 2010 Code Serial No 185E 311000001 XR16 Hovertrim 16 Petrol kg RPM kW Manufactured by Hayter Limited Spellbrook Bishop s Stortford Herts England CM23 4BU Contact Seago International Inc 229 Ninth Street NW Hickory NC28601 to source all repl...

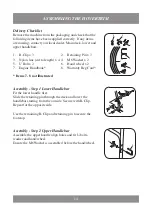
Page 14: ...e Handbook 8 Warranty Reg Card Items 7 8 not illustrated Assembly Step 1 Lower Handlebar Fit the lower handle first Slide the retaining pin through the deck and lower the handlebar starting from the outside Secure with R Clip Repeat for the opposite side Use the remaining R Clip and retaining pin to secure the footstop Assembly Step 2 Upper Handlebar Assemble the upper handle align holes and fit U...

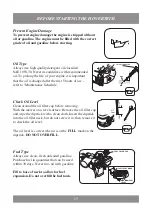
Page 15: ...ter cap before removing With the mower on a level surface Remove the oil filler cap and wipe the dipstick with a clean cloth Insert the dipstick into the oil filler neck but do not screw it in then remove it to check the oil level The oil level is correct when it is at the FULL mark on the dipstick DO NOT OVERFILL Fuel Type Always use clean fresh unleaded gasoline Purchase fuel in quantities that ...

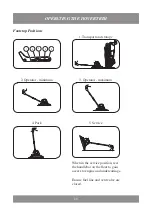
Page 16: ...tions 1 2 3 4 5 1 Transport and storage 2 Operator minimum 3 Operator maximum 4 Park 5 Service When in the service position rest the handlebar on the floor to gain access to engine and undercarriage Ensure fuel line and vent valve are closed ...

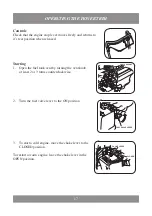
Page 17: ...by turning the vent knob at least 2 or 3 turns counterclockwise 2 Turn the fuel valve lever to the ON position 3 To start a cold engine move the choke lever to the CLOSED position To restart a warm engine leave the choke lever in the OPEN position OPERATING THE HOVERTRIM N E P O FUEL CAP VENT OPEN FUEL VALVE LEVER ON CLOSED CHOKE LEVER OPEN ...

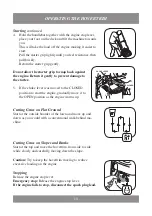
Page 18: ...CLOSED position to start the engine gradually move it to the OPEN position as the engine warms up Cutting Grass on Flat Ground Start at the outside boarder of the lawn and move up and down as you would with a conventional walk behind ma chine Cutting Grass on Slopes and Banks Start at the top and move the hovertrim from side to side while slowly and carefully moving down the slope Caution Try to k...

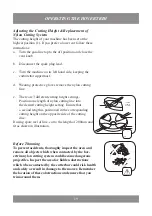
Page 19: ...ing line into the desired cutting height setting Ensure that a second length is positioned in the corresponding cutting height on the opposite side of the cutting disc If using spare reel of line cut to the length of 200mm and fit as shown in illustration Before Trimming To prevent accidents thoroughly inspect the area and remove all objects which when contacted by the hov ertrim nylon cutting sys...

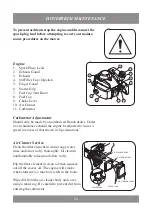
Page 20: ...es should the engine be adjusted to run at a speed in excess of that shown in Specifications Air Cleaner Service Clean the filter element in warm soapy water rinse and allow to dry thoroughly Or clean in nonflammable solvent and allow to dry Dip the filter element in clean oil then squeeze out all the excess oil The engine will smoke when started if too much oil is left in the foam Wipe dirt from ...

Page 21: ...ys in the top cowl and the surrounding deck areas on a daily basis after use Never spray the engine with water during cleaning Water can con taminate the fuel Always clean with a brush or compressed air Grass and debris may clog the engine s air cooling system especially after prolonged operation while cutting tall dry grass The internal cooling fins and surfaces may require cleaning to prevent ov...

Page 22: ...g and filling instruc tions Change the engine oil after the first 5 hours of operation and thereafter according to the Maintenance Schedule 1 Drain fuel by running the engine until the fuel tank is empty 2 Remove the spark plug lead 3 Allow the engine to cool 4 Drain the oil while the engine is warm not hot 5 Tip the machine over on to its side ensuring that the air cleaner is uppermost 6 Remove t...

Page 23: ...sconnect the spark plug lead turn off fuel valve lever Change the engine oil Remove the engine spark plug and pour 15ml of engine oil into the engine cylinder and replace the spark plug Do not exceed the stated volume of oil as engine damage may occur on re starting Do not replace the spark plug lead Slowly pull the engine start grip once to crank the engine This will distribute the oil and help p...

Page 24: ... incorrect 1 Raise height of cut 2 Drain tank and fill with correct fuel 3 Connect spark plug lead 4 Operate engine brake lever 5 Clean and adjust the gap or replace 6 Fill fuel tank 7 Set throttle to start position Engine runs rough 1 Spark plug lead becoming disconnected in use 2 Faulty spark plug 3 Air cleaner blocked 4 Incorrect contaminated fuel 1 Connect spark plug lead 2 Clean and adjust ga...

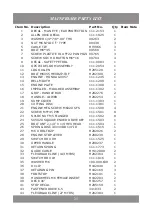
Page 25: ...2276 2 18 HANDLE LOWER H292254 1 19 SUMP COVER 111 1303 1 20 CUTTING DISC 111 1381 1 21 ENGINE MTG SCREW M6X20 SFS 111 1500 4 22 SCREW M5 45 PPD 111 1501 8 23 NYLOC NUT M5 FLANGED 111 1502 8 24 5X5X20 SQUARE ENDED DRIVE KEY 111 1503 1 25 BOLT UNF 2 1 4 X 1 4 HEX HEAD 111 1504 1 26 SPRING DISC 40mmOD 1 4 ID 111 1515 1 27 M6 U BOLT BZP H292026 2 28 ENGINE STOP LEVER H290239 1 29 SWITCH BOX RH 111 15...

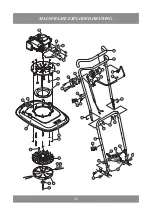
Page 26: ...26 MAINFRAME EXPLODED DRAWING 2 4 6 9 10 11 13 14 15 16 17 18 19 20 21 22 23 24 25 26 27 28 29 30 31 33 34 35 38 40 41 12 4 7 27 39 37 3 36 36 37 8 32 1 5 43 35 43 32 44 ...

Page 27: ...KITS PARTS LISTS Kit Options Parts List Extension Handlebars Item No Description Part No Qty Item Note 1 Throttle Control OPC H292387 1 Not Shown 2 Handwheel H192204 2 Not Shown 3 Handlebar Extension H292392 1 Not Shown ...

Page 28: ...28 NOTES ...

Page 29: ...29 NOTES ...

Page 30: ...30 NOTES ...

Page 31: ...31 NOTES ...

Page 32: ... Manufactured by Hayter Limited Manufactured by Hayter Limited Manufactured by Hayter Limited Allen_logoblack eps ALLEN_logocmyk eps ALLEN_logoPantone eps Allen_haylogoblack eps ALLEN_haylogocmyk eps ALLEN_haylogoPantone eps Seago International Inc 229 Ninth Street NW Hickory NC28601 USA Free Phone 001 800 780 9889 ...

Reviews: