background image

3

HARDWARE CONTENTS

(Shown actual size)

SAFETY INFORMATION

WARNING:

 IMPORTANT:  NEVER attempt any work without shutting off the electricity.

 Go to the main fuse, or circuit breaker, box in your home.  Place the main power switch in the

 "OFF"  position.

 Unscrew the fuse(s), or switch "OFF" the circuit breaker switch(s), that control the power to  

the fixture or room that you are working on.

 Place the wall switch in the "OFF" position.  If the fixture to be replaced has a switch or pull 

chain,  place those in the "OFF" position.

 Do not use bulbs with wattage greater than specified on this fixture.

 WARNING: California Prop 65: This lighting fixture contains chemicals known to the state of 

california to cause cancer, birth defects, and/or other reproductive harm.  Wash hands after 

use. 

CAUTION:

 Read and understand all instructions and illustrations completely before proceeding with  

assembly and installation of this fixture.

 If you have any doubts about how to install this lighting fixture, or if the fixture fails to operate 

completely, please contact a qualified licensed electrical contractor.

 All parts must be used as indicated in these instructions.  Do not substitute any parts, leave 

parts  out, or use any parts that are worn out or broken.  Failure to obey this instruction could  

invalidate the UL listing and/or C.S.A. certification of this fixture.

PREPARATION

Before beginning assembly of product, make sure all parts are present. Compare parts with  

package contents list and hardware contents. If any part is missing or damaged, do not attempt 

to assemble the product. 

Estimated Assembly time:  

30 minutes to 1 hour.

Tools Required for Assembly (not included): Phillips screwdriver, flathead screwdriver, wire 

strippers, electrical tape.

Wire

Connectors

Qty: 2

Threaded

Knobs

Qty: 2

Long

Machine

Screws

Qty: 2

AA

Short

Machine

Screws

Qty: 2

Mounting

Bracket

(Not to scale)

Qty: 1

Ground

Screw

(Not to scale)

Qty: 1

BB

CC

DD

EE

FF

Please read and understand this entire manual before attempting to assemble, operate or install the

product.

Summary of Contents for 0180825

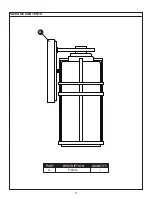
Page 1: ...0 01 ORB WALL LANTERN 1 Questions problems missing parts Before returning to your retailer call our customer service department at 1 866 439 9800 8 a m 6 p m EST Monday Thursday ATTACH YOUR RECEIPT HERE Serial Number Purchase Date 8 a m 5 p m EST Friday ...

Page 2: ...PACKAGE CONTENTS 2 PART QUANTITY DESCRIPTION 1 Fixture A A ...

Page 3: ...re If you have any doubts about how to install this lighting fixture or if the fixture fails to operate completely please contact a qualified licensed electrical contractor All parts must be used as indicated in these instructions Do not substitute any parts leave parts out or use any parts that are worn out or broken Failure to obey this instruction could invalidate the UL listing and or C S A ce...

Page 4: ...d ground screw FF on mounting bracket EE no less than 2 in from wire end Tighten ground screw FF If fixture is supplied with a ground wire connect to outlet ground wire with an extra wire connector not included For installation in Canada If fixture is supplied with ground wire wrap ground wire around ground screw FF on mounting bracket EE Tighten ground screw FF Hardware Used x 1 Mounting Bracket ...

Page 5: ...a u q s d r o C l e l l a r a P h t o o m s d n u o r d r o C l e l l a r a P Clear Brown Gold or Black without Tracer colored stripes Clear Brown Gold or Black with Tracer colored stripes Insulated Wire not green with copper metal conductor Insulated Wire not green with Silver metal conductor ASSEMBLY INSTRUCTIONS x 2 Wire Connectors AA 3 Hardware Used Threaded Knobs x 2 x 2 Long Machine Screws x...

Page 6: ... shades in an automatic dishwasher OPERATING INSTRUCTIONS Mounting surface should be clean dry flat and 1 4 in larger than the canopy on all sides Any gaps between the mounting surface and canopy exceeding 3 16 in should be corrected as required With silicone calking compound caulk completely around where back of canopy meets the wall surface to prevent water from seeping into outlet box Fixture d...

Page 7: ... for the repair or replacement of defective products as provided herein or at the Distributor s sole option Distributor may refund the purchase price of the products THE FOREGOING WARRANTY IS IN LIEU OF ALL OTHER WARRANTIES EXPRESS OR IMPLIED INCLUDING THOSE OF MERCHANTABILITY FITNESS FOR ANY PARTICULAR PURPOSE OR INFRINGEMENT No affirmation of Distributor by words or action other than set forth i...

Page 8: ...ions des problèmes des pièces manquantes Avant de retourner l article au détaillant appelez notre service à la clientèle au 1 866 439 9800 entre 8 h et 18 h HNE du lundi au jeudi ou entre 8 h et 17 h HNE le vendredi JOIGNEZ VOTRE REÇU ICI Numéro de série Date d achat ...

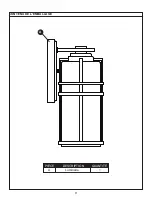
Page 9: ...CONTENU DE L EMBALLAGE 9 PIÈCE QUANTITÉ DESCRIPTION 1 Luminaire A A ...

Page 10: ...t OFF Dévissez les fusibles ou placez en position d arrêt OFF l interrupteur des disjoncteurs qui alimentent le luminaire ou la pièce dans laquelle vous travaillez Placez l interrupteur mural en position d arrêt Si le luminaire à remplacer est doté d un interrupteur à bouton ou à chaîne placez le en position d arrêt OFF N utilisez pas d ampoules dont la puissance dépasse la puissance nominale indi...

Page 11: ...BB Placez le support de fixation EE de façon à ce que la partie centrale surélevée sorte du côté de la boîte de sortie consultez la figure 1 Enroulez le fil de mise à la terre de la boîte de sortie autour de la vis de mise à la terre FF du support de fixation EE à au moins 5 cm de l extrémité du fil Serrez la vis de mise à la terre FF Si le luminaire est muni d un fil de mise à la terre reliez le ...

Page 12: ... COULEUR BLANCHE DE LA BOÎTE DE SORTIE AU FIL SUIVANT Noir Cordon parallèle rond et lisse Clair brun doré ou noir sans repère rayures colorées Fil isolé pas vert avec âme en cuivre métallique Blanc Cordon parallèle carré et nervuré Clair brun doré ou noir avec repère rayures colorées Fil isolé pas vert avec âme métallique argentée INSTRUCTIONS POUR L ASSEMBLAGE x 2 Capuchons de connexion AA 3 Quin...

Page 13: ... 5 mm Appliquez un calfeutrant à base de silicone tout autour du périmètre du couvercle à la jonction du couvercle et de la surface du mur pour empêcher l eau de s infiltrer dans la boîte de sortie Vérifiez toujours que le courant est coupé avant de nettoyer le luminaire Utilisez un linge doux et humide ainsi qu un savon non abrasif N utilisez jamais de nettoyants pour vitres vous risqueriez d end...

Page 14: ...lé aux présentes ou à sa seule discrétion le distributeur peut choisir de rembourser le prix d achat des produits LA GARANTIE SUSMENTIONNÉE PRÉVAUT SUR TOUTE AUTRE GARANTIE QU ELLE SOIT EXPRESSE OU IMPLICITE Y COMPRIS TOUTE GARANTIE DE QUALITÉ MARCHANDE D ADÉQUATION À UN USAGE PARTICULIER OU DE NON CONTREFAÇON Aucune affirmation de la part du distributeur qu elle se traduise en mots ou en action n...

Page 15: ...problemas piezas faltantes Antes de volver a la tienda llame a nuestro Departamento de Servicio al Cliente al 1 866 439 9800 de lunes a viernes de 8 a m a 6 p m y los viernes de 8 a m a 5 p m hora estándar del Este ADJUNTE SU RECIBO AQUÍ Número de serie Fecha de compra ...

Page 16: ...CONTENIDO DEL PAQUETE 16 PIEZA CANTIDAD DESCRIPCIÓN 1 Lámpara A A ...

Page 17: ...entación principal en la posición OFF apagado Desatornille el o los fusibles o coloque el interruptor de circuito que controla la alimentación del ensamble o habitación en la que trabaja en la posición OFF apagado Coloque el interruptor de la pared en la posición OFF apagado Si la lámpara a reemplazar posee un interruptor o cadena de tiro colóquelos en la posición OFF apagado No utilice bombillas ...

Page 18: ...ontaje EE de modo tal que la sección central elevada sobresalga hacia el interior de la caja de salida Consulte la fig 1 Coloque el conductor de puesta a tierra de la caja del tomacorriente alrededor del tornillo de puesta a tierra FF en la abrazadera de montaje EE a no menos de 5 08 cm del extremo del conductor Apriete el tornillo de puesta a tierra FF Si la lámpara cuenta con un conductor de pue...

Page 19: ...do o negro sin líneas rayas de colores Conductor con aislamiento no verde con conductor de cobre CONECTE EL CONDUCTOR DEL SUMINISTRO DEL TOMACORRIENTE BLANCO NEUTRO AL Blanco Cordón paralelo cuadrado y rígido Claro Marrón Dorado o Negro con líneas rayas de colores Conductor con aislamiento no verde con conductor de plata INSTRUCCIONES DE ENSAMBLAJE x 2 Conectores de cables AA 3 Aditamentos utiliza...

Page 20: ...e corregir según corresponda Con un compuesto de calafateo de silicona calafatee completamente alrededor del punto donde la parte posterior de la base se una con la superficie de la pared para evitar que el agua se filtre dentro de la caja del tomacorriente Siempre asegúrese de que la corriente eléctrica esté desconectada antes de limpiar Utilice un paño húmedo suave y jabón suave no abrasivo para...

Page 21: ...istribuidor será para la reparación o el reemplazo de los productos con defectos tal como se indica aquí o a discreción del distribuidor y este último podrá reembolsar el precio de compra de los productos LA GARANTÍA ANTERIOR REEMPLAZA EXCLUSIVAMENTE A TODAS LAS DEMÁS GARANTÍAS EXPRESAS O IMPLÍCITAS INCLUIDAS AQUELLAS DE COMERCIABILIDAD O IDONEIDAD PARA UN FIN EN PARTICULAR O RESPECTO DE INFRACCIO...

Reviews: