


6
3.1 USB AUDIO INTERFACE
A built-in 4 in, 4 out, 24-bit/96kHz USB Audio Interface allows for studio-quality recording
direct from your mixer to your PC without the need of any additional equipment. This is
class-compliant (plug-and-play) for Mac and iOS devices. (iOS devices require a camera
connection kit). Simply connect a USB cable between the USB port on the mixer and the
USB port on your computer or device.
For Windows systems, driver software must be installed in order for it to work.
The latest drivers and documentation can be found at
www.allen-heath.com/downloads
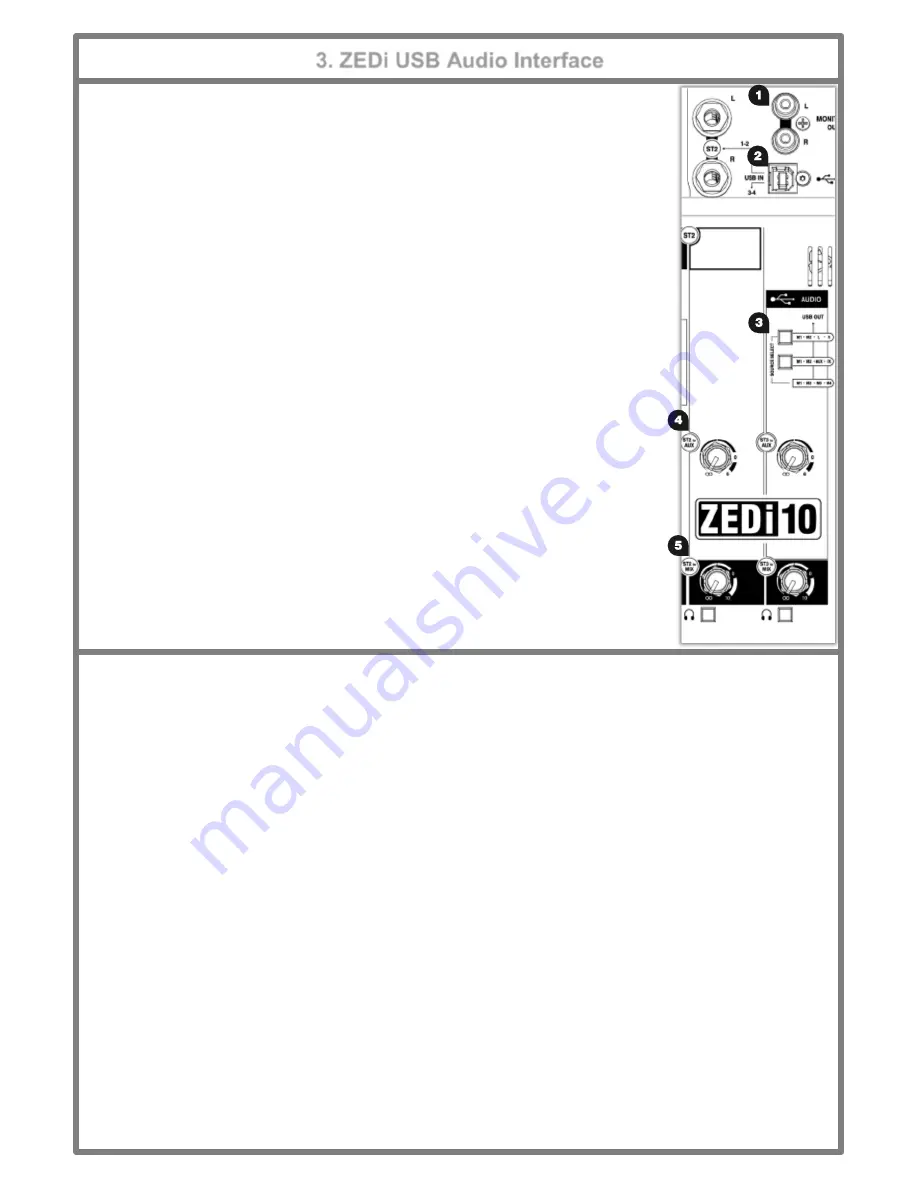
1. MONITOR OUT
is an unbalanced stereo line level output using standard RCA
phono sockets.
This could be used for connecting to external equipment such as
monitor speakers or a phones/ in-ear monitoring system.
2. USB connector
is a Type-B USB connector for multi-channel bi-directional audio
streaming between the mixer and a computer and follows the high speed USB 2.0
standard.
3. USB OUT
SOURCE SELECT
buttons allow you to chose where the signal to the
outputs of the USB interface output is taken from.
M1 - M2 - AUX - FX
selects the
USB OUT
source from channels
M1, M2
and the
AUX and FX buss outputs and has priority over the default
M1 - M2 - M3 - M4
source
select.
M1 - M2 - L - R
selects the
USB OUT
source from channels
M1, M2 & MAIN MIX
and has priority over the
M1 - M2 - AUX - FX
source select switch.
If neither of these buttons are selected the default channel
USB OUT
source is taken
directly from channels
M1 - M2 - M3 - M4
.
4. ST2 and ST3 to AUX send
control the level of signal sent to the
AUX OUT
.
This
is useful for routing
USB IN 1
-
2
and
USB IN 3
-
4
to the PHONES or MONITOR OUT
5. ST2 & ST3 MIX
rotary faders control the volume of the
USB IN 1-2
or
USB IN 3-4
signals into the
MAIN MIX
respectively.
3. ZEDi USB Audio Interface
3.2 Troubleshooting USB Audio Interface problems
Playback and recording problems when using the
ZEDi USB Audio Interface
can be avoided by following the steps
below:
Minimum System Requirements:
Ensure that your PC exceeds the Minimum System Requirements of the
Digital Audio Workstation software that you are using to guarantee reliable performance and recording without pops,
clicks, dropouts, or distortion in audio.
Latest Driver Software:
For Windows systems it’s best to have the latest driver software installed.
Go to
http://www.allen-heath.com/downloads
for the latest driver software and documentation.
Audio Buffer Size:
The audio buffer setting helps avoid pops, clicks, and dropouts by processing audio in
blocks, but can also cause latency, a delay in the time it takes for audio to be processed and recorded or played back.
Ideally the buffer size should be set as low as possible to minimize latency, whilst avoiding pops, clicks, and dropouts.
USB Hubs:
Sharing USB ports via a hub may cause a reduction in the USB bandwidth available to the Audio
Interface. It’s best to connect audio interfaces directly to the USB port on your PC.
Ground Loops and Hum:
Mains Ground Loops which cause low frequency noise or hum between audio
devices can be avoided by powering devices from the same mains outlet via a suitable multi-socket extension. If
you’re still experiencing this try disconnecting your laptop power supply as they are commonly the cause. Where
possible, using balanced audio cables will also help.
Feedback Loops:
It’s possible to create an internal feedback loop between the mixer and DAW software when
recording the L-R stereo mix. Beware of returning monitoring signals from your DAW to the mix as the feedback can
build up very quickly and potentially damage speakers or other equipment. Either mute the record-enabled channels
in the DAW or turn down the
MIX
control on the
USB IN
channel and use
PFL
to monitor the signal from the DAW.
!


