XONE:464
User Guide
11
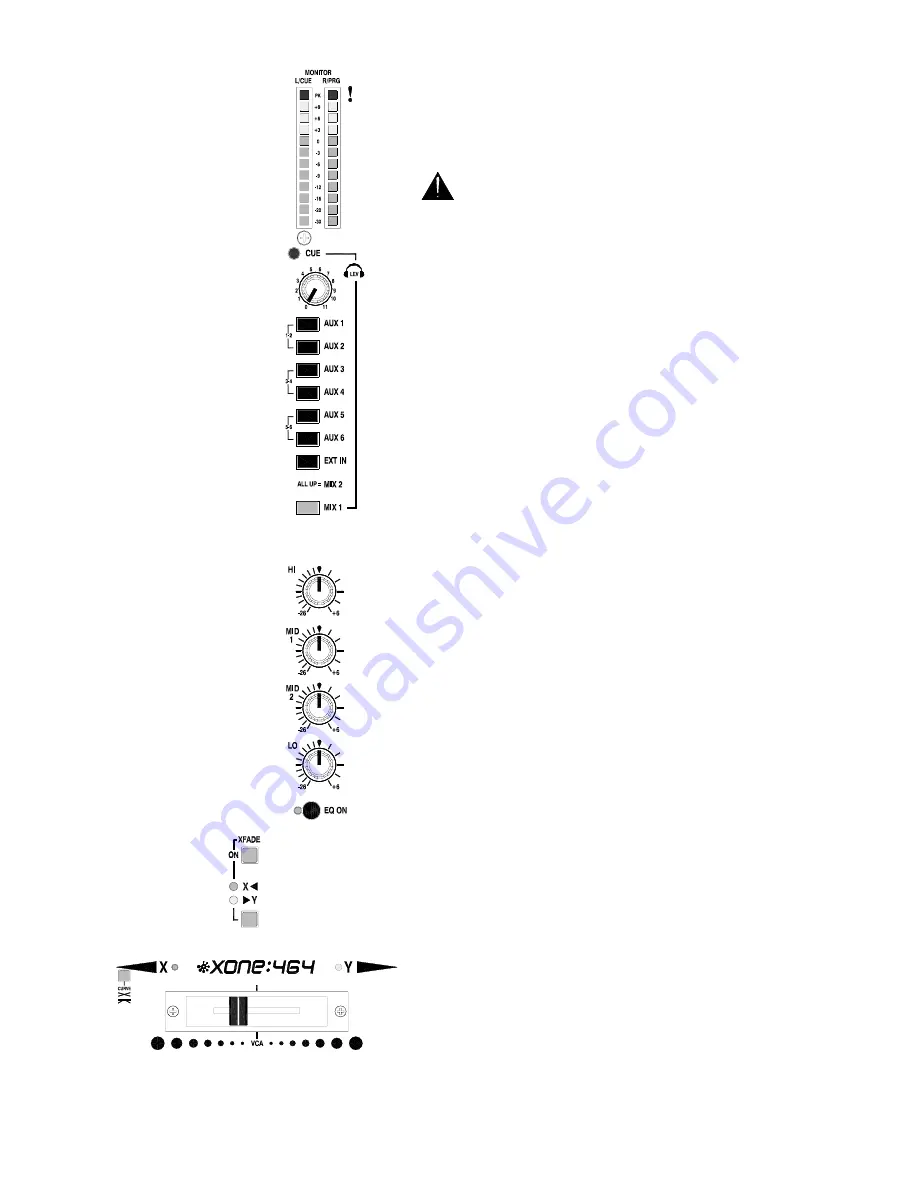
Check the sound using the Cue system
. With the
music playing press the large CUE switch. The switch
itself and the master section CUE led light to show that
the cue monitor is active. The channel signal is now sent
to the headphones. Slowly turn up the headphones level
control until you hear the music at comfortable volume.
Avoid listening to loud headphones levels for
long periods as this may damage your hearing
.
The channel signal is now displayed on the main monitor
meters giving you finer control in setting the gain. Note
that the cue system lets you monitor channel signals pre-
fader. In other words you can check or cue any source
before you raise its fader to bring it into the mix.
Route the signal to the main Mix1 output
. Release
the CUE switch. The CUE led turns off and the
headphones and monitor meters go quiet. Raise CH5
fader to its top ‘0’ position. Raise MIX1 master level to
maximum. With the XFADE ON switch in its up position
the signal is routed direct to Mix1. The signal is now
indicated on the Mix1 meters at the same level as the
channel meter. The level is now the same throughout
the console signal path, as set by the channel gain
control. This is the ideal setting with meters averaging
0dB so giving the best signal-to-noise performance while
maintaining plenty of headroom to avoid clipping.
Listen to the main Mix1 output
. To hear the signal in
the headphones press the MIX1 monitor select switch.
Make sure the other select switches are up as these will
automatically override Mix1 if pressed. Similarly any
CUE switch pressed will override the monitor selection.
Check the effect of the Stereo EQ
. Press CH5 EQ ON
switch. This lights to show that the signal is routed
through the equaliser. Now try the effect of each of the 4
frequency bands. The EQ is designed for creative live
performance control and provides a safe +6dB boost and
a massive –26dB cut. Experiment with cutting rather
than boosting frequencies to create dramatic effects.
These can be punched in or out using the EQ ON switch.
Route through the Crossfader
. Press XFADE ON to
route the signal through the crossfader rather than direct
to Mix1. The green X led lights indicating that the
channel is assigned to the left (X) side of the crossfader.
Press the XY switch to assign the signal to the right (Y)
side. In this case the yellow Y led lights. Note the green
X and yellow Y leds above the crossfader to help you see
which channel is routed to which side.
Using the Crossfader
. This lets you fade between
signals routed to either side, typically to fade smoothly
into a new music track or to creatively layer sounds when
scratch or beat mixing. Experiment further by connecting
two music
sources such as CD or turntables and
assigning one to X, the other to Y. Use XFADE PAN to
adjust the balance between the left and right signals of
the active source, either to correct an imbalance or as an
effect in its own right.
Summary of Contents for XONE 464
Page 1: ...USER GUIDE Publication AP4147...
Page 32: ...32 XONE 464 User Guide DANCE FLOOR...
Page 36: ......
Page 37: ...XONE 464 CUE SHEET Photocopy and use to log your console settings...


