background image


70200-0096_B_GT-400 Lithium Battery 


105938 


Technical Note 


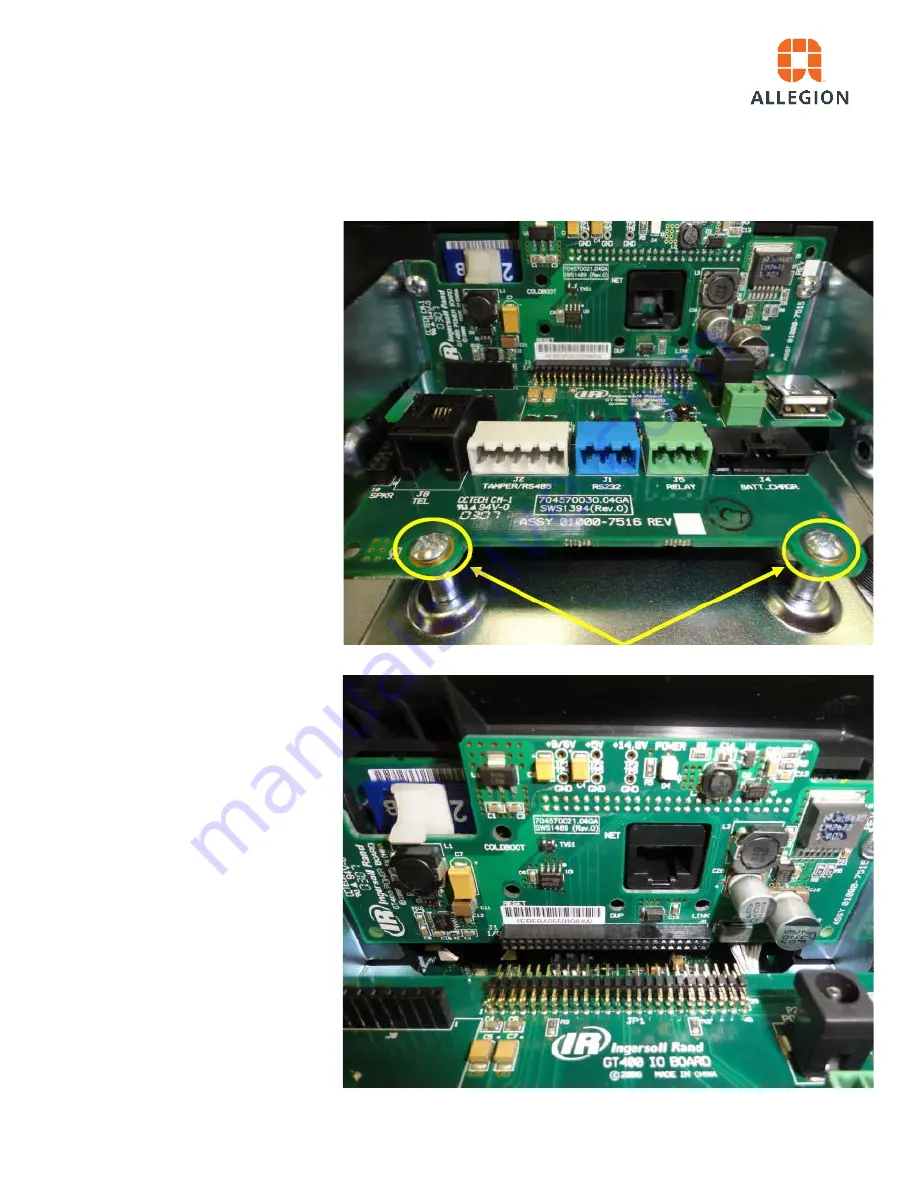
Removal of the back plate 


Lay the GT-400 terminal face 
down of a clean antistatic mat to 
protect the surface from 
scratches and thePCBs from 
ESD damage. Remove the two 
screws highlighted and set aside 
for reuse. 


Removal of the IO board


With the terminal still lying face 
down and while wearing the ESD 
ground strap hold the IO board 
by the edges and gently pull the 
board towards you and set 
aside. 


Summary of Contents for GT-400

Page 1: ...ounding Strap worn at all times Antistatic mat clear of debris to protect the terminal from scratches 2 Philips Screwdriver for the disassembly of theGT 400 Small flat Jeweler s type screwdriver Torqu...

Page 2: ...n antistatic mat to protect the surface from scratches and thePCBs from ESD damage Remove the two screws highlighted and set aside for reuse Removal of the IO board With the terminal still lying face...

Page 3: ...board Remove the two screws highlighted and set aside for reuse Hold the power board by the edges and gently pull the board towards you and set aside Removal of the back plate Remove the two screws hi...

Page 4: ...switch connector from the main board Do not pull by the wires but depress the tab to release the connector Removal of the lithium battery Carefully place the terminal on its top panel so that you are...

Page 5: ...to retrieve the battery 2 Take a small jeweler s size flat screwdriver and gently release the battery up on the right hand side of the battery holder Installation of the lithium battery There are two...

Page 6: ...battery installed Make sure that the battery cable is routed around the camera compartment as shown in the image above The area highlighted in yellow needs special attention when installing the back p...

Page 7: ...plate into the battery compartment and start rotating the back plate towards the top If there is a backup battery installed make sure that the BB 300 cable is not getting pinched in the lower right ha...

Page 8: ...sure that neither the BB 300 cable nor the white camera cable will be pinched Install these screws into the two the back plate inserts Do not use the longer self tapping screws used for the power boa...

Page 9: ...rd to the unit using the two screws shown in the image to the right Reinstalling the IO board Align the IO s 2 x 25 pin header and connector and gently press them together making sure that it is insta...

Page 10: ...70200 0096_B_GT 400 Lithium Battery 105938 Technical Note Plugging in the battery backup cable if installed Replacement complete For additional information please contact Customer Care at 877 671 7011...

Reviews: