background image

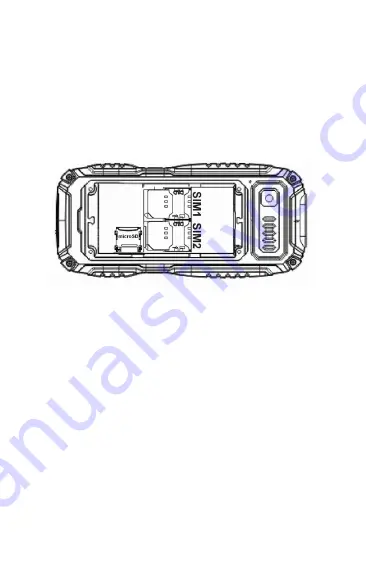
Insert SIM cards, memory card and battery

1.

Remove the battery cover on the back side of the phone

2.

Insert carefully one or two SIM cards at the slots under 
the space for battery. Make sure that the SIM cards are 
placed correctly with the contacts towards down. The 
battery must be removed when placing of SIM cards.

3.

Insert the MicroSD card at the slot

4.

Insert battery 

5.

Put the battery cover back and tighten the 2 supplied 
screws. Screws must be tightened but make sure not to 
damage the threads by an accessive force.  

Battery charging

The indicator of charging level is placed at the upper part of 
the screen. In case the battery is discharged proceed as 
follows :

1.Connect the charger with the electrical network
2.Open the cap of the connector on the bottom side of the 

phone

3.Connect the charger with the mobile phone

7

Summary of Contents for R30 eXtremo

Page 1: ...Resistant mobile phone for 2 SIM cards with Power Bank function charging of other devices R30 eXtremo...

Page 2: ...S function 12 Safety and ecology 13 Declaration of conformity 14 We thank you for buying of this resistant mobile phone ALIGATOR Before you start please read this quick guide with important instructio...

Page 3: ...e that there is no dirt on the seal caps they seal properly and are fully deployed When the phone or its part got into contact with water dry it thoroughly before operating it Especially dry all caps...

Page 4: ...bile phone and accessories from the extremely high temperatures Do not put the battery at the fire and do not expose it to the temperature over 60 C danger of explosion or fire Protect the mobile phon...

Page 5: ...suffocated or may hurt Software and hardware of the mobile phone are continuously updated The importer reserves the right to alter the instruction manual or mobile phone functions without a prior not...

Page 6: ...Button for calling 5 Connector for charger and USB connector for function of Power bank 6 Numeric keypad 7 Navigation direction button 8 Right functional button contacts 9 Torchlight 10 Button to fini...

Page 7: ...ds 3 Insert the MicroSD card at the slot 4 Insert battery 5 Put the battery cover back and tighten the 2 supplied screws Screws must be tightened but make sure not to damage the threads by an accessiv...

Page 8: ...harged after a long time of non using it can take even tens of minutes till the indicator of charging level appears and till the mobile phone can be switched on and started to be used Switch On and Sw...

Page 9: ...lock You can lock the keypad by press of the button 10 on the main screen To unlock the keypad please press first the left button 3 followed by a button Even if the keypad is locked you can call emer...

Page 10: ...n and transmission Antennas are placed at the upper and bottom back part Do not cover the places where the antennas are placed While making a call please keep the mobile phone at least 2 3 cm away fro...

Page 11: ...lephone directory Numbers of your telephone contacts can be stored both at the SIM card memory and at the memory of the cell phone Dialing numbers from the contact list The simplest way to display the...

Page 12: ...itsself Make sure that the light is not focused at anyone s eye while inserting a battery Shortcuts Favourite functions can be assigned to one press of one of the 4 directional sides of the navigatio...

Page 13: ...d electric device to the respective collection point which provides the ecological liquidation Please contact your dealer to get more information how to deal with the used products Battery liquidation...

Page 14: ...nformity ADART COMPUTERS s r o hereby declares that the type of radio device ALIGATOR R30 is in compliance with Directive 2014 53 EU www aligator cz Copyright 2018 ADART COMPUTERS s r o Sokolovsk 2170...

Reviews: