background image

22 | About your monitor

Universal Serial Bus (USB) interface

This section gives you information about the USB ports that are available on the 

monitor.

Transfer speed

Data rate

Power consumption*

Super-Speed

5 Gbps

4.5 W (Max, each port)

High speed

480 Mbps

4.5 W (Max, each port)

Full speed

12 Mbps

4.5 W (Max, each port)

NOTE: This monitor is Super-Speed USB 3.0 compatible.

* Up to 2 A on USB downstream port (with 

 battery icon) with battery 

charging version-compliant devices or normal USB devices.

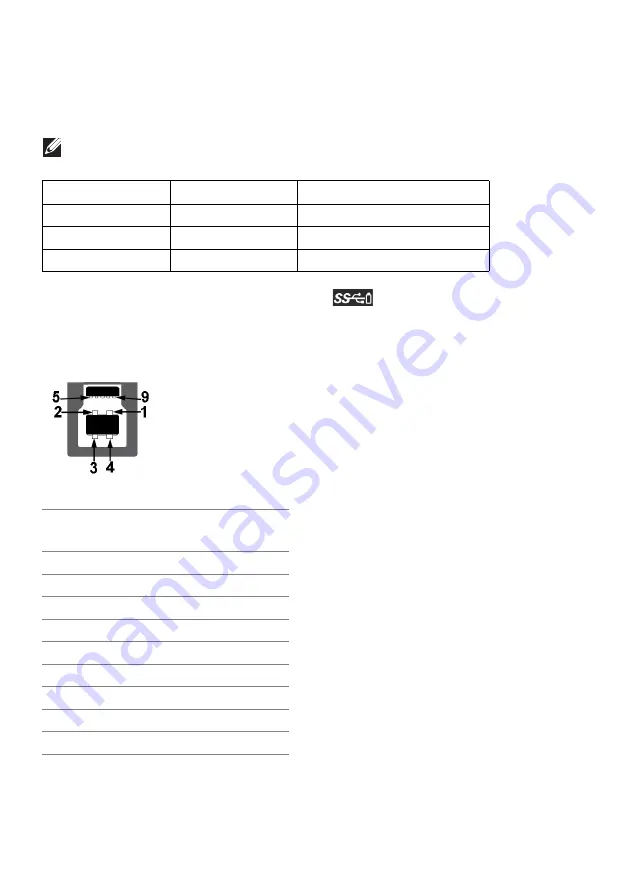
USB upstream connector

Pin number

9-pin side of the 

connector

1

VCC

2

D-

3

D+

4

GND

5

SSTX-

6

SSTX+

7

GND

8

SSRX-

9

SSRX+

Summary of Contents for AW5520QF

Page 1: ...Alienware AW5520QF Monitor User s Guide Model AW5520QF Regulatory model AW5520QFb...

Page 2: ...mage to hardware or loss of data if instructions are not followed WARNING A WARNING indicates a potential for property damage personal injury or death 2019 Dell Inc or its subsidiaries All rights rese...

Page 3: ...rted video modes 14 Preset display modes 15 Electrical specifications 16 Speaker Specifications 17 Physical characteristics 17 Environmental characteristics 18 Power management modes 19 Pin assignment...

Page 4: ...ols 39 Front panel button 40 Using the On Screen Display OSD menu 41 Accessing the menu system 41 OSD warning message 55 Setting the maximum resolution 60 Requirements to view or playback HDR content...

Page 5: ...5 Universal Serial Bus USB specific problems 74 Appendix 75 FCC notices U S only and other regulatory information 75 Contact Dell 75...

Page 6: ...mponent is missing contact Dell technical support For more information see Contact Dell NOTE Some components may be optional and may not ship with your monitor Some features or media may not be availa...

Page 7: ...6 for assembling the stand Remote control and batteries AAA x 2 Power cable varies by country DisplayPort cable DisplayPort to DisplayPort HDMI cable USB 3 0 upstream cable enables the USB ports on t...

Page 8: ...ayPort and 3 HDMI ports Equipped with 1 USB upstream port and 4 USB downstream ports Plug and play capability if supported by your system On Screen Display OSD adjustments for ease of setup and screen...

Page 9: ...tons For more information see Operating the monitor 3 IR lens To receive the infrared light signals sent from the remote control shipped with your monitor 4 Power On Off button with LED indicator To t...

Page 10: ...lienware logo and the LED stripe may light on To change the settings see AlienFX Lighting 2 I O cover Protects the I O ports 3 Stand and VESA adapter mounting holes For stand or VESA adapter 200 mm x...

Page 11: ...ect your computer with the DisplayPort cable shipped with your monitor 5 SPDIF Out port Connect your S PDIF device with the S PDIF cable sold separately 6 USB upstream port Connect the USB cable shipp...

Page 12: ...onitor and to your computer 2 USB downstream port with Power Charging Connect to charge your device 3 HDMI port HDMI 3 Connect your computer with the HDMI cable shipped with your monitor 4 Headphone p...

Page 13: ...x 0 315 mm Pixel per inch PPI 81 Viewing angle Vertical Horizontal 120 typical 120 typical Luminance output 130 cd m typical 400 cd m maximum Contrast ratio 130000 1 typical Faceplate coating Hard coa...

Page 14: ...layPort 3840 x 2160 120 Hz HDMI 3840 x 2160 60 Hz Supported video modes Video display capabilities HDMI DisplayPort playback 480i 480p 576i 576p 720p 1080i 1080p QHD UHD Connectivity 1 x DisplayPort v...

Page 15: ...R 49 3 59 9 71 0 VESA 1280 x 1024 64 0 60 0 108 0 VESA 1280 x 1024 80 0 75 0 135 0 VESA 1600 x 1200 75 0 60 0 162 0 VESA 1920 x 1080 67 5 60 0 148 5 VESA 1920 x 1080 137 3 120 0 285 5 VESA 2048 x 1280...

Page 16: ...tional specification including Consumer Electronics Control CEC HDMI Ethernet Channel HEC Audio Return Channel ARC standard for 3D format and resolutions and standard for 4K digital cinema resolution...

Page 17: ...or As Dell does not have control over the different cable suppliers in the market the type of material connector and process used to manufacture these cables Dell does not guarantee video performance...

Page 18: ...Storage 5 to 90 non condensing Shipping 5 to 90 non condensing Operating 5 000 m 16 404 ft maximum Non operating 12 192 m 40 000 ft maximum 1331 BTU hour maximum 341 BTU hour typical Weight with stan...

Page 19: ...han 0 5 W Switch off Off Less than 0 3 W Power Consumption Pon 84 75 W Total Energy Consumption TEC 262 12 kWh Zero power consumption in OFF mode can only be achieved by disconnecting the main cable f...

Page 20: ...yPort connector Pin number 20 pin side of the connected signal cable 1 ML3 n 2 GND 3 ML3 p 4 ML2 n 5 GND 6 ML2 p 7 ML1 n 8 GND 9 ML1 p 10 ML0 n 11 GND 12 ML0 p 13 GND 14 GND 15 AUX p 16 GND 17 AUX n 1...

Page 21: ...C DATA SDA 17 DDC CEC Ground 18 5V POWER 19 HOT PLUG DETECT Plug and Play capability You can connect the monitor to any Plug and Play compatible system The monitor automatically provides the computer...

Page 22: ...ed 5 Gbps 4 5 W Max each port High speed 480 Mbps 4 5 W Max each port Full speed 12 Mbps 4 5 W Max each port NOTE This monitor is Super Speed USB 3 0 compatible Up to 2 A on USB downstream port with b...

Page 23: ...able computer NOTE The USB ports on the monitor work only when the monitor is turned on or in power save mode If you turn off the monitor and then turn it on the attached peripherals may take a few se...

Page 24: ...ial screen cleaning tissue or solution suitable for the anti static coating Do not use benzene thinner ammonia abrasive cleaners or compressed air Use a lightly dampened warm cloth to clean the monito...

Page 25: ...for the stand that was shipped with your monitor If you are attaching a stand that you purchased from any other source follow the set up instructions that were included with the stand CAUTION The foll...

Page 26: ...g up the monitor 3 Remove the peripheral boxes and mounting bracket from the packaging cushion 4 Remove the upper and side foam cushions WARNING Two people are required to lift the monitor as it is ve...

Page 27: ...e hand in the cutout areas on the bottom cushion as shown in the image below b With your partner hold the monitor with the other hand by the thicker section of monitor side c Lift the monitor off the...

Page 28: ...rface 7 Remove the tape strips on the protective cover and tear the cover along the perforated line to access the I O cover on the monitor 8 Insert a hand into the recess on the bottom edge of the mon...

Page 29: ...into the stand a Align the screw holes on the bracket with the screw holes on the stand b Using a Phillips crosshead screwdriver tighten the six screws to secure the mounting bracket to the stand 11...

Page 30: ...through the cable management channels and clip Power cable HDMI cable DisplayPort cable S PDIF audio cable optional cables are not included USB upstream cable USB downstream cables optional cables are...

Page 31: ...e a With your partner use a hand to hold the bottom edge of the monitor as shown in the image below b With your partner hold the monitor with the other hand by the thicker section of monitor side c Li...

Page 32: ...32 Setting up the monitor 15 Remove the cardboard from the monitor 16 Remove the protective cover from the monitor...

Page 33: ...structions that come with the VESA compatible wall mount kit or 3rd party arm Screw dimension M4 x 10 mm 1 Follow step 1 to 8 in Attaching the stand to access the VESA adapter mounting area 2 Attach t...

Page 34: ...ot included USB upstream cable USB downstream cables optional cables are not included 4 Mount the monitor on the wall For more information see the documentation that shipped with the purchased wall mo...

Page 35: ...the computer 1 Connect the other end of the DisplayPort cable or HDMI cable to your computer 2 Connect the other end of the USB 3 0 upstream cable to an appropriate USB 3 0 port on your computer 3 Co...

Page 36: ...e different video signals that are connected to your monitor Then press the OK button to confirm the selection and exit 3 Directional buttons Use the buttons up down left right to move between the set...

Page 37: ...ing the and signs on each battery to the and signs of the battery compartment Do not mix battery types Do not combine a new battery with the used one It causes shorter life or leakage of batteries Rem...

Page 38: ...e control to install the batteries only Operating range of the remote control Point the top of the remote control toward the IR sensor of the monitor during button operation Use the remote control wit...

Page 39: ...sing the front panel controls Use the control buttons on the front of the monitor to access the OSD menu and shortcut keys The following table describes the front panel buttons Front panel button Desc...

Page 40: ...ur selection 4 To go back to the previous menu NOTE If you use the remote control to access the OSD menu the directional buttons illustrated below will not appear on the screen 3 Shortcut key Volume T...

Page 41: ...nu 2 Use the up or down buttons to move between the setting options As you move from one icon to another the option name is highlighted 3 Use the right button to enter the submenu 4 Use the directiona...

Page 42: ...ose from a list of preset color modes Standard Loads the monitor s default color settings This is the default preset mode FPS Loads color settings ideal for First Person Shooter FPS games RPG Loads co...

Page 43: ...of time we suggest you to 1 Set the distance of the screen between 20 inches to 28 inches 50 cm 70 cm from your eyes 2 Blink frequently to moisten your eyes or wet your eyes with water after prolonged...

Page 44: ...starts Select an option from the time interval list to keep you aware of the remaining time Frame Rate Selecting On allows you to display the current frames per second when playing games The higher t...

Page 45: ...se the green shade of the video image Use the Down button to increase the purple shade of the video image NOTE The Hue adjustment is available only when you select FPS MOBA RTS SPORTS or RPG preset mo...

Page 46: ...Select the HDMI 1 HDMI 2 or HDMI 3 input when you are using the HDMI connectors Press the OK button to confirm the selection HDMI 2 HDMI 3 Auto Select Turn on the function to allow the monitor to auto...

Page 47: ...Operating the monitor 47 Color To specify an LED lighting color select On and move down to highlight the Custom Color option Then you can make a selection from the list of 20 available colors...

Page 48: ...40 0 13 100 245 35 14 0 240 0 15 0 240 85 16 70 240 145 17 0 240 240 18 0 160 240 19 0 96 240 20 0 0 240 No R G B To turn off the LED lighting function select Off NOTE The function is only available w...

Page 49: ...Use Display to adjust images Brightness Brightness adjusts the luminance of display Use the directional buttons up and down to increase or decrease the brightness level min 0 max 100 Contrast Adjust...

Page 50: ...arpness level from 0 to 100 Smart HDR The Smart HDR High Dynamic Range menu enhances the display output by optimally adjusting contrast and the ranges of color and luminosity to resemble true to life...

Page 51: ...ermanent image retention caused by static content when you use the monitor for a long period of time you can manually activate this function to refresh the pixels Alternatively the function will activ...

Page 52: ...anish French German Brazilian Portuguese Russian Simplified Chinese or Japanese Transparency Use the directional buttons up and down to change the menu transparency min 0 max 100 Timer Sets the length...

Page 53: ...E USB ON OFF under standby mode is only available when the USB upstream cable is unplugged This option will be greyed out when the USB upstream cable plugs in Monitor Sleep Allows you to let the monit...

Page 54: ...DDC CI Display Data Channel Command Interface allows your monitor parameters brightness color balance and etc to be adjustable via the software on your computer You can disable this feature by selecti...

Page 55: ...the program may take some time to run You can enable this feature by selecting On Firmware Displays the firmware version of your monitor Service Tag Displays the service tag of your monitor This stri...

Page 56: ...h the signal that it is receiving from the computer See Monitor specifications for the Horizontal and Vertical frequency ranges addressable by this monitor Recommended mode is 3840 x 2160 You will see...

Page 57: ...nnected input signal If you press any button other than the power button the following message will appear depending on the selected input NOTE The message may be slightly different according to the c...

Page 58: ...the refresh process will run automatically after the monitor is turned off The process takes approximately 5 minutes to complete When Panel Refresh is selected the following message appears Select Ye...

Page 59: ...pears NOTE If you press the Power key on the monitor or remote control during the process of running Pixel Refresh or Panel Refresh the monitor will be turned off Next time when you turn on the monito...

Page 60: ...ell desktop or a laptop Go to www dell com support enter your service tag and download the latest driver for your graphics card If you are using a non Dell computer laptop or desktop Go to the support...

Page 61: ...00 WX4100 etc For a full range of HDR capable AMD graphics cards refer to www amd com Check HDR driver support information and download the latest driver from www amd com Intel Integrated Graphics HDR...

Page 62: ...n is downloaded and will be automatically installed The installation takes a few minutes to complete 2 Navigate to the program folder to ensure that the installation is successful Alternatively you ca...

Page 63: ...r a name in the text box to add a theme B Edit controls EDIT Provides options for you to customize lighting settings for your theme GO DIM Makes the light dimmer GO DARK Turns off the light C Theme co...

Page 64: ...nel Use the controls in this panel to set up lighting effects for a theme See Setting lighting effects for details I SAVE THEME Click to save all adjustments and changes for the theme J Live preview T...

Page 65: ...y selecting the zone check box es above the live preview area or clicking the numbered callout on the image of monitor 6 In the LIGHTING panel select your preferred lighting effects from the drop down...

Page 66: ...eferred color from the color palette or the list of PRESET COLORS The selected color and its RGB color codes will be displayed on the right field NOTE To change the color use the up and down arrow but...

Page 67: ...st right click on it 3 Drag the BRIGHTNESS slider to adjust the lightness of the color 4 Drag the TEMPO slider to adjust the pulsing speed Color Descriptions The effect makes the LED light in a single...

Page 68: ...The effect makes the light change from bright to dim To make the adjustments 1 Pick a preferred color from the color palette or the list of PRESET COLORS The selected color and its RGB color codes wil...

Page 69: ...e computer To ensure proper Self Test operation remove all digital cables from the back of computer 3 Turn on the monitor NOTE A dialog box should appear on screen against a black background if the mo...

Page 70: ...Unplug the video cable s from the back of the computer or monitor The monitor then goes into the self test mode 3 Press and hold Button 3 for 5 seconds A gray screen appears after 1 second 4 Carefully...

Page 71: ...connector Run the built in diagnostics Ensure that the correct input source is selected in the Input Source menu Poor Focus Picture is fuzzy blurry or ghosting Eliminate video extension cables Reset t...

Page 72: ...ins in the video cable connector Restart the computer in the safe mode Safety Related Issues Visible signs of smoke or sparks Do not perform any troubleshooting steps Contact Dell immediately Intermit...

Page 73: ...ssing any key on the keyboard Check whether the signal cable is plugged in properly Re plug the signal cable if necessary Reset the computer or video player The picture does not fill the entire screen...

Page 74: ...erals working slowly or not working at all Check that your computer is USB 3 0 capable Some computers have USB 3 0 USB 2 0 and USB 1 1 ports Ensure that the correct USB port is used Reconnect the upst...

Page 75: ...ulatory information see the regulatory compliance website located at www dell com regulatory_compliance Contact Dell For customers in the United States call 800 WWW DELL 800 999 3355 NOTE If you do no...

Reviews: