background image

15

30/09/2019

EN

PRE-ASSEMBLY INSTRUCTIONS

MAINTENANCE INSTRUCTIONS BEFORE ASSEMBLY 

•  Do not expose the wooden parts and roof covering to the sun during assembly.

•  In order to maximise the lifespan of your garden cabin, we advise you to varnish it before assembly so 

that you can treat any areas that will become inaccessible once assembled.

•  Your garden cabin must be treated with a protective (interior and exterior) fungicide and pesticide layer 

on the woodwork (to protect against fungi and insects). Exposure to direct sunlight and rain is not recom-

mended during this process.

SELECTION AND PREPARATION OF THE SITE

•  Your cabin must be placed on a completely flat surface. Do not assemble the cabin on inclined ground.

•  Eliminate any oversized irregularities in the flatness of the surface. You can check the flatness of the 

ground by using a ruler longer than the length of your cabin and a spirit level. Avoid backfilling with soil 

or sand as this may affect the stability of the cabin. You can complete the preparation of the ground by 

laying down a geotextile which will prevent the growth of plants under the floor.

•  Assemble the product in a spacious area at least 2 meters away from any other object, structure or obs-

tacle (walls, barriers, hedges, trees, clotheslines or electrical cables, etc.) that may injure your children 

while playing. This product must not be assembled on hard ground (concrete, tarmac, etc.).

•  Make sure that the weather on the day chosen for the assembly of your cabin is dry and calm. Do not 

attempt to build your cabin on a windy day.

•  The assembly area must be clean, clear and completely flat. A cluttered, damp or wet work area can 

pose a risk of injury. Make sure there are no cables on the floor during assembly.

•  Provide sufficient working space to easily move and position parts during assembly. Make sure you have 

enough space at the entrance so that the door(s) of your cabin can open fully. 

Summary of Contents for CWH2SL

Page 1: ...CWH2SL MAGNOLIA 30 09 2019 6H alicesgarden fr alicesgarden be alicesgarden es alicesgarden nl alicesgarden co uk alicesgarden pt alicesgarden it alicesgarden com au 0 3 3 MAX 50 KG MAXI PAR ENFANT ...

Page 2: ... Montage 30 IMPORTANT À CONSERVER POUR CONSULTATION ULTÉRIEURE À LIRE ATTENTIVEMENT ESPAÑOL Almacenamiento del paquete previo al montaje 10 Instrucciones de seguridad 10 Instrucciones previas al montaje 11 Mantenimiento 12 Garantía 13 Lista de piezas 27 Montaje 31 IMPORTANTE CONSÉRVELO PARA FUTURAS REFERENCIAS LEA ATENTAMENTE INDEX ÍNDICE CONTENTS INHOUD ...

Page 3: ...arranty 17 List of parts 27 Assembly 32 IMPORTANT KEEP FOR FUTURE REFERENCE READ CAREFULLY NEDERLANDS Opslag van het pakket voor montage 18 Veiligheidsinstructies 18 Instructies voorafgaand aan de montage 19 Onderhoud 20 Garantie 21 Onderdelenlijst 27 Montage 33 BELANGRIJK BEWAAR VOOR TOEKOMSTIGE REFERENTIE ZORGVULDIG LEZEN ...

Page 4: ... Conserve este manual por si lo necesita más adelante Para uso doméstico Atención No indicado para niños menores de 3 años Peligro de asfixia causada por pequeñas piezas Las piezas de madera pueden representar un riesgo por la presencia de astillas Manipule la madera con precaución Atención Utilice guantes cuando manipule las piezas Por su seguridad es obligatorio leer las medidas de seguridad de ...

Page 5: ...plinters vertonen Hanteer het hout voorzichtig Let op Draag handschoenen als u deze onderdelen manipuleert Het is belangrijk om de veiligheidsinstructies in deze handleiding te lezen voordat u begint met de bouw van de blokhut Belangrijke informatie en nuttig advies zullen de bouw ervan vereenvoudigen en veraangenamen Conserve este manual para qualquer necessidade no futuro Destinado para uma util...

Page 6: ...ou de perte d équilibre Assurez vous qu il soit complètement ouvert et installé sur une surface totalement plane Ne l ap puyez pas sur la cabane tant que celui ci n est pas totalement monté Ne montez jamais sur le toit de la cabane Utilisez avec précaution les différents outils nécessaires pour le montage de cette maisonnette Familiarisez vous avec le fonctionnement de tous les outils Respectez le...

Page 7: ...ez de remblayer avec de la terre ou du sable ceci pouvant nuire à la stabilité de la maisonnette Vous pouvez compléter la préparation du sol par la pose d un géotextile qui évitera la pousse de végétaux sous le plancher Installer le produit dans un endroit spacieux à 2 mètres minimum de tout autre objet structure ou obsta cle murs barrières haies arbres fils à linge ou câbles électriques etc pouva...

Page 8: ...e brosse dure ou de nettoyants abrasifs y compris les dégraissants et les solutions de nettoyage à base d acétone ou d huile car ils peuvent tâcher ou endommager la cabane Evitez l accumulation de feuilles mortes et de neige sur le toit de la cabane Un poids trop important sur le toit peut endommager la cabane et rendre son utilisation dangereuse Nettoyez le régulièrement à l aide d un balai à man...

Page 9: ...mauvais montage ou utilisation Cette cabane est conçue pour résister à des vents d intensité normale lorsqu elle est montée conformément aux instructions contenues dans ce manuel Le fabricant ne se tient nullement responsable d aucune conséquence résultant d un montage non conforme à ces instructions ni de dommages causés par les conditions météorologiques ou des cas de force majeure Nos cabanes s...

Page 10: ...fuera del alcance de los niños pequeños Sea prudente si tiene que utilizar una escalerilla existe riesgo de caída o de pérdida de equilibrio Asegúrese de que está completamente abierta e instalada sobre una superficie completamente pla na No la apoye en la caseta si no está completamente montada No se suba al techo de la caseta Utilice las distintas herramientas necesarias para el montaje de la ca...

Page 11: ...l le permitirán comprobar la planitud del suelo Evite terraplenar con tierra o arena esto podría perjudicar la estabilidad de la caseta Podrá completar la preparación del suelo mediante el uso de geotextil lo que evitará la presencia de vegetación sobre el piso Instale el producto en un lugar espacioso con una distancia mínima de 2 metros en relación con cualquier otro objeto estructura u obstácul...

Page 12: ... manguera para jardín o de un detergente no abrasivo No emplee cepillos duros o productos de limpieza abrasivos incluidos los desengrasantes y las soluciones de limpieza a base de acetona o aceite puesto que estos pueden manchar o dañar la caseta Evite la acumulación de hojas secas y de nieve sobre el techo de la caseta Un peso muy importante sobre el techo puede dañar la caseta y hacer que sea pe...

Page 13: ...vuelta corren a cargo del comprador Esta garantía no será aplicable en caso de abuso defectos de montaje o uso Esta caseta está diseñada para resistir vientos de intensidad normal cuando está montada de acuerdo con las instrucciones conte nidas en el presente manual El fabricante no será responsable en ningún caso de ninguna consecuencia como resultado de un montaje que no siga estas instrucciones...

Page 14: ... of falling or losing your balance Make sure it has been fully opened and placed on a completely flat surface Do not rest it against the cabin until it has been fully assembled Never climb on the roof of the cabin Be careful when using the various tools necessary for the assembly of this cabin Familiarise yourself with the operation of all tools Follow the safety instructions of the tools you use ...

Page 15: ...han the length of your cabin and a spirit level Avoid backfilling with soil or sand as this may affect the stability of the cabin You can complete the preparation of the ground by laying down a geotextile which will prevent the growth of plants under the floor Assemble the product in a spacious area at least 2 meters away from any other object structure or obs tacle walls barriers hedges trees clo...

Page 16: ... abrasive detergent Do not use hard brushes or abrasive cleaners including degreasers and acetone or oil based cleaning solutions as they can stain or da mage the cabin Avoid the accumulation of dead leaves and snow on the roof of the cabin Too much weight on the roof can damage the cabin and make it unsafe to use Clean it regularly using a long handled broom with soft bristles Do not store heavy ...

Page 17: ...rranty does not apply in the event of abuse incorrect assembly or incorrect use This unit is de signed to withstand normal wind strengths when mounted in accordance with the instructions in this ma nual The manufacturer is not liable for any consequences resulting from assembly not in accordance with these instructions nor for damage caused by weather conditions or cases of force majeure Our cabin...

Page 18: ... of het evenwicht verliest Zorg ervoor dat de ladder geheel geopend is en op een vlakke ondergrond wordt geplaatst Steun niet op het hut voordat dit volledig gemonteerd is Klim nooit op het dak van het hut Gebruik de verschillende benodigde gereedschappen voor het bouwen van dit hut voorzichtig Zorg ervoor dat u bekend met het gebruik van de verschillende gereedschappen respecteer de veilig heidsv...

Page 19: ...kunnen de vlakte van de grond controleren Verhoog de grond niet met aarde of zand dit zou de stabiliteit van het huisje kunnen afnemen Om vegetatie te voorkomen kunt u een geotextiel op de vloer leggen Installeer het product op een ruim oppervlakte minstens 2 meter van alle andere objecten structuren of obstakels muren hekken heggen bomen elektrische kabels wasmolen die uw kinderen zouden kunnen b...

Page 20: ...borstel of schurende reinigingsmiddelen ook geen ontvettende middelen of reinigingsoplossingen op basis van aceton of olie deze kunnen uw hut vlekken of beschadigen Voorkom ophoping van dode bladeren en sneeuw op het dak van het hut Een te zwaar gewicht op het dak kan het hut beschadigen en het gebruik ervan gevaarlijk maken Reinig het dak regelmatig met een lange bezem met soepele haren Zet geen ...

Page 21: ... in geval van misbruik onjuiste montage of onjuist gebruik Deze hut is ontwerpen om bestand te zijn tegen normale windsnelheden indien het gemonteerd is volgens de instructies in deze handleiding De fabrikant kan niet aansprakelijk worden gesteld voor gevolgen van montage die niet volgens deze instructies is uitgevoerd of schade door weersomstandigheden of in geval van overmacht Onze hutten zijn g...

Page 22: ...banco pois corre o risco de queda ou de perda de equilíbrio Assegure se de que está completamente aberto e instalado sobre uma superfície totalmente plana Não o apoie sobre a cabana enquanto esta não estiver totalmente montada Nunca suba ao telhado da cabana Utilize com precaução as diferentes ferramentas necessárias para a montagem desta casinha Familiarize se com o funcionamento de todas as ferr...

Page 23: ...m terra ou areia pois isto pode prejudicar a estabilidade da casinha Pode completar a preparação do solo através da colocação de um feltro geotêxtil que evitará o crescimento de vegetação sob a plataforma Instale o produto num local espaçoso com no mínimo 2 metros de distância de qualquer outro objeto estrutura ou obstáculo muros barreiras sebes árvores cordas da roupa ou cabos elétricos etc evita...

Page 24: ...vo Não utilize uma escova dura ou produtos de limpeza abrasivos incluindo os desengordurantes e as soluções de limpeza à base de acetona ou de óleo pois podem manchar ou danificar a cabana Evite a acumulação de folhas mortas e de neve sobre o telhado da cabana Um peso muito significa tivo sobre o telhado pode danificar a cabana e tornar a sua utilização perigosa Limpe o regularmente com uma vassou...

Page 25: ...ontagem incorreta ou utilização Esta cabana está concebida para resistir a ventos de intensidade normal quando montada em confor midade com as instruções contidas neste manual O fabricante não se responsabiliza por qualquer consequência que resulte de uma montagem que não esteja em conformidade com estas instruções nem por danos causados pelas condições me teorológicas ou por casos de força maior ...

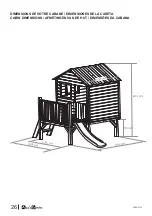
Page 26: ...26 30 09 2019 1240 mm 1662 mm 2114 mm 590 mm DIMENSIONS DE VOTRE CABANE DIMENSIONES DE LA CASETA CABIN DIMENSIONS AFMETINGEN VAN DE HUT DIMENSÕES DA CABANA ...

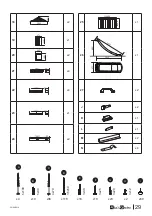
Page 27: ... parts needed to assemble your cabin and identify where each part will be in the cabin Sort and inventory them using the parts list below Some additional fittings are provided If you find that you are missing a part contact our Alice s Garden after sales service Do not start assembling the cabin The manufacturer cannot be held responsible for any consequences resulting from a partially assembled c...

Page 28: ...2019 1 1250 68 68 x2 11 500 28 115 x2 2 570 68 68 x2 13 x1 3 1715 26 54 x2 4 1188 26 54 x4 14 x1 5 1104 26 54 x1 6 400 26 54 x8 15 x1 7 1780 95 19 x11 16 x1 8 1712 19 95 x2 9 734 28 115 x1 17 x2 10 734 28 115 x1 ...

Page 29: ...9 2019 x4 x10 x36 x118 x16 x18 x23 x2 x60 A B C D F E G H I 5x100 5x30 4x70 3 5x50 3x30 3x25 3x20 3x12 18 x2 25 1104 00 0 0 0 6 x1 19 x1 26 1322 x1 20 x2 21 x4 22 x4 27 x2 23 x1 J x2 K x1 L x1 24 x2 M x2 N x4 ...

Page 30: ...nous vous recommandons d ef fectuer un pré perçage avec vissage Assurez vous d effectuer le vissage dans une épaisseur de bois suffisante ceci afin d éviter échardes et pointes de vis apparentes Au cours du montage prenez soin d éliminer par ponçage les inévitables imperfections échardes noeuds tombés peluche liées à la nature du matériau bois Malgré les contrôles des échardes peuvent subsister su...

Page 31: ... atornillado Asegúrese de realizar el atornillado en un lugar que presente un grosor de madera suficiente con el objetivo de evitar la formación de astillas y que las puntas de los tornillos queden visibles Durante el montaje asegúrese de eliminar mediante lijado las imperfecciones inevitables astillas nu dos caídos polvo relacionados con la naturaleza de la madera A pesar de las comprobaciones es...

Page 32: ...en parts we recommend pre drilling with a screwdriver Make sure to screw into wood of sufficient thickness to avoid splinters and visible screw tips During assembly take care to sand away the inevitable imperfections splinters knots wood fluff pre sent due to the nature of wood as a material Despite inspections splinters may remain on some pieces of wood Be sure to wear gloves TOOLS AND MATERIALS ...

Page 33: ...adigen adviseren wij eerst de nodige gaten te boren voordat u meteen schroeft Verzeker u ervan in een juiste hout dikte te schroeven om splinters en zichtbare schroeven te voorkomen Tijdens de montage is het van nut af en toe de hut te schuren om de splinters en andere onvolkomenhe den te verwijderen Er kunnen splinters zijn tijdens de montage ook na controle daarom is het van belang handschoenen ...

Page 34: ...om aparafusamento Assegure se de que efetua o aparafusamento numa espessura de madeira suficiente para evitar farpas de madeira e pontas de parafusos aparentes Ao longo da montagem tenha atenção a eliminar por polimento as inevitáveis imperfeições farpas nós pendentes borboto associadas à natureza do material da madeira Apesar dos controlos podem subsistir farpas em determinadas peças de madeira C...

Page 35: ...35 30 09 2019 1 5 C C C A 2 3 4 6 D D C 5 1 2 D x16 C x28 A x4 C x8 ...

Page 36: ...36 30 09 2019 8 8 7 D 25 D D D 3 4 D x8 D x52 ...

Page 37: ...37 30 09 2019 20 16 E 5 20 13 E 6 E x4 E x4 ...

Page 38: ...38 30 09 2019 16 14 D D 12 7 D 13 8 D x6 D x9 ...

Page 39: ...39 30 09 2019 15 D 13 18 18 E 9 10 E x8 D x9 ...

Page 40: ...40 30 09 2019 17 17 D 18 22 22 23 G G 11 12 G x9 D x9 ...

Page 41: ...41 30 09 2019 22 G 22 19 F 19 J Mini 12mm 13 14 F x10 G x6 ...

Page 42: ...42 30 09 2019 K G 15 16 L H G x2 H x2 ...

Page 43: ...43 30 09 2019 M M M I I I 24 G G G 24 G G 24 17 18 G x6 I x60 ...

Page 44: ...44 30 09 2019 21 F F 9 10 11 D 19 20 D x8 F x8 ...

Page 45: ...45 30 09 2019 D Ground 400 MIN 50 Beton B N 21 22 B x4 D x2 ...

Page 46: ...46 30 09 2019 B 26 27 B 23 B x6 ...

Page 47: ......

Page 48: ...RANKRIJK 020 262 1095 033 313 383 After sales aftersales alicesgarden nl aftersales alicesgarden be IMPORTADO POR WALIBUY SPAIN SL Ed Palau de Mar Plaça Pau Vila 1 oficina 3B3 08039 BARCELONA ESPAÑA 931 993 006 911 337 937 Servicio postventa desistimiento alicesgarden es defecto IMPORTÉ PAR WALIBUY SAS 270 avenue de l Espace 59118 WAMBRECHIES FRANCE 0805 650 000 081 280 149 Service après vente sav...

Page 49: ...erviço pós venda livreresolucao alicesgarden pt defeito IMPORTATO DA WALIBUY ITALIA S R L Via Torino 60 20123 MILANO ITALIA 0039 02 87368397 Contatto contatto alicesgarden it IMPORTED BY ALICE S GARDEN OUTDOOR PTY LTD SHOP 1 1 Denham Street Bondi 2026 NSW AUSTRALIA 1300 827 171 Contact service alicesgarden com au ...

Page 50: ......

Reviews: