4
www.observint.com
© 2019 Observint Technologies. All rights reserved.
OSD menu navigation
For the ALIBI Recorder
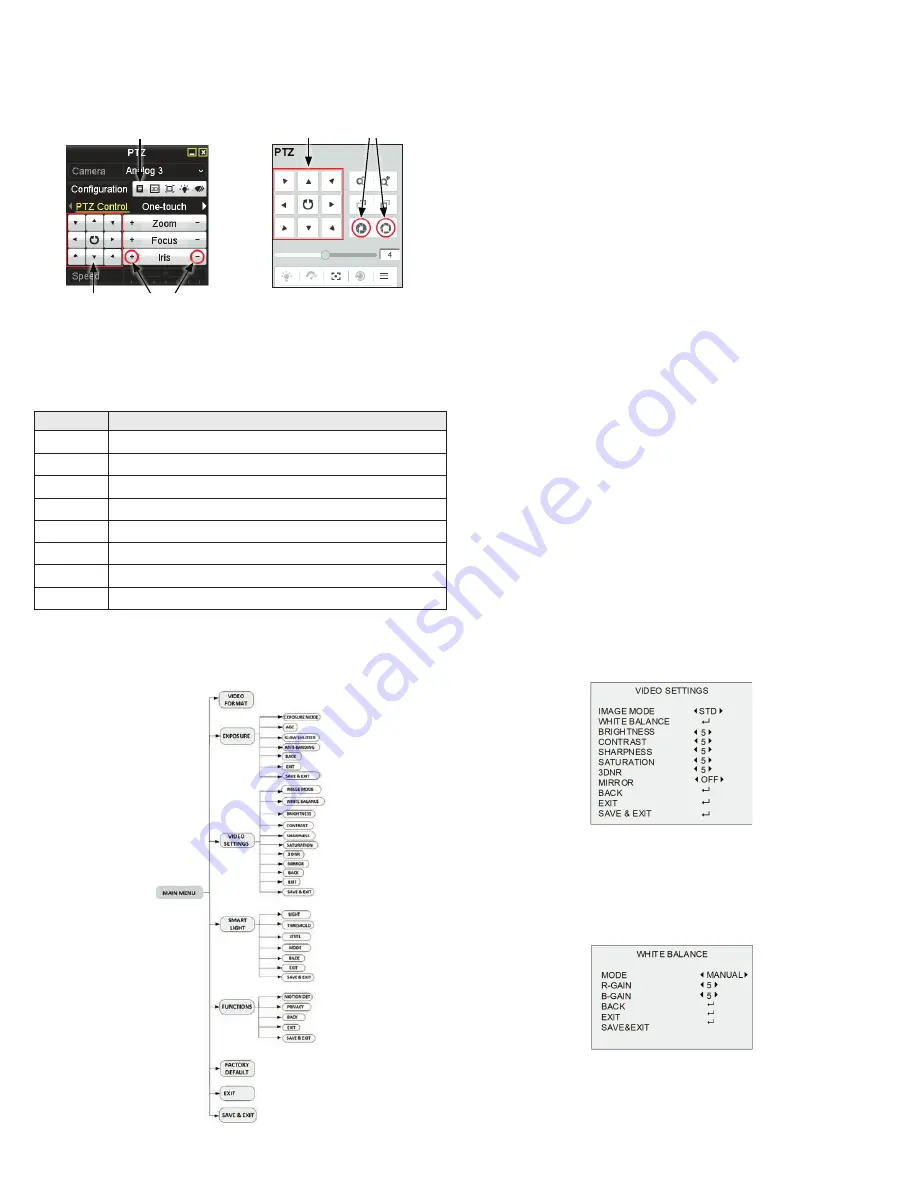
: Navigation and settings in the OSD are made through direction keys and the
Iris
+
and
Iris -
buttons in the recorder PTZ Control panel. See below.
Direction keys
Click to open OSD menu
Iris+ Iris–
Iris+ Iris–
Direction keys
ALIBI recorder PTZ Control panel
ALIBI recorder remote access PTZ control panel
For remote access to the
recorder
: Navigation and settings in the OSD are made through direction keys
and the
Iris +
and
Iris -
buttons in the recorder PTZ control panel. See above.
The function of the directional keys and Iris buttons are defined in the table below.
Keys
Function
p
Move up in the parameter list
q
Move down in the parameter list.
t
Move to previous page, field
u
Move to next page, field
Zoom +
Zoom in
Zoom –
Zoom out
Iris+
(OPEN)
Set parameter value, or open sub-menu
Iris–
(CLOSE)
Cancel change of parameter.
OSD Definitions: On-screen Display (OSD) menus
After the camera is installed on a compatible recorder, you can open the OSD menu by clicking the PTZ
Control icon on the Quick Setting Toolbar.
To navigate the OSD menu and select options:
•
Click the up / down (
p
/
q
) direction buttons to select the menu item.
•
Click the left / right (
t
/
u
) direction buttons to adjust the value of the selected item.
•
Click the
Iris+
key to confirm a selection.
VIDEO FORMAT
You can set the video format to 5MP @ 20 fps, 4MP @ 30 fps, 4MP @ 25 fps, 2MP @ 30 fps or 2MP @ 25
fps.
EXPOSURE
EXPOSURE MODE: You can set the EXPOSURE MODE to GLOBAL, BLC, HLC, WDR, or HLS.
GLOBAL: Global refers to the normal exposure mode which adjusts lighting distribution, variations, and
non-standard processing.
BLC (Backlight Compensation): BLC compensates light to the object in the front to make it clear, but this
may cause the over-exposure of the background where the light is strong.
HLC (Highlight Compensation): HLC stands for highlight compensation. The camera detects the strong
spots (the over-exposure portion of image), then reduce the brightness of the strong spots to improve the
overall images.
WDR (Wide Dynamic Range): The WDR function helps the camera provide clear images even under back
light circumstances. When there are both very bright and very dark areas simultaneously in the field of
view, WDR balances the brightness level of the whole image and provide clear images with details.
HLS (Highlight Suppression): It is the same visual effect as the solar eclipse. If the brightness of a part in the
image exceeds the threshold, this part will become black. Then whole image can be clear.
AGC (Auto Gain Control): Optimizes the clarity of the image in poor light conditions. The AGC level can be
set to HIGH, MEDIUM, or LOW.
Note
: The noise is amplified when the AGC level is increased.
SLOW SHUTTER: Slow Shutter increases the exposure time on a single frame, which makes a camera more
sensitive to the light so it can produce images even in low lux conditions.
ANTI-BANDING: Anti-banding is a camera setting that prevents the appearance of horizontal lines
(banding) when photographing images in the low frequency light and high brightness environments.
VIDEO SETTINGS
Move the cursor to VIDEO SETTINGS and click Iris+ to enter the submenu. IMAGE MODE, WHITE BALANCE,
BRIGHTNESS, CONTRAST, SHARPNESS, SATURATION, 3 DNR, and MIRROR are adjustable.
IMAGE MODE: Image Mode is used to adjust the image saturation. You can set it to STD (Standard) or
HIGH-SAT (High Saturation).
WHITE BALANCE: White balance, the white rendition function of the camera, adjusts the color temperature
according to the environment. It can remove unrealistic color casts in the image. You can set WHITE
BALANCE mode to AUTO or MANUAL.
•
AUTO: Under AUTO mode, white balance is being adjusted automatically according to the color
temperature of the scene illumination.
•
MANUAL: You can set the R-GAIN/B-GAIN value to adjust the shades of red/blue color of the image.


