3
www.Observint.com
© 2017 Observint Technologies. All rights reserved.
Step 5. Install cameras
Install your security cameras. Always follow the installation instructions provided with the camera.
Step 6. Connecting it together – initial system setup
1.
Plug the coaxial cables from the cameras into the BNC camera input connectors on the back of the DVR.
2.
Power on your cameras.
3.
Power on the DVR using the power on / off (I / O) switch on the back panel.
4.
Power on the monitor.
NOTE
Some monitors have multiple inputs such including VGA ,HDMI, BNC, etc. If you are using this kind of monitor, configure your monitor to
display the input connected to your DVR (HDMI or VGA).
Step 7. Using the Wizard for basic configuration setup
Power on the DVR. Normally, an Alibi logo splash screen appears within 2 minutes.
By default, the Setup Wizard will open automatically. Refer to the
ALIBI Embedded Digital Video Recorder Firmware V3.4.x User
Manual
for incomplete instructions for using the Wizard and configuring and using your DVR.
Important Notes for using the Wizard:
When configuring the recorder, consider the following:
•
Password
: When logging into the recorder for the first time, create a “
Strong
” administrator user password. Follow the on-screen
instructions, and save this password and the GUID file created by the firmware in a secure location.
NOTE
: There is no factory default
password for this device.
•
Date and Time
: Set the time zone, date and time correctly. All recorded video and capture (photo) files are time stamped.
•
Storage - HDD
: In the HDD Management wizard, if a new recorder is shipped with a pre-configured HDD, nothing needs to be done
with it in this window. If you installed an HDD or replaced the HDD, that HDD needs to be initialized by the recorder before it can be used
to record data. Select (check the box for) that HDD, then click
Init
to initialize the disk.
NOTE
:
Init
will erase all data from the disk and
can take several minutes to complete. When the initialization is complete, click
Next
to continue.
•
Network Settings
: By default, the recorder acquires it’s network settings using DHCP (Dynamic Host Configuration Protocol).
Depending on the configuration of the network, these settings may change. To improve remote access to the recorder, Observint
recommends that you configure the DVR with fixed network settings. To easily change the DHCP acquired network settings to fixed
To remove a jumper for AC load alarm circuits:
1.
Disconnect all cabling from the DVR.
2.
Remove the DVR top cover: Remove the two cover screws on the back of the chassis, the slide the cover toward the back until it is free.
3.
Locate the jumper associated with the alarm output you are using for an AC load alarm, then remove it. Save the jumper for use later,
if needed.
4.
Reinstall the DVR top cover.
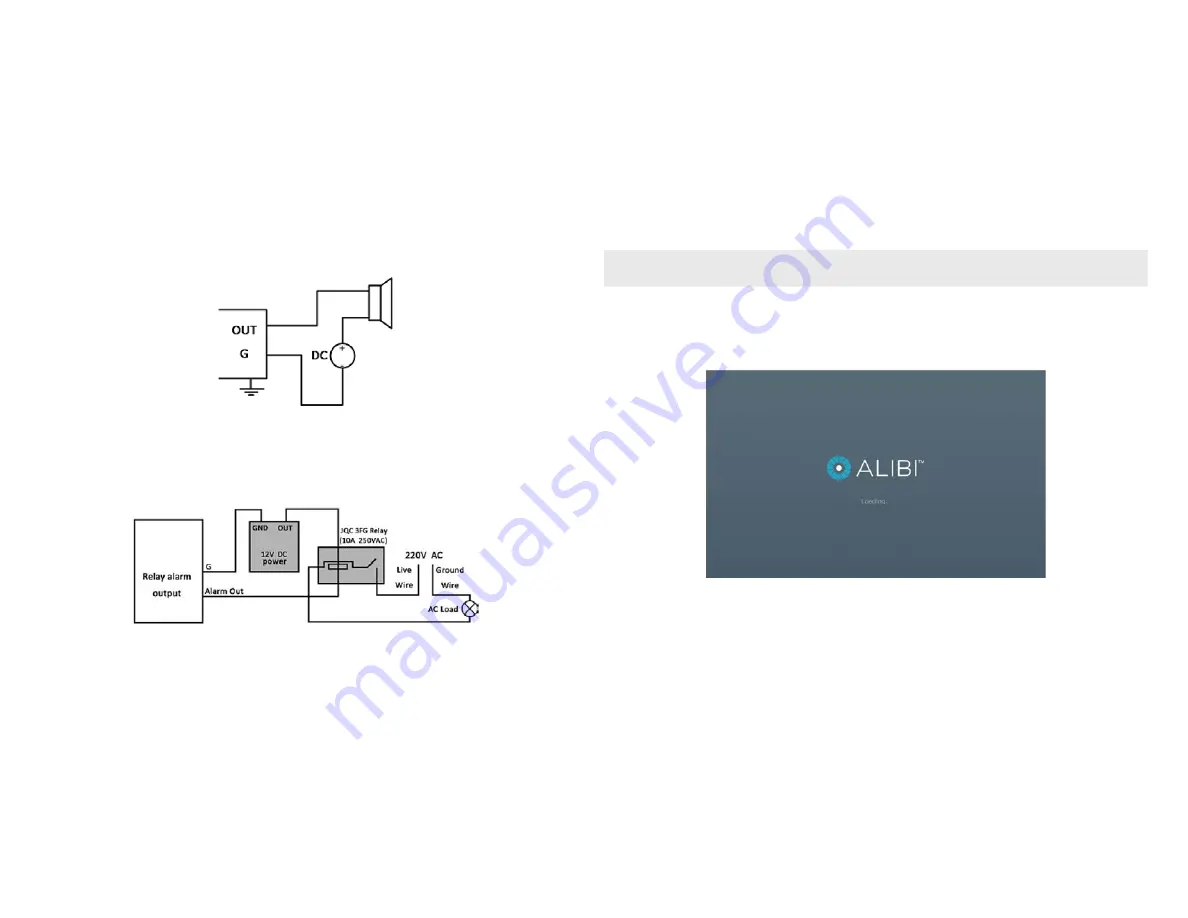
DC load alarm output circuits
DC loads must operate within the limitation of 12V / 1A. To connect to a DC alarm output, use the following diagram:
DVR
DC Load
AC load alarm output circuits
To connect an AC load to an alarm output, a jumper, associated with the output on the alarm termination PC board, (within the chassis), must
be removed. These jumpers shunt pin pairs J1, J2, J3, and J4 for alarm outputs 1, 2, 3, 4 respectively. Use an external relay for safety.
DVR
Step 4. Install a monitor, mouse, power
For the following steps, refer to the back panel photo above for the location of connectors.
1.
Install and setup your monitor in accordance with the instructions provided with the monitor. Do not power it on at this time.
2.
Cable the HDMI or VGA connector to your monitor’s VGA or HDMI input. The HDMI interface provides the best performance.
3.
Plug the mouse into the USB connector on the front or back of the DVR.
4.
Plug a drop cable from your local area network (LAN) into the RJ45 LAN connector on the back of the DVR.
5.
Connect the power cord to the power connector on the back panel of the DVR, and then into a UPS (recommended) or surge protector.


